Subscription and Recurring Payments - Magento 2
- Vita Naumenko (Unlicensed)
- Former user (Deleted)
- Former user (Deleted)
Firefox user notice:
Please use another web browser to view this document.
Sorry for the inconvenience.
![]()
Magento 2 Subscription and Recurring Payments assigns subscriptions to products. Configure a payment gateway, payment schedule, subscription duration, initial fees, and trial payments, for each subscription plan. Set subscription prices per product. Subscribers are charged automatically once a subscription period starts. They can track the status of the purchased subscription(s) from their accounts.
Compatibility: Magento Open Source 2.1.X - 2.3.X, Magento Commerce 2.1.X - 2.3.X
Thank you for choosing Aheadworks!
Installing Subscription and Recurring Payments
| Command Line Installation | Composer Installation |
|---|---|
1. Backup your web directory and store database 2. Download the Subscription and Recurring Payments installation package 3. Upload contents of the Subscription and Recurring Payments installation package to your store root directory 4. In SSH console of your server navigate to your store root folder: cd path_to_the_store_root_folder run the following command: : php -f bin/magento module:enable Aheadworks_Sarp then: php -f bin/magento setup:upgrade after: php -f bin/magento setup:static-content:deploy 5. Flush store cache; log out from the backend and log in again Make sure the installation is done from the FTP administrator account. Otherwise, set 775 permissions to the store root directory after the extension is deployed. | If you are installing an extension from Aheadworks for the first time, you need to add our composer repository to your Magento store: 1. Login to your ssh console and navigate to your store folder:
cd path_to_the_store_root_folder
Run the following command:
composer config repositories.aheadworks composer https://dist.aheadworks.com/
On successful execution of the command you will be able to use the composer to install the extensions. To install the extension: 2. Login to your ssh console and navigate to your store folder:
cd path_to_the_store_root_folder
3. Run the following command to install the latest version of the extension: composer require aheadworks/module-sarp if you need to install a specific version, run this command: composer require aheadworks/module-sarp:<version> Specify the version of the extension in <version> When prompted, enter Public Key (Username) and Private Key (Password): Both Public Key (Username) and Private Key (Password) can be found in the Composer Access page in your personal account on our site: 4. Enable the extension: php -f bin/magento module:enable <Module_Name> Add the product name in <Module_Name> Next, register the extension: bin/magento setup:upgrade Recompile your Magento store if you are in the Production mode: bin/magento setup:di:compile To verify that the extension is enabled, run this command: bin/magento module:status Clean store cache, by running the following command: bin/magento cache:clean Log out and Log in the backend again. To upgrade the extension: 5. To update or upgrade an extension: Download the updated extension file. Take note of the module-name and version. Export the contents to your Magento root. If a composer package exists for the extension, run one of the following. Update per module name: composer update aheadworks/module-sarp Updater per version: composer require aheadworks/module-sarp:<version> Run the following commands to upgrade, deploy, and clean the cache. php bin/magento setup:upgrade --keep-generated
php bin/magento setup:static-content:deploy
php bin/magento cache:clean
|


Introducing Subscription and Recurring Payments
The Subscription and Recurring Payments extension offers the following subscription functionality:
- Payments processed via the PayPal Express, Adyen, and Stripe external gateways;
- Multiple subscription products can be purchased within the same subscription plan;
- Trial payments and initial fees configured per subscription product;
- Editable billing and shipping subscription addresses;
- Multi-store and multi-currency subscriptions;
- Configurable and bundle product support.
Extension Logic
With the extension, store owners can offer regular products as subscriptions. Once subscription plans have been created, an admin can enable them at the product level. The general subscription settings, including subscription duration, payment frequency, etc., are configured per plan. The more specific ones are set at the product level.
The module does not convert products into subscriptions. Instead, it adds a few new purchase options to the appropriate product: as a regular item or as a subscription. The admin can decide whether to offer products as subscription-only, one-off only (by default), or in both variants.
In essence, the extension is divided into the following menu pages:
- Subscriptions - the main subscription management page. It lists all customer subscriptions with an overview of the most important subscription attributes;
- Subscription plans - a grid with the list of all active subscription plans. You can create the new and edit the existing plans;
- Log - a grid with a record of all subscription-related actions by the admin and customers (subscription status change, customer profile creation, etc.).
In addition, the extension introduces the general configuration settings page.
Payment Gateway Configuration
Stripe
1) Go to Admin > Stores > Configuration > Sales > Payment Methods > Stripe(Subscriptions).
2) Fill in the 'Live Secret Key' and 'Live Publishable Key' fields. You need to create a merchant account at Stripe. Follow the instructions given on the Stripe's side.
After the account is created, you can obtain this data from the 'API' tab at https://dashboard.stripe.com/.
3) On your Stripe account page, navigate to Webhooks > Settings:
- click the "Add endpoint..." button
- set URL as "yourstore.com/index.php/aw_sarp/stripe/webhook" and set "Mode = Live/Test".
Make sure to save the changes made.
PayPal Express Checkout
1) Go to Admin > Stores > Configuration > Sales > Payment Methods > PayPal Express Checkout.
PayPal Express Checkout Required Settings

2) Fill in all the required fields, including 'API Username', 'API Password', and 'API Signature' or 'API username', 'API password', and 'Certificate' (depending on the option selected in the 'API Authentification Methods' box). The email associated with your PayPal Merchant account is optional for Magento 2.
Before filling the above fields, you should create an account on the PayPal's side.
The API Authentification Method has two options:
- API Signature - the method that includes the 'API username', 'API password', and 'PayPal signature' authentification fields;
- API Certificate - the method that includes the 'API username', 'API password', and the downloadable 'Certificate' option as a set of authentification fields.
The 'Get Credentials from PayPal' button copies the credentials to Magento automatically right after you login to your PayPal account.
For testing purposes, you can also use the Sandbox Mode and your Sandbox account (if any).
The extension relies on IPN (Instant Payment Notifications) function of PayPal. Make sure this function is configured properly in your PayPal merchant account.
Those Magento admins who connect to PayPal via proxy should also provide the server's 'Host' and 'Port' parameters.
PayPal Express Checkout Basic Settings
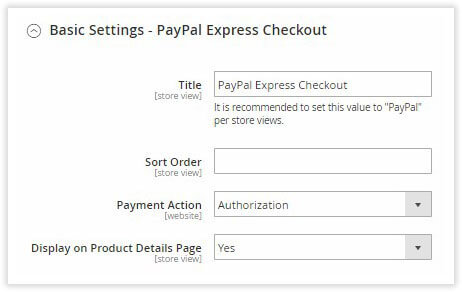
3) The basic settings include:
- Title - the title of the payment method to be displayed;
- Sort Order - the position of the method in the list of all payment methods;
- Payment Action - determines the logic of purchase approvements and payment withdrawals (detailed guide);
- Display on Product Details Page - makes the method visible on product pages.
Make sure to save the changes made.
That's it. If necessary, you can also configure the Advanced PayPal Express Checkout Settings.
Adyen
Adyen has an extensive documentation about how to install the payment method in a Magento 2 store that can be found here: https://docs.adyen.com/developers/plug-ins-and-partners/magento/magento-2
In short, the installation process requires the following set of actions:
1) The Adyen extension is installed as any other Magento 2 extension. It implies the upgrade and deploy stages.
The package can be obtained from:https://github.com/Adyen/adyen-magento2
2) Install the Adyen library via composer: https://github.com/Adyen/adyen-php-api-library
composer require adyen/php-api-library
3) Create an account at Adyen. Make sure you have received the 'Account' and 'Username' information to your email.
4) Set up the account as described in the Adyen documentation here.
5) Set up the store as per documentation:
- 'Required Settings' tab: fill in Merchant Account (Adyen > Accounts > Account Code);
- 'Required Settings' tab: set up the Test/Production Mode;
- 'Required Settings' tab: fill in Notification User Name/Email (these are the Adyen's credentials);
- 'Required Settings' tab: fill in Webservice username/Email for Test (Adyen > Settings > Users > select Web Service user > User Account Details: User Name/Password);
- 'CreditCard API integration' tab: fill in Enter CSE Public Key of Test Adyen Web Service User (Adyen > Settings > Users > select Web Service user > Easy Encryption: Client Encryption).
Make sure to save the changes made.
For the extension's purposes, Adyen processes only credit card payments.
Working with Adyen
When working with Adyen subscriptions, the store owner must consider the following:
1) If the subscription is NOT infinite, the suspended time is not considered. Only the specified number of cycles (payment periods) will be processed.
For example:
The customer subscribed for 6 months. The subscription has been active for 3 months. The customer took a month break. After the subscription is reactivated, the customer will still have 3 more months of subscription and will be charged accordingly.
2) The payment dates will not be transitioned to the end of the period after the subscription is reactivated.
For example:
There are two payments planned for the 10th and 20th days of the month.
The 10th payment is processed, and the customer suspends the subscription for 5 days.
On the 15th day, the customer reactivates the subscription.
On the 20th day, the customer is charged with another payment.
3) Considering the above examples, whenever customer suspends and reactivates the subscription, the missed billing cycle is transferred to the closest billing date. This means that all the missed billing periods are placed in the queue and processed regularly.
Backend Configuration
General Settings
Start with configuring the extension settings under Stores > Configuration > AHEADWORKS EXTENSIONS > Subscription and Recurring Payments.
.png?version=1&modificationDate=1555769562656&cacheVersion=1&api=v2)
The settings define the extension behavior when dealing with taxes, the logging period's duration, and introduces a couple of UI enhancements:
- Apply Tax on Trial Amount - defines if product taxes should be applied to trial period payments;
- Apply Tax on Shipping Amount - defines if product taxes should be applied to shipping amounts;
- Display "You Save X %" on Product Page - defines whether the %-difference between an original item price and a subscription price should be displayed in the 'Subscribe' button on product pages (for promotional purposes);
- Tooltip Near Subscription Button on Product Page - displays a tooltip next to the 'Subscribe' button on product pages. The tooltip describes how the subscription option works;
- Keep Log for, days - defines the number of days during which the extension keeps a log.
Subscription Plans
Having configured the settings, you might start creating subscription plans. Go to Sales > Subscription and Recurring Payments by Aheadworks > Subscription plans.
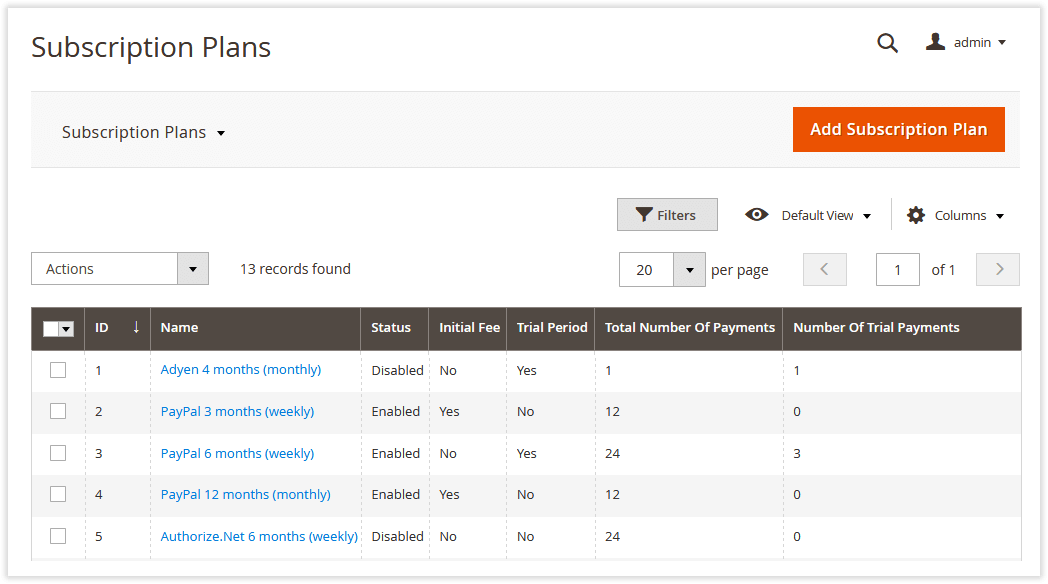
Subscription Plans is a grid that contains the basic information about the existing subscriptions:
- ID - an ID of a plan;
- Name - the plan's title;
- Status - the plan's status;
- Initial Fee - the column shows whether an initial fee is required by the plan;
- Trial Period - the column shows whether a trial period is provided by the plan;
- Total Number Of Payments - the total number of payments required by the plan;
- Number Of Trial Payments - the total number of trial payments required by the plan.
To create a new plan, click  above the grid. Once created, the plan is shared among all the products with the subscription option enabled.
Creating a New Plan
The 'New Subscription Plan' page's settings are split into four blocks: General Information, Schedule, Additional Pricing Settings, and Storefront Description.
General Information

As the title suggests, the block lists the common plan settings:
- Status - enables/disables a subscription plan;
- Website - defines a website the plan should be available at;
- Name - defines the plan's name for internal identification purposes.
- Subscription engine - selects a payment method available for the plan.
Schedule
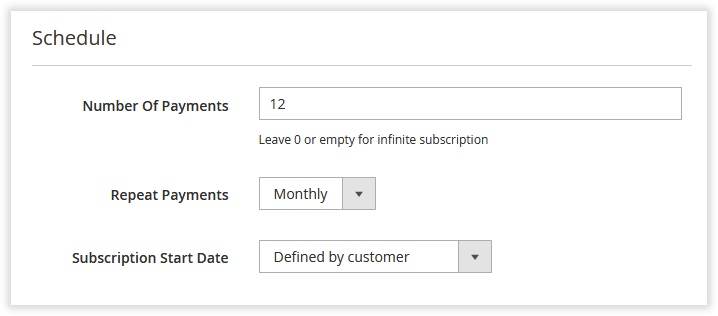
Here you can define how many times and how often customers will be charged along with the subscription start date:
- Number of Payments - defines how many times customers will be charged (the number of orders will be created accordingly);
- Repeat Payments - defines how often customers will be charged;
- Subscription start date - defines if the subscription will start at the moment of purchase, the exact day of a month, the last day of the current month, or on the date defined by a customer.
Total subscription period = Number of Payments * Repeat Payments
The Stripe payment method only supports infinite subscription plans. This means that the product will be automatically ordered within the specified time interval until the subscription is canceled.
Additional Pricing Settings
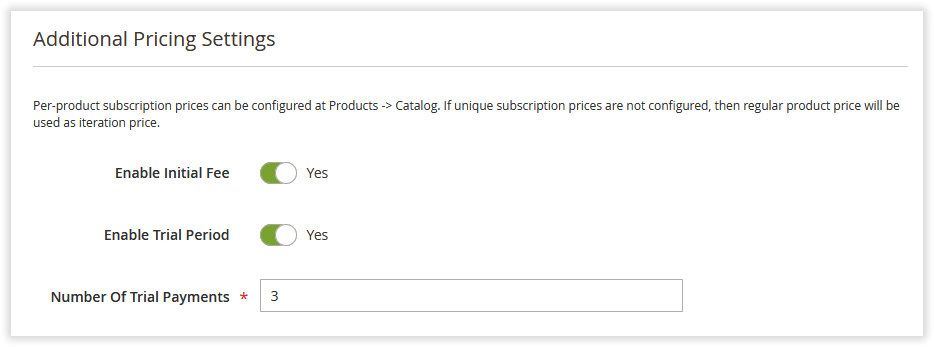
This section controls all the additional subscription plan's pricing parameters:
- Enable Initial Fee - defines if the initial fee is enabled for the subscription plan. The exact value is set at the product level;
- Enable Trial Period - defines if the trial period is enabled for the subscription plan. The price is set at the product level;
- Number of Trial Payments - defines the number of trial period payments in this period. Make sure to enter the value that doesn't contradict the 'Number of Payments' setting.
The Stripe payment method does not support initial fees and trial payments.
Storefront Description
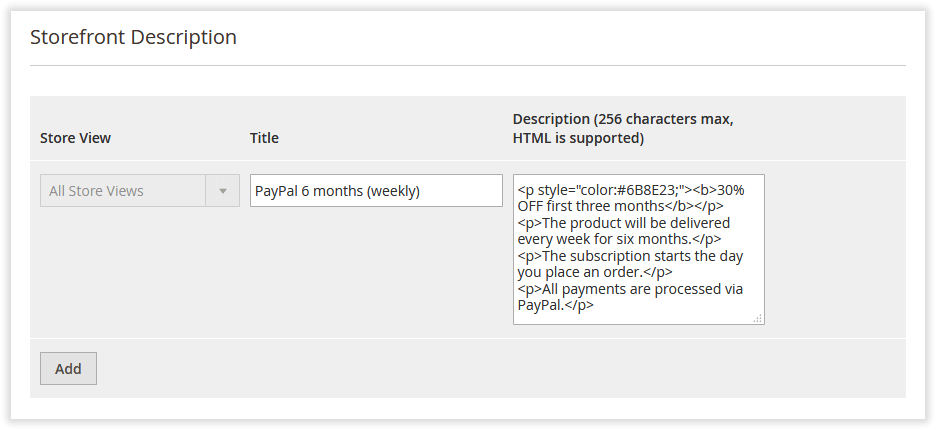
In this section you can set the subscription plan's name and description to be displayed on the storefront:
- Store View - defines a store view this plan's title and description will be displayed at;
- Title - the name of the subscription plan;
- Description - the plan's description (supports HTML).
Additional store view descriptions can be added by clicking  .
.
Once the plan's settings have been configured, click  .
.
Configuring Subscription Products
The extension doesn't add a new product type with a limited set of options to the store. Instead, it suggests offering the existing products as subscriptions.
Subscription settings are added to the configurable, bundle, simple, virtual, and downloadable product types. It can be found in the 'Subscription Configuration' section on the product details page in Catalog > Products.
The extension does NOT work with the 'grouped' product type.
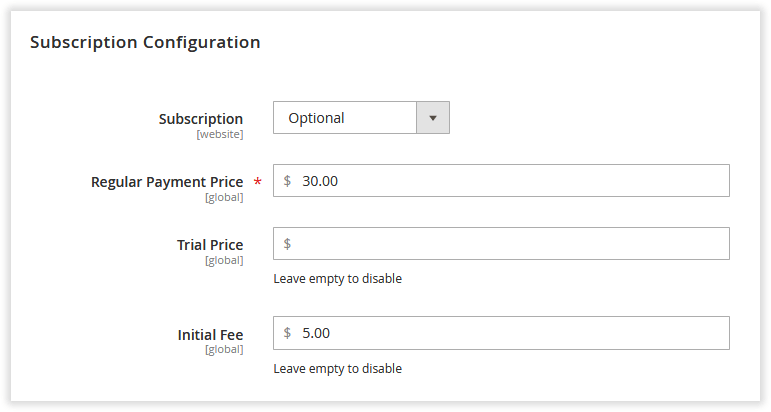
There is a total of four settings:
- Subscription - defines if the product should be offered as a single-time purchase, only as a subscription, or available in both variants: a subscription and a single purchase;
- Regular Payment Price - defines the price of a regular subscription payment;
- Trial Price - defines the price of the trial subscription period (if the trial is period is enabled);
- Initial Fee - defines the initial fee a customer will have to pay for placing a subscription order. This is a single payment that is processed separately.
For configurable products, such options can be configured per item, meaning that you can define different regular payment prices for different product configurations.
Subscriptions
Every time the customer purchases a subscription product, a new entry is created in the 'Subscriptions' grid under Sales > Subscription and Recurring Payments by Aheadworks > Subscriptions.
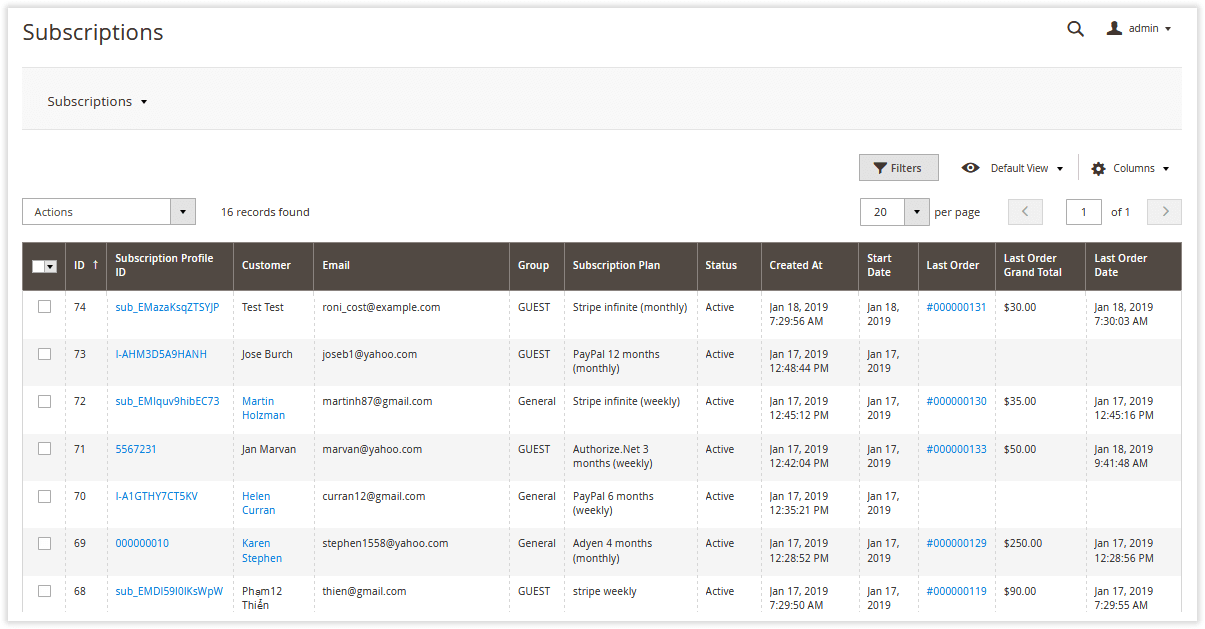
Here you are presented with an overview of all active, suspended, canceled, and expired subscriptions.
- ID - an ID of a subscription;
- Subscription Profile ID - an ID of a subscription profile;
- Customer - the name of a subscribed customer;
- Email - the subscriber's email;
- Group - the subscriber's group;
- Subscription Plan - the plan purchased by the subscriber;
- Status - the current subscription status (active, suspended, or canceled);
- Created At - the order creation date;
- Start Date - the subscription's start date;
- Last Order - the last order's ID;
- Last Order Grand Total - the last order's largest total;
- Last Order Date - the last order's date.
With the 'Actions' box, you can cancel and suspend the selected subscription(s).
By clicking 'Subscription Profile ID', you can check all orders associated with the subscription (just like in the native Magento).
Extension Log
Starting with the version 1.3.0, the extension comes with the 'Log' grid that stores all the subscription-related action records.
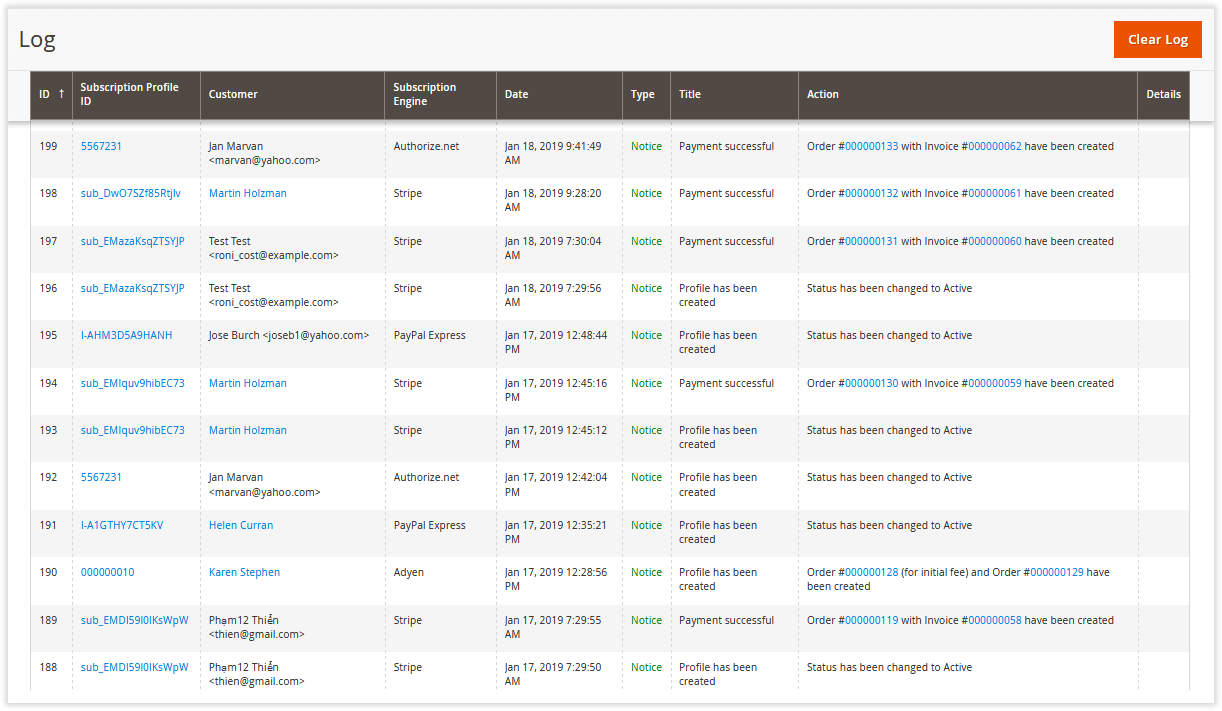
In case the log needs to be cleared, click ![]() .
.
Storefront
Subscription Product
Depending on the subscription options selected, the subscription product will look something like this:
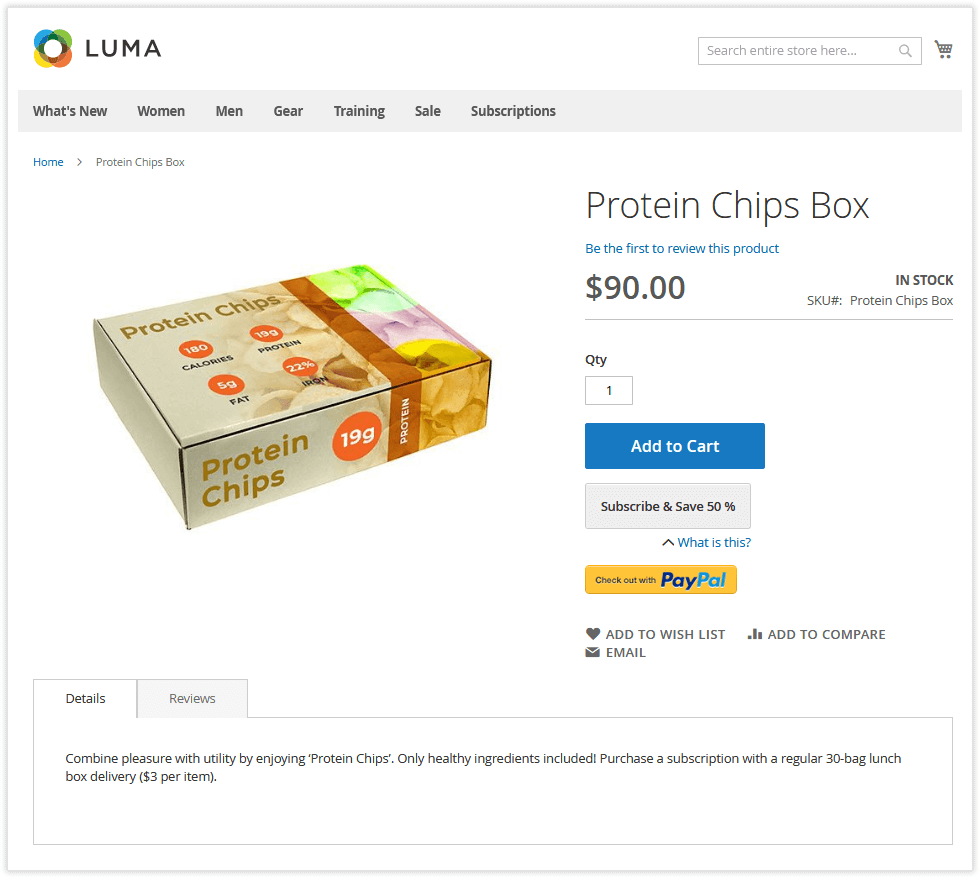
In the above picture, you can see the product with the 'Subscription' option set to Optional. Thus, there are two buttons displayed at once: 'Add to Cart' and 'Subscribe'.
The native 'Price' attribute of this product was set to $15, while the subscription price was set to $12,5. That's why one can see that subscribing to this product supplies will save 16% total.
In the case of configurable subscription products, the child ones might have individual subscription prices. The 'Subscribe' button on each particular child product page will always display the relevant discounts.
Subscription Cart
All subscription products are added to the dedicated subscription cart. It was introduced to avoid issues with payment gateways, as most of the payment processors can either process a single-time payment or create a recurring profile.
When customers click on the 'Subscribe' button, they get redirected to the 'Subscription Cart' page:
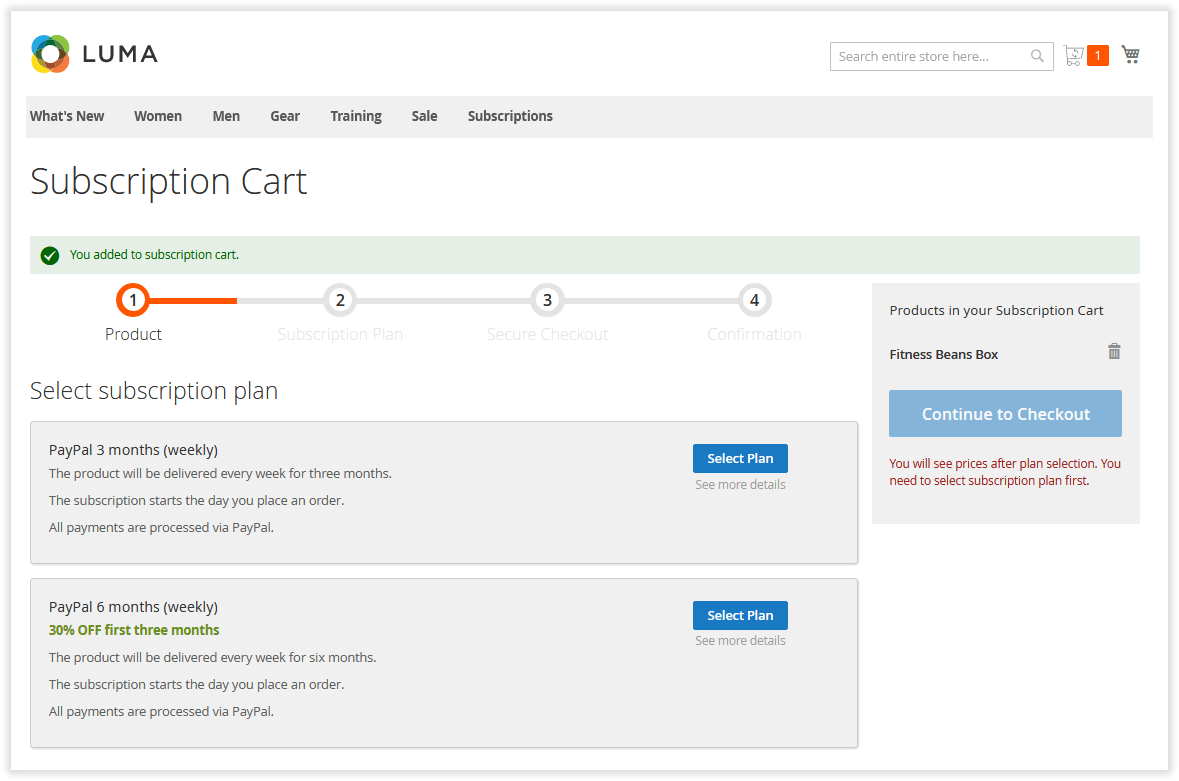
The 'Subscription Cart' page represents a four-step progress bar indicating the checkout process.
At the first step - 'Product' - the customer is suggested to select the appropriate subscription plan. The plans come in individual blocks. Each block contains the subscription plan's basic info.
To get a comprehensive overview of the subscription terms, the customer needs to click on the 'See more details' active link below Select Plan.
Upon clicking the 'Select Plan' button, the customers proceed to the second checkout step - 'Subscription Plan'. There, they can see the plan's overview.

When everything is considered, one should click  to proceed to the next step.
- The third step - 'Secure Checkout' - is the step of the native Magento 2 checkout. There the customer is suggested to indicate his/her shipping and billing info and choose the proper shipping method.
- The fourth step - 'Confirmation' - is the payment confirmation stage.
Once the subscription order has been placed, the customer can navigate to his/her account to check all active subscriptions.
Customer Account Section
The extension introduces the 'My Subscriptions' section to a customer account. The section lists all the customer's subscriptions (both the active and expired ones).
.png?version=1&modificationDate=1555769944153&cacheVersion=1&api=v2)
By clicking on the 'View' active link next to the required subscription, the customer can have an in-depth look at all associated orders and adjust his/her billing and shipping information (if required).
On the subscription details page, customers can also suspend and cancel subscriptions anytime required.
Uninstalling Subscription and Recurring Payments
Manual Removal
1. Disable the module by executing the following commands:
php bin/magento module:disable Aheadworks_Sarp
php bin/magento setup:upgrade
2. Remove the extension files from the following folder:
app/code/Aheadworks/Sarp
Automatic Removal (via Composer)
1. Disable the module by executing the following commands:
php bin/magento module:uninstall Aheadworks_Sarp
Need Customization?
.png?version=1&modificationDate=1564162336260&cacheVersion=1&api=v2)
You can always find the latest version of the software, full documentation, demos, screenshots, and reviews on http://aheadworks.com
License agreement: https://aheadworks.com/end-user-license-agreement
Contact Us: https://aheadworks.com/contact
Copyright © 2021 Aheadworks Co. http://www.aheadworks.com