Firefox user notice:
Please use another web browser to view this document.
Sorry for the inconvenience.

Magento 2 FAQ extension introduces to the storefront the FAQ page of most frequent questions and answers. The extension helps customers find the information they need in a matter of a few clicks. The following features highlight the extension:
- Answer helpfulness rating
- Customer group restriction to access FAQ
- Search field for quick navigation around the FAQ articles
- Multi-column adjustable design of the FAQ page
- SEO instruments: meta data, canonical URLs, sitemap, FAQ article URLs
- Interactive Chat-bot with anti-spam protection
Compatibility: Magento Open Source 2.3.X - 2.4.X, Magento Commerce 2.3.X - 2.4.X
Thank you for choosing Aheadworks!
Installing FAQ
| Command Line Installation | Composer Installation |
|---|---|
1. Backup your web directory and store database 2. Download the FAQ installation package 3. Upload contents of the FAQ installation package to your store root directory 4. In SSH console of your server navigate to your store root folder: cd path_to_the_store_root_folder run the following command: php -f bin/magento module:enable Aheadworks_Faq then: php -f bin/magento setup:upgrade after: php -f bin/magento setup:static-content:deploy 5. Flush store cache; log out from the backend and log in again Make sure the installation is done from the FTP administrator account. Otherwise, set 775 permissions to the store root directory after the extension is deployed. | If you are installing an extension from Aheadworks for the first time, you need to add our composer repository to your Magento store: 1. Login to your ssh console and navigate to your store folder:
cd path_to_the_store_root_folder
Run the following command:
composer config repositories.aheadworks composer https://dist.aheadworks.com/
After the command was executed successfully, you can use the composer to install the products. To install the extension: 2. Login to your ssh console and navigate to your store folder:
cd path_to_the_store_root_folder
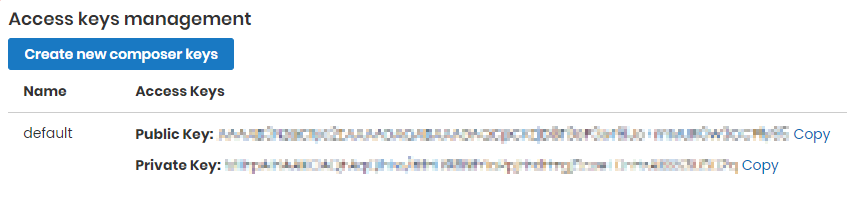
3. Run the following command to install the latest version of the extension: composer require aheadworks/module-faq if you need to install a specific version, run this command: composer require aheadworks/module-faq:<version> Specify the desirable extension version in <version> When prompted, enter Public Key (Username) and Private Key (Password): Both Public Key (Username) and Private Key (Password) can be found in My Projects and Licenses in your personal account on our site:
4. Enable the extension: php -f bin/magento module:enable Aheadworks_Fab Next, register the extension: bin/magento setup:upgrade Recompile your Magento store if you are in the Production mode: bin/magento setup:di:compile To verify that the extension is enabled, run this command: bin/magento module:status Clean store cache, by running the following command: bin/magento cache:clean Log out and Log in the backend again. To upgrade the extension: Download the updated extension file from Marketplace or another extension developer. Take note of the module-name and version. Export the contents to your Magento root. Run one of the following with the composer:
composer update aheadworks/module-faq
composer require aheadworks/module-faq:<version>
Run the following commands to upgrade, deploy, and clean the cache. php bin/magento setup:upgrade --keep-generated |

Introducing Magento 2 FAQ
About M2 FAQ
The FAQ extension for Magento 2 by Aheadworks eases the load on the support team of the store by allowing customers to find answers to urgent questions in a simple and convenient way. Having answered a question a couple of times store representatives may want to compose an article with step-by-step instructions on how to avoid the issue. The answers can be composed using the native Magento What You See Is What You Get editor (WYSIWYG), which also allows for use of various media sources.
Some of the articles can be edited for internal company educational purposes with the help of customer group management and multi-store support. Some of the articles can be relevant only to a particular audience, for example, questions on payment methods available only for certain countries, worldwide delivery notice for international customers. With the help of the FAQ extension for Magento 2, store administrators can target the audience they want to have more insight into the question.
Customers are suggested to rate the helpfulness of articles. When answers do not meet the expectations, and the customer rates the article poorly, a notification with a suggestion to contact the support team or send feedback will appear. The notification can be adjusted according to the accepted support model.
What's New?
The Chat-bot addon is available as of version 1.3.0 of the present extension. The Chat-bot comes as a separate pack and is included into the download of M2 FAQ 1.3.0. The Store-Admin is free to install the Chat-bot or not to do so.
The Chat-bot has multiple configuration options, including anti-spam protection and ticket creation.
In FAQ version 1.4.1 following is added:
- a switcher in the backend that enables/disables showing subcategories and Articles on the FAQ Category page on the frontend;
- display of FAQ articles on the product page;
- the sidebar with the list of categories and articles;
- the Category Description tab with WYSIWYG editor in the Category page;
- Meta Keywords, Meta Title and Meta Description improvements;
Using Magento 2 FAQ
FAQ on Storefront
At the storefront, FAQ can be accessed via the main navigation menu.
The FAQ page consists of the following elements:
- FAQ Menu Reference – is a navigation element, added to the menu on the installation of the extension (when an article gets available);
- FAQ Category – is a thematic unit of the extension to contain articles on a topic;
- FAQ Article – is a knowledge unit that consists of a question and answer. Customers are able to cast their votes to rate the helpfulness of the articles;
- Dedicated Article Search – is an in-extension search tool that facilitates customers' seeking for answers. The search tool herein doesn't work for other store items such as products or blog articles.
Depending on the settings of the extension FAQ Categories can display a limited number of articles, the remaining rest will be cropped under the 'Read <number of extra articles> more articles' link. Clicking on the link, a customer will be redirected to a dedicated FAQ category page featuring all the classified articles.
Dedicated article search can be used to search for an article by a keyword. Articles matching the search word in the title come first, then - articles where the search word is found within the article content.
.jpg?version=2&modificationDate=1621427998393&cacheVersion=1&api=v2)
This is how articles look like. Along with the answer, customers can see the helpfulness of the article as rated by other users. Moreover, they can cast their votes too. Depending on how customers rated an article they are either displayed the 'Thank you' message or a notification with a suggestion to provide feedback or contact the support team. To simplify the navigation, customers can select the needed article in the sidebar.

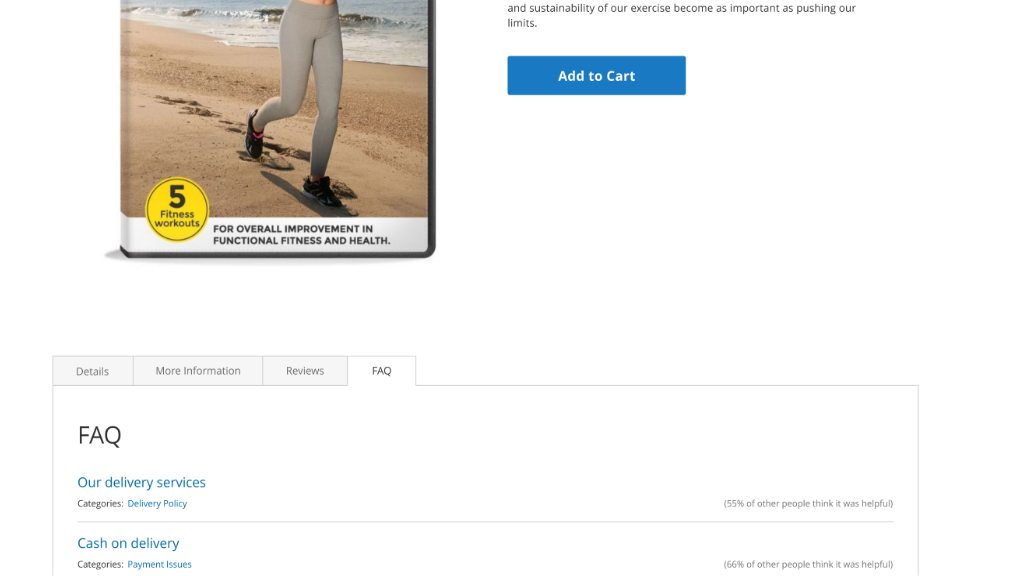
The FAQ tab is added to the product page. Customers can check the information related to a product.
Configuration Settings
Proceed to Stores → Configuration → Aheadworks extensions → FAQ to configure the extension. The settings come in three sections: General, SEO and Article Helpfulness.
General settings
The General Settings section controls the behavior, layout, metadata, and availability for particular customer groups within the present extension. The following settings are available within the section:
- FAQ Name – the name of the FAQ index page to be displayed at the storefront;
- FAQ Route – the URL path to the FAQ index page and all the categories and articles;
- FAQ Main Page Meta Title – the meta title of the FAQ main page as it will appear in a search list of a web-crawler (for SEO purposes);
- FAQ Main Page Meta Keywords - the meta keywords of the FAQ main page as it will appear in a search list of a web-crawler (for SEO purposes);
- FAQ Main Page Meta Description – the meta description of the FAQ main page as it will appear in a search list below the meta title (for SEO purposes);
- Default Number of Columns on FAQ Main Page – allows adjusting FAQ category layout to 1, 2, or 3 columns;
- Enable search in articles – Yes/No to enable/disable search for FAQ pages (may not be required considering the number of available articles);
- Display Link to FAQ in the Top Menu – defines if the Storefront FAQ Name is to be displayed in the top menu along with account sign-in options;
- Display Link to FAQ in the Main Navigation – defines if the Storefront FAQ Name is to be displayed in the main navigation menu;
- Display Link to FAQ in Footer Links – defines if the Storefront FAQ Name is to be displayed at the store footer;
- Enable Ask a Question form on the article pages - defines if the Ask a Question form is to be available on an article page;
If you set to Yes Enable Ask a Question form on the article pages field it will be required to fill in the new field Email address for the questions from article pages.
- Who can view FAQ content - a list of customer groups to specify the target audience of the FAQ (by default - ALL GROUPS).
.jpg?version=2&modificationDate=1621428031158&cacheVersion=1&api=v2&width=1024&height=576)
Untick the Use system value check-box next to the Who can view FAQ content for custom selection of customer groups. The list supports multi-select.
Articles helpfulness
The Articles Helpfulness section controls the behavior of the extension with regard to the article helpfulness rating. The following settings are available within the section:
- Who Can View Helpfulness – defines customer groups that are eligible to rate articles for helpfulness;
- Display Helpfulness Rate Before Voting – defines if helpfulness rating should be displayed to all customers before they cast a vote;
- Display Helpfulness Rate After Voting – defines if helpfulness rating should still be displayed to all customers after they cast a vote.
.jpg?version=1&modificationDate=1621429909461&cacheVersion=1&api=v2)
Search Engine Optimisation (SEO)
This is where you optimize your FAQ for the best search outcomes with modern search engines. The SEO section features the following sections:
- Article URL Suffix - the character(s) to close a URL of an article page (usually a '/', '.html' or empty);
- Category URL Suffix - the character(s) to close a URL of a category page (usually a '/', '.html' or empty);
- Create Permanent Redirect for URLs if URL Key Changed -the redirection of the preferred URLs, do not prevent showing multiple results to the visitors;
- Page Title Separator - the symbols, punctuation, and other characters used to distinguish between various parts of the page title;
- Title Prefix - the text line to start the title of a FAQ page (as included into the <title> tag);
- Title Suffix - the text line to close the title of a FAQ page (as included into the <title> tag);
- Meta Title Suffix For All Pages - the meta title suffix that can be for all pages;
- Use Canonical Link Meta Tag For Categories - decide whether you are using canonical link meta tag for category pages;
- Use Canonical Link Meta Tag For Articles - decide whether you are using canonical link meta tag for article pages.
.jpg?version=1&modificationDate=1621430258492&cacheVersion=1&api=v2)
URL Suffix - to forward-slash or not?
This is mostly the question of a forward slash, which is often automatically added to a url by many blog platforms like WordPress, for example. The addition of a slash at the end of aURL (aka trailing slash)instructs the webserver to search for a directory. This speeds the web page loading because the server will retrieve the content of the web page without wasting time searching for the file. However, this is not the rule, but a recommendation of the present day. You may either use the trailing slash or not, but make sure the choice is consistent.
It is important to stick to the preferred version and enforce a common policy for all the URLs of the website, including those in the site map. In some cases, the non-trailing slash and trailing slash version don’t redirect to the same version of a page. This can be the case when you migrate your FAQ from WordPress to Magento. WordPress delivers the same content with and without the trailing slash. Migration may break the ties. To prevent showing multiple results to the visitors, set up redirection to the preferred URLs. In the latest version (1.2.0) of the extension, this could be done with the help of the Create Permanent Redirect for URLs if URL Key Changed selector.
Page title separators
Separators bring structure and clarity to your page titles. The key is to choose characters that facilitate usability while enhancing the aesthetic quality of your titles.
From aSEOperspective, the sequence in which title elements appear is an important ranking factor. Placing your post title information before other title elements increases page relevance in the search engines.Then, eliminating unnecessary elements such as page type and FAQ tagline improves readability and keeps the focus on the essential. To improve the structural and semantic clarity of the titles, you might inject an alternate character or two. Instead of using hyphens after every the title element, you could use a more distinctive character such as the bullet ( • ) or vertical bar ( | ) to distinguish the main title of the article from the other title elements.
Canonical tags
A canonical tag (aka "rel canonical") is a way of telling search engines that a specific URL represents the master copy of a page. Using the canonical tag prevents problems caused by identical or "duplicate" content appearing on multiple URLs. Practically speaking, the canonical tag tells search engines which version of a URL you want to appear in search results.
For example, if your FAQ is configured to include the category path in article URLs, your store will generate multiple URLs that point to the same product page:
http://site.com/faq/payment/payment_methods/offline_payment_methods/payment_on_credit/
http://site.com/faq/payment_on_credit/http://site.com/faq/payment/payment_methods/offline_payment_methods/payment_on_credit/http://site.com/faq/payment_on_credit/Canonical tags vs. redirects
One common SEO question is whether canonical tags pass link equity-like 301 redirects. In most cases, they seem to, but this can be a dangerous question. Keep in mind that these two solutions create two very different results for search crawlers and site visitors.
If you 301 redirect Page A → Page B, then human visitors will be taken to Page B automatically and never see Page A. If you rel-canonical Page A → Page B, then search engines will know that Page B is canonical, but people will be able to visit both URLs. Make sure your solution matches the desired outcome.
The settings above echo those in Stores → Config → Catalog → Catalog → Search Engine Optimization. For more details on SEO practices in Magento 2 refer to the official Magento 2 use guide.
To finalize the settings click the 'Save config' button at the top right of the page.
FAQ Categories
Categories Grid
To populate FAQ with question categories, navigate to Content → FAQ by Aheadworks → Categories.
The page features a grid to aggregate all categories available for the FAQ. The grid shows the following columns:
- ID - the identification number of a category;
- Category Name - the name of a category (as it will appear on the storefront);
- URL Key - the closing tag of a category url;
- Status - the status of a category (enabled/disabled);
- Store View - the store view to feature the category;
- Sort Order - a whole numeric to indicate the order of a category in the category tree on the storefront.
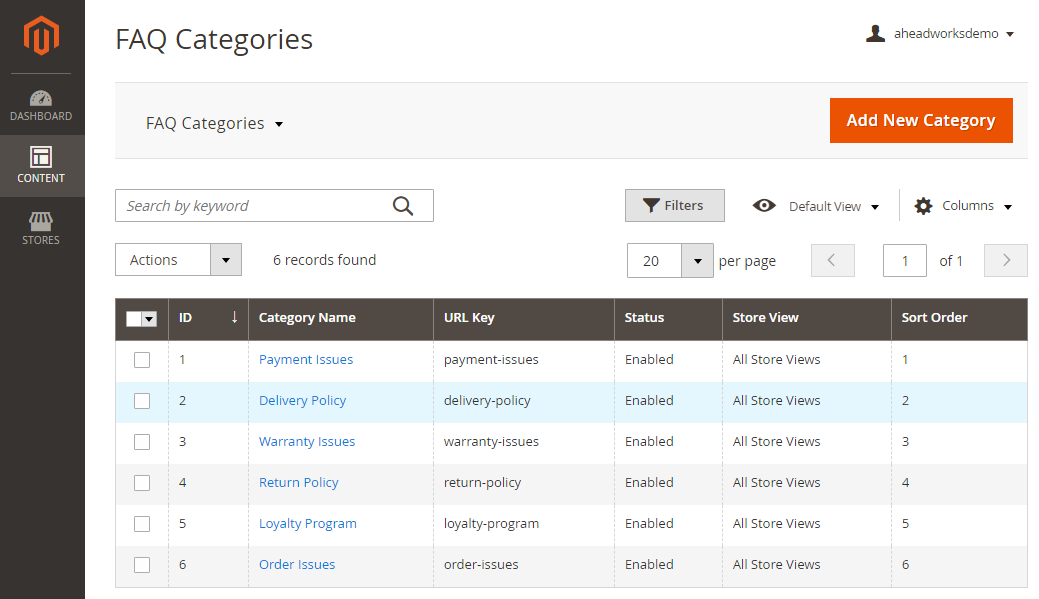
To add a new category, click on the Add New Category button at the top of the page. To edit a category, click on the name of the category in the grid. To delete or change the status of a category, tick the checkbox to the left of the category name and apply action from the Actions folding list above the grid (bulk action is supported too).
Create New/Edit Category
Categories represent a thematic unit of FAQ extension. Categories are suggested to contain a set of articles on a particular theme.
Category settings are split into two sections: General Settings and SEO:
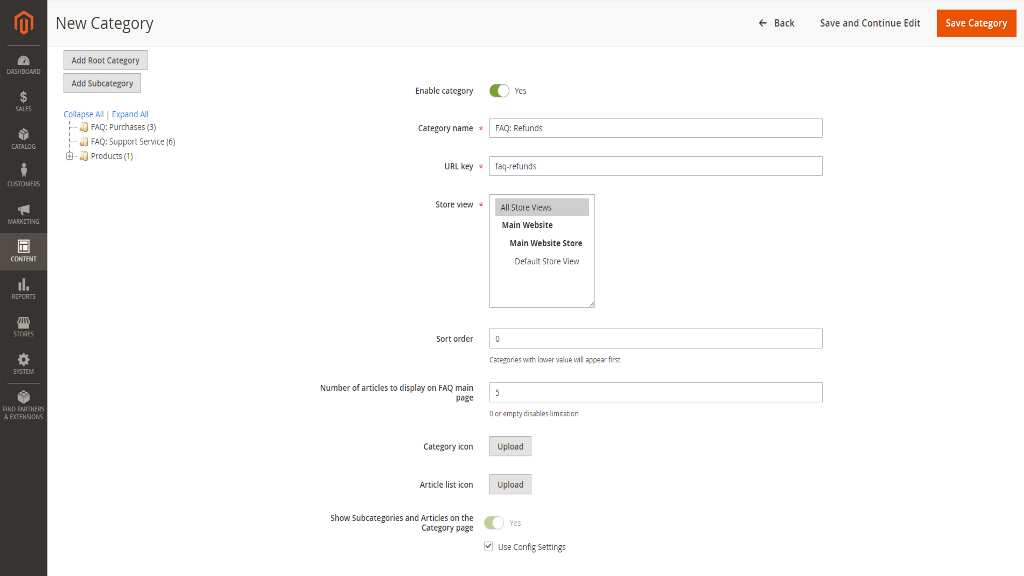
General Settings come as a list of the following parameters:
- Enable category – defines if the category is enabled on the storefront;
- Category name – defines the category name;
- URL Key – defines the category URL;
- Store View – defines the store views the category should be displayed at;
- Sort Order – defines the order in which categories are displayed at the FAQ index page;
- Number articles to display on FAQ main page – defines the number of articles displayed under the category (additional articles will be cropped by the 'Read <number of extra articles> more articles' link);
- Category icon – allows uploading an icon that will define the category;
- Article list icon – allows uploading images to be used as list points to highlight a particular category in color;
- Show Subcategories and Articles on the Category page - allows showing subcategories and articles on the category page, to disable this function untick the Use Config Settings.
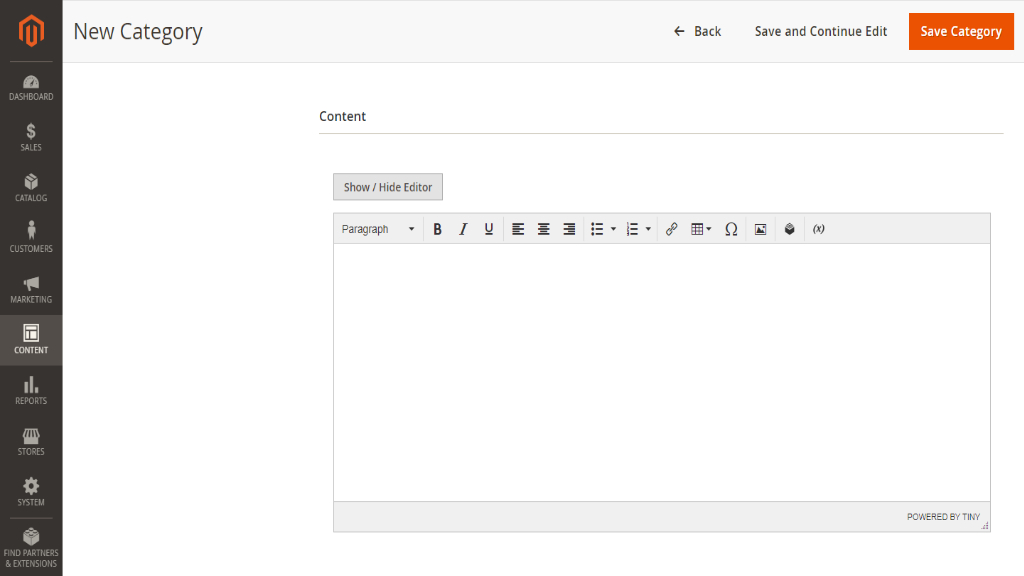
In the Content area you Admin can edit category description. The content area provides a text-box with a WYSIWYG editor to type-in and format a reply to a question, or to provide information on the topic.
SEO Settings come as a list of the following parameters:
- Meta Title - the title of the FAQ category page as it will appear in a search list of a web-crawler;
- Meta Keywords - the keywords (that describe your store) of the FAQ category page as it will appear in a search list below the meta title, each keyword separated by a comma;
- Meta Description - the description of the FAQ category page will appear in a search list below the meta title.
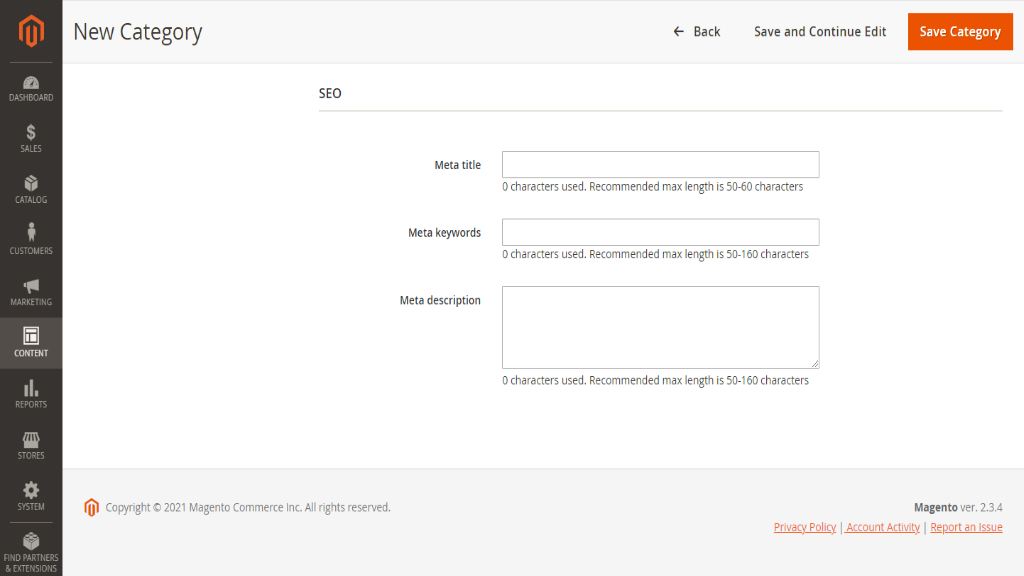
Click Save Category in the top right to finalize category configuration.
FAQ Articles
Articles Grid
To populate FAQ with articles, navigate to Content → FAQ by Aheadworks → Articles.
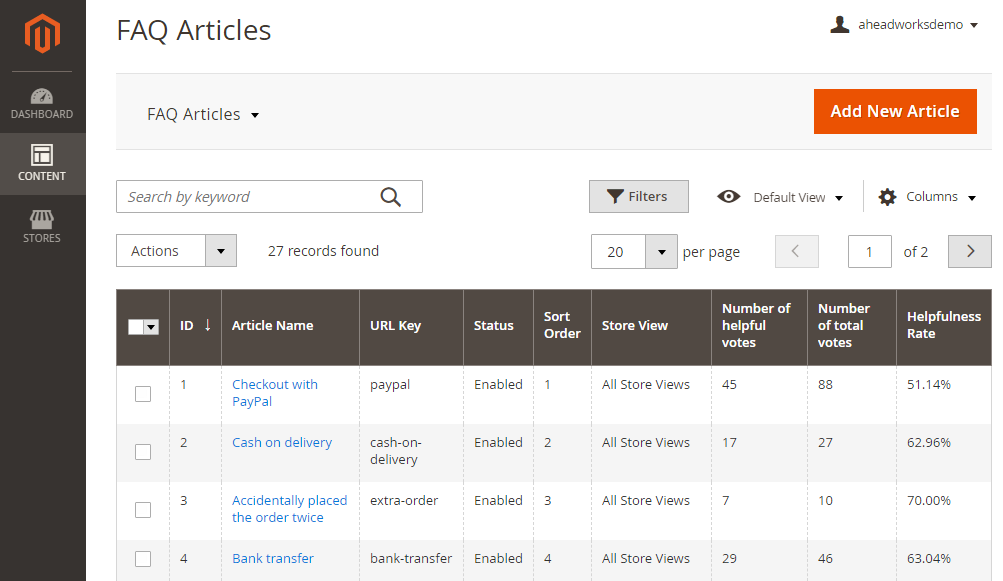
The page features a grid to aggregate all articles available for the FAQ. The grid shows the following columns:
- ID - the identification number of an article;
- Category Name - the name of an article (as it will appear on the storefront);
- URL Key - the closing tag of an article url;
- Status - the status of an article (enabled/disabled);
- Store View - the store view to feature the article;
- Sort Order - a whole numeric to indicate the order of an article on the storefront;
- Number of Helpful Votes - the whole digital to tell the number of votes given by customers to the article to mark its helpfulness;
- Number of Total Votes - the whole digital to tell the total number (negative and positive) of votes given to the article;
- Helpfulness Rate - the %-ratio between the above two values to tell the helpfulness of an article.
To add a new article, click on the Add New Article button at the top of the page. To edit an article, click on the name of the article in the grid. To delete or change the status of an article, tick the checkbox to the left of the article name and apply action from the Actions folding list above the grid (bulk action is supported too).
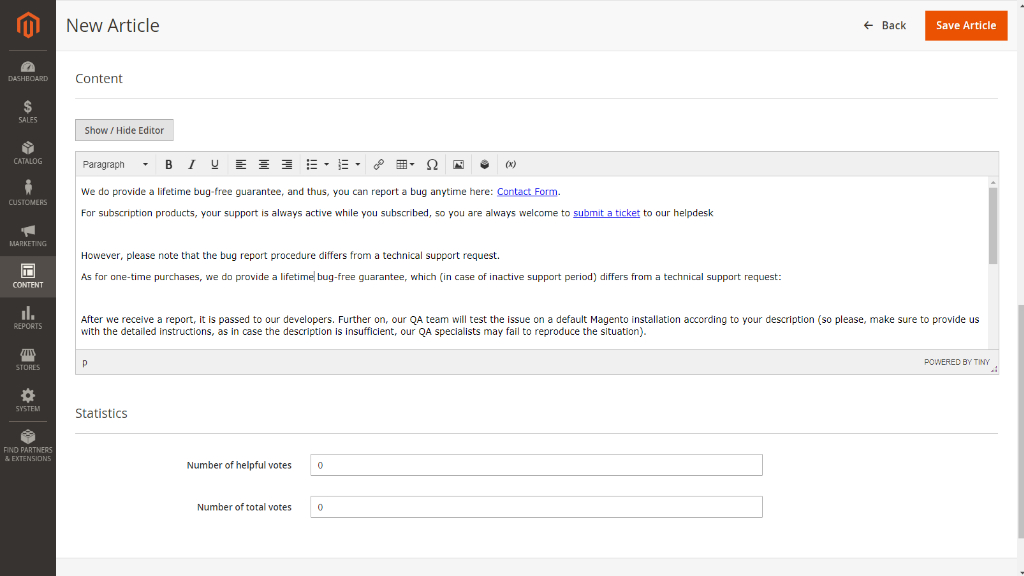
Create New/Edit Article
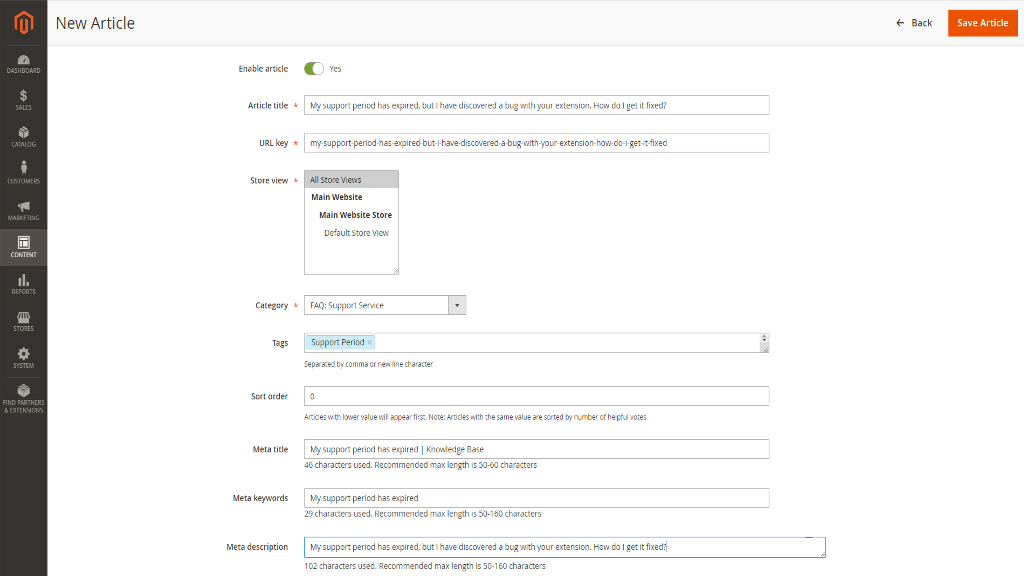
Settings for an article are split into three sections: General Settings, Content, and Statistics.
The General Settings come as follows:
- Enable Article – defines if the article is enabled on the storefront;
- Show the whole article in the Chatbot (available when Chat-bot is installed) - set to Yes to show the whole article in the chat window;
- Article Title – defines the name of the article;
- URL Key – defines the URL of the article;
- Store View – defines the store views the article should be displayed at;
- Category – defines which category the article belongs to;
- Sort Order – defines the order in which articles are displayed within the category;
- Meta Title – the meta title of the article page as it will appear in a search list of a web-crawler (for SEO purposes);
- Meta Keywords - the meta keywords (that describe your store) of the article page as it will appear in a search list below the meta title (for SEO purposes), each keyword separated by a comma;
- Meta Description – the meta description of the article page as it will appear in a search list below the meta title (for SEO purposes).
When "Show the whole article in the Chatbot" is set to No, the "Short Content" field is available. Enter the text, different to that of the full text of the article, you want Chat-bot to display to the Customer when he/she chooses the article to read. This text is not displayed on the page of the article, and is visible only in the chat window.
The Content block suggests a text-box with a WYSIWYG editor to type-in and format a reply to a question, or to provide information on the topic.
On EE stores if Page Builder is enabled > " Show the whole article in the Chatbot" = No > "Content" field is filled > In Chat Bot the text is absent. On CE, EE where Wysiwig is enabled the text from the"Content" field is displayed
The Statistics block allows configuring helpfulness of the article. The block is represented with two fields:
- Number of Helpful Votes – a whole numeric to indicate the number of customers who clicked on Yes in reply to the Was this helpful? (next to the article) question on the storefront
- Total Votes – a whole numeric to indicate the number of customers who responded in total to the question "Was this helpful?"
By default, 0 is the value of the above parameters. Active articles in the editing mode herein will show real numbers of customers rating. It is possible to adjust the numbers if need be.
Click Save Article in the top right to finalize article configuration.
Using Chat-Bot
On Backend
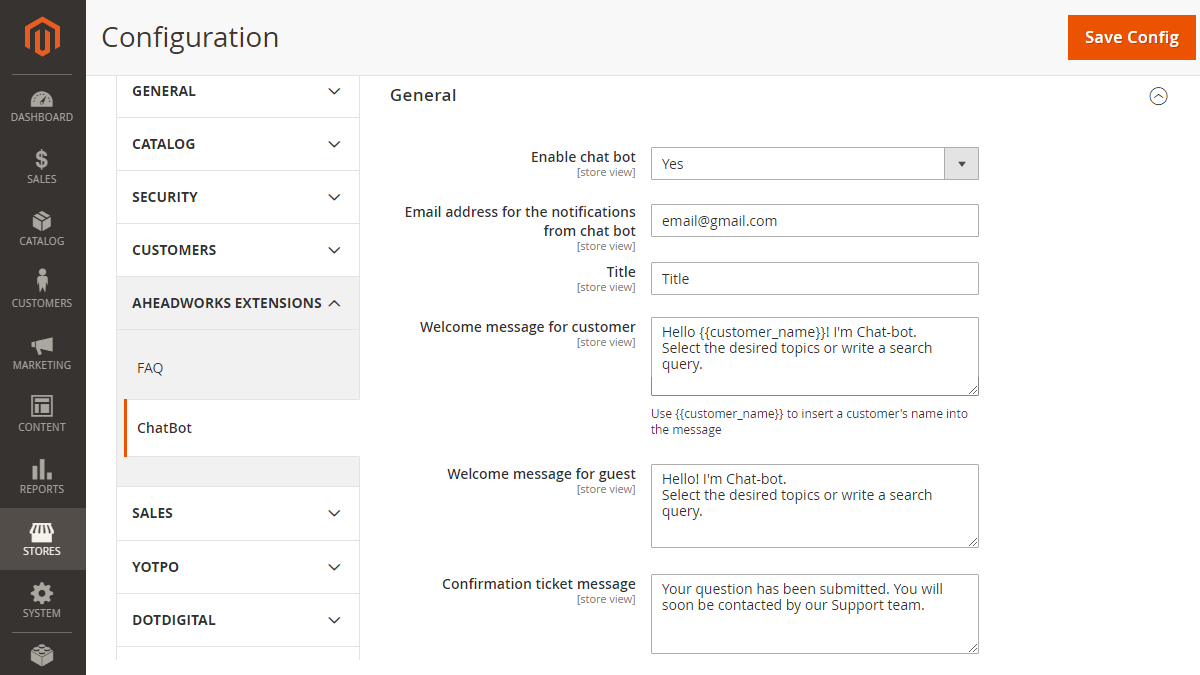
To configure Chat-bot, go to Stores → Configuration → Aheadworks Extensions → Chatbot.
- Enable Chatbot - set to Yes to enable Chat-bot on the Frontend;
- Email Address for the Notifications from Chat bot (available when Chat-bot is enabled)- indicate the email address to receive Chat-bot notifications;
- Title - enter a string that will appear on the top of the Chat window and that will tell customers what the window is meant for (for example, "Chat-bot", "We're here to help", etc). When the window is minimized, only Title and Chat-bot image are displayed;
- Welcome Message for Customer - suggest the message to welcome logged-in customers on the start of the session with Chat-bot;
- Welcome Message for Guest - suggest the message to welcome guest-customers on the start of the session with Chat-bot;
- Confirmation Ticket Message - the message is shown to the customer in the Chat window when a ticket is submitted via Chat-bot.
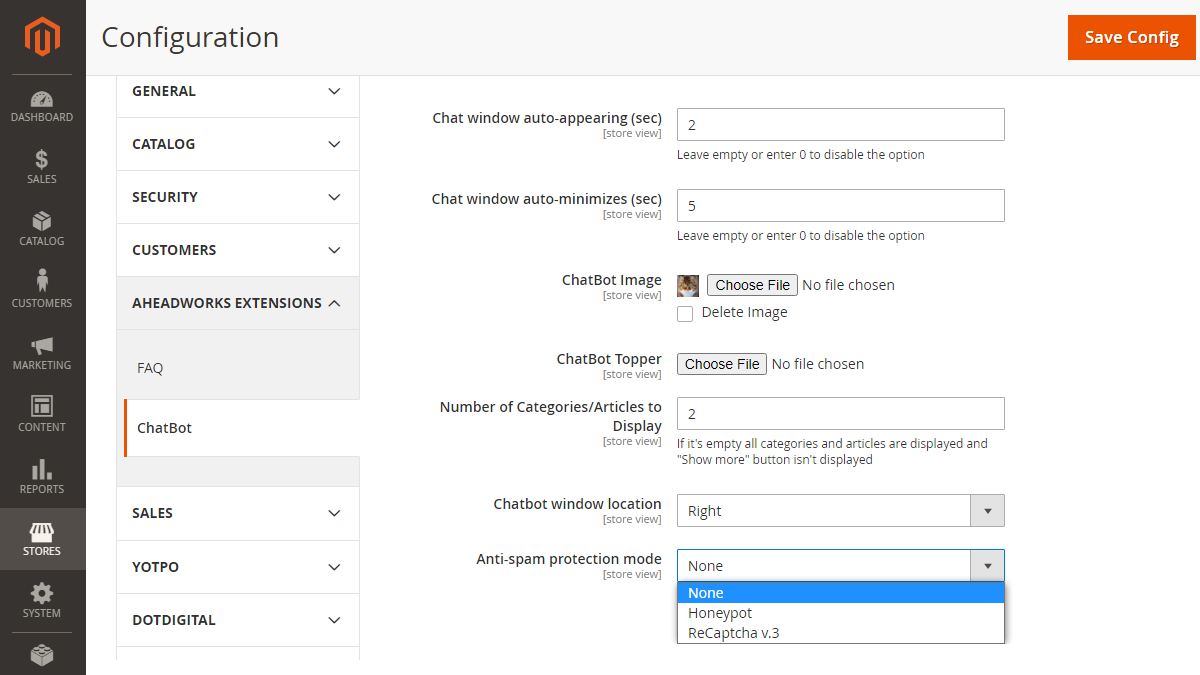
(list continued)
- Chat window auto-appearing (sec) - the time Chat-bot waits to auto-open on load of the store page;
- Chat window auto-minimizes (sec) -the time Chat-bot waits to auto-minimize when no interaction happens it;
- ChatBot Image - Chat-bot avatar to be displayed in the Chat window;
- ChatBot Topper - additional image to be displayed on top of the Chat window to attract customers' attention. ChatBot Topper remains visible both when the chat window is minimized and when open;
- Number of Categories/Articles to Display - specify the number of FAQ categories for the Chat window to display on the start of the session with the Customer;
- Chatbot window location - set to Right to display the Chat window on the right of the page, set to Left to display on the left;
- Anti-spam protection mode - select the spam-protection mechanism: None, reCaptcha, Honeypot;
- ReCaptcha site key (available when reCaptcha is selected above) -enter your Google reCaptcha key. Refer to the official Magento 2 guide to learn more on enabling and configuring reCaptcha.
To disable the Chat window auto-appearing and Chat window auto-minimizes options set the respective value to 0 or leave the field empty.
On Frontend
Chat box appears automatically on frontend pages a few seconds (see Chat window auto-appearing) after the load of the page. The chat box always stays on the screen. When idle for the given time (see Chat window auto-minimizes), the chat box minimizes automatically. When minimized, the chat box displays the image and title of the Chat-bot.
To manually minimize the chat window, the Customer click on the "-" icon in the top right of the chat box. To open the window, the Customer clicks on the minimized bar of the Chat-bot.
Who can see the Chat box?
Chat box is available only for groups of customers specified in Admin → Stores → Configuration → FAQ → Who can view FAQ content.
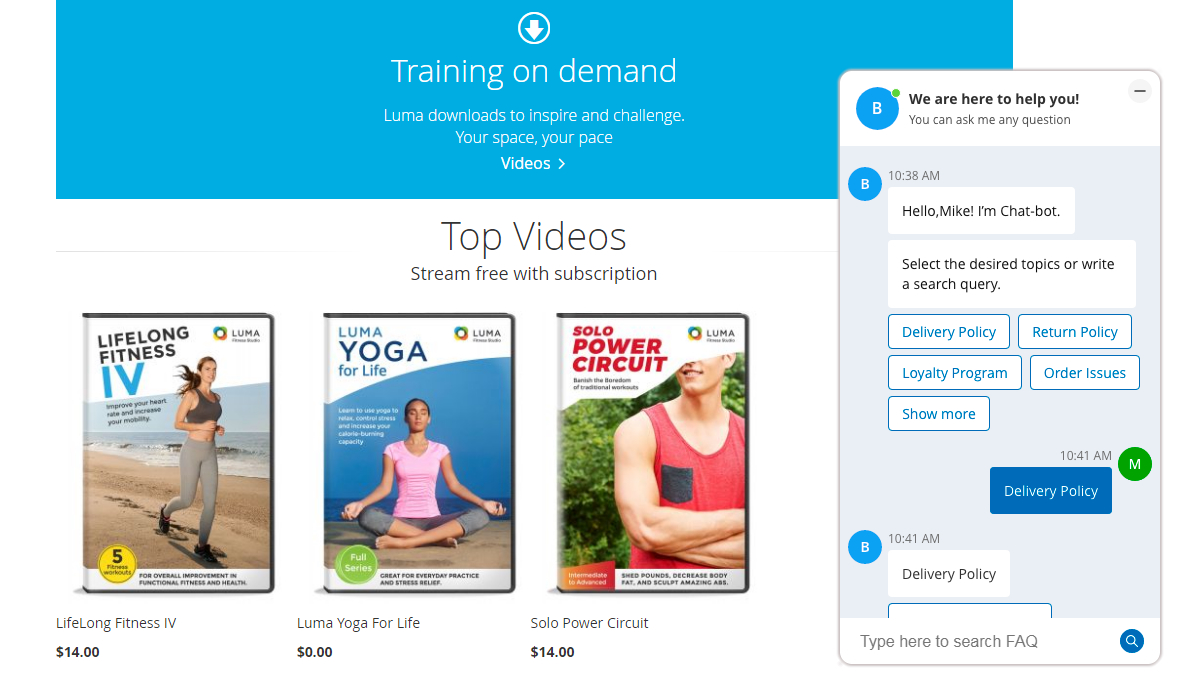
On load, the chat box displays the Welcome message and the FAQ categories. Only the specified number of categories (see Number of Categories/Articles to Display) is shown in the chat window. The Show more button next to the first N categories opens other categories for the Customer.
When a category is clicked on, the choice is displayed in the chat box as the Customer's message and the articles (of the chosen category) are displayed as the Chat-bot's reply.
Chat-bot does not display the title of an article when:
part of the title/the whole title is entered
tag is entered
Chat-bot does not take into account "Sort Order" set on the pages of articles and categories.
The Customer can type in a question for Chat-bot to search the FAQ articles for an answer. Customers do that with the help of the search-field marked "Type here to search FAQ".
Chat-bot keeps all steps of interaction with the Customer within a session. Customers can scroll up and down the interaction thread. Alternatively, to navigate the thread, the Customer can use the Back button which is displayed next to the categories/articles on each step of interaction with Chat-bot. When Back is clicked on, Chat-bot shows its previous message.
When no answer is found, Chat-bot sends the following message: “We don’t have any article about it, but you can submit a ticket. Click the button below to do that.“and displays the Submit a ticket button. When the Customer clicks on the "Submit a ticket" button, the following fields are displayed:
- Email (for guest-customers only) - the email of the Customer;
- Subject - the subject of the issue (by default - the last search query);
- A text area for the question.
To submit the question, the Customer clicks on the Send button. To cancel the operation and return to the chat thread, the Customer clicks on the Cancel button. When the Send button is clicked on, a ticket is created (*), and the chat window displays a confirmation message (see Confirmation ticket message).
* A ticket is created only when the Help Desk Ultimate 2 from Aheadworks is installed in the store. Otherwise, the Admin receives the question by email. The subject in the email is : FAQ: Question from "<article name>".
| No answer is found → | Customer types-in the question → | Question is submitted as ticket |
|---|---|---|
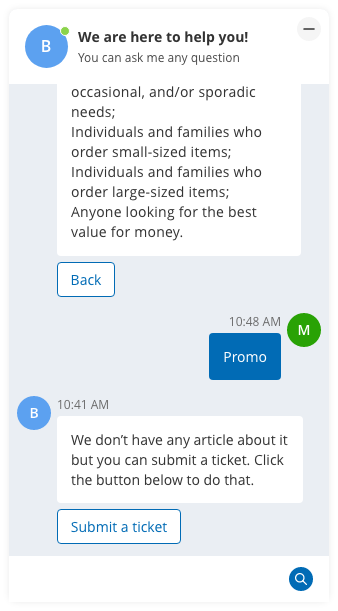 | 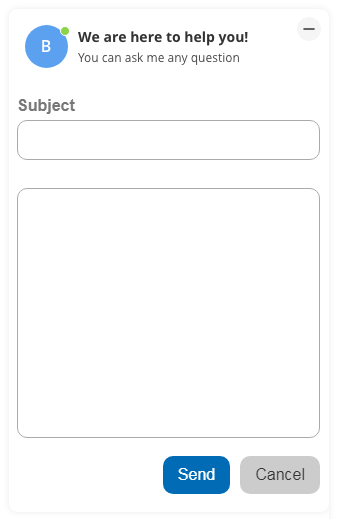 | 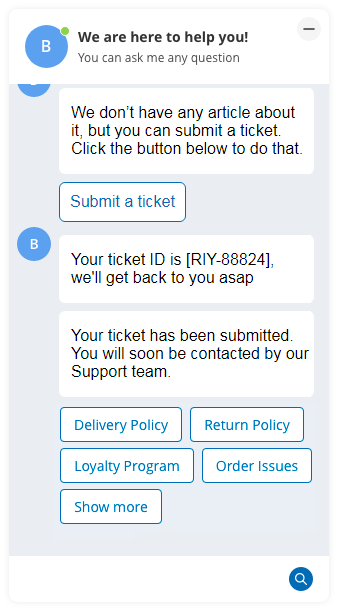 |
Uninstalling FAQ
| Automatic removal | Manual Removal |
|---|---|
To uninstall the extension, run the following command: php bin/magento module:uninstall Aheadworks_Faq Please note: uninstall script works correctly only if the module was previously installed via Composer Note for a developer: To use the uninstall script in the standard workflow, see Magento\Setup\Console\Command\ModuleUninstallCommand::validate(). The function should return an empty array for further correct processing. You can simply comment out the lines 319-338. | 1. Disable the module by executing the following commands: php bin/magento module:disable Aheadworks_Faq php bin/magento setup:upgrade 2. Remove the extension files from the following folder: app/code/Aheadworks/Faq |
.png?version=1&modificationDate=1570029397042&cacheVersion=1&api=v2)
License agreement: https://aheadworks.com/end-user-license-agreement
Contact Us: https://aheadworks.com/contact
Copyright © 2021 Aheadworks Co. http://www.aheadworks.com