Firefox user notice:
Please use another web browser to view this document.
Sorry for the inconvenience.

Magento 2 Smart One Step Checkout ensures the flawless checkout process with a one-step checkout page. With the module, you can configure newsletter subscription, delivery dates, address auto completion, GeoIP detection, customizing billing and shipping sections, etc. Analytical reports demonstrate general and detailed (per form) checkout abandonment stats.
Compatibility: Magento Open Source 2.3.X- 2.4.X, Magento Commerce 2.3.X- 2.4.X
Thank you for choosing Aheadworks!
Installing M2 One Step Checkout
| Command Line Installation | Composer Installation |
|---|---|
1. Backup your web directory and store database; 2. Download the One Step Checkout installation package; 3. Upload the contents of the One Step Checkout installation package to your store root directory; 4. Navigate to your store root folder in the SSH console of your server: cd path_to_the_store_root_folder run the following command: php -f bin/magento module:enable Aheadworks_OneStepCheckout then: php -f bin/magento setup:upgrade after: php -f bin/magento setup:static-content:deploy 5. Flush the store cache; log out from the backend and log in again. Make sure the installation is done from the FTP Administrator account. Otherwise, set 775 permissions to the store root directory after the extension is deployed. | If you are installing an extension from Aheadworks for the first time, you need to add our composer repository to your Magento store: 1. Login to your ssh console and navigate to your store folder:
cd path_to_the_store_root_folder
Run the following command: composer config repositories.aheadworks composer https://dist.aheadworks.com/ On successful execution of the command you will be able to use the composer to install the extensions. To install the extension: 2. Login to your ssh console and navigate to your store folder:
cd path_to_the_store_root_folder
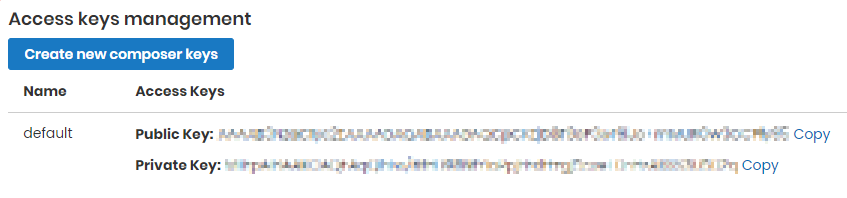
3. Run the following command to install the latest version of the extension: composer require aheadworks/module-onestepcheckout if you need to install a specific version, run this command: composer require aheadworks/module-onestepcheckout:<version> Specify the version of the extension in <version> When prompted, enter Public Key (Username) and Private Key (Password): 4. Enable the extension: php -f bin/magento module:enable Aheadworks_OneStepCheckout Next, register the extension: bin/magento setup:upgrade Recompile your Magento store if you are in the Production mode: bin/magento setup:di:compile To verify that the extension is enabled, run this command: bin/magento module:status Clean store cache, by running the following command: bin/magento cache:clean Log out and Log in the backend again. To upgrade the extension: 5. To update or upgrade an extension: Download the updated extension file. Take note of the module-name and version. Export the contents to your Magento root. If a composer package exists for the extension, run one of the following. Update per module name: composer update aheadworks/module-onestepcheckout Updater per version: composer require aheadworks/module-onestepcheckout:<version> Run the following commands to upgrade, deploy, and clean the cache. php bin/magento setup:upgrade --keep-generated
php bin/magento setup:static-content:deploy
php bin/magento cache:clean
|
.png?version=1&modificationDate=1613401999884&cacheVersion=1&api=v2&width=450&height=83)
Introducing M2 Smart One Step Checkout
The Magento 2 Smart One Step Checkout extension converts the native multi-step checkout page into the single-step one with all the required options at a customer's hand. Moreover, it introduces the following powerful features:
- Best checkout practices;
- Advanced built-in analytics;
- Flexible checkout settings;
- Form auto completion and default values;
- Delivery date and notice fields.
Extension Logic
Once installed, the module replaces the native Magento checkout with a full-fledged single-step checkout page. There, the customer can find all the required options: login, payment and shipping info, etc. Moreover, the page enhances customer experience with field auto-completion, country IP auto detection, Google form auto-completion, and other features. An admin, in turn, can rename and rearrange checkout fields at their convenience.
To cover all aspects of the checkout process and provide a store owner with a constant possibility to improve, the extension comes with a set of checkout progression reports. The reports show overall and detailed checkout abandonment stats (checkout field completion rates) for quick and meaningful checkout page adjustments.
What's new?
The latest versions of the extension (1.6.0 and 1.7.0) feature integration with the NMI Payment module and further optimized code which allows for fewer requests on page load and thereby ensures faster and more stable operation. There has been solved the issue of page freezing on adding over 150 products to cart. Furthermore, admins are now able to disable/enable reporting on checkout performance, should they opt for a system outside our module. Finally, to enhance user experience on the backend side, all Shipping and Billing fields are now dragable.
Getting Around
The one-step checkout page introduced by the extension provides all the necessary functionality in one place.
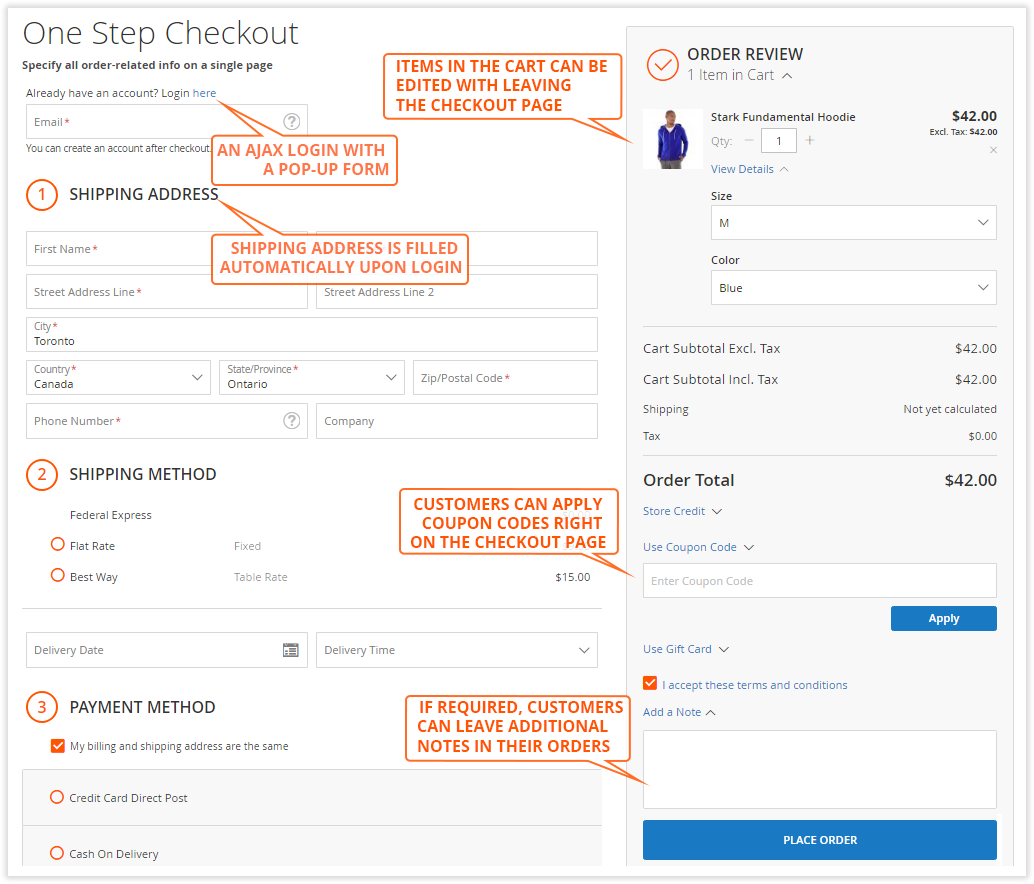
The extension is designed in a way to minimize the number of customers leaving the checkout page. Let's take a closer look at it.
Login and Shipping Address
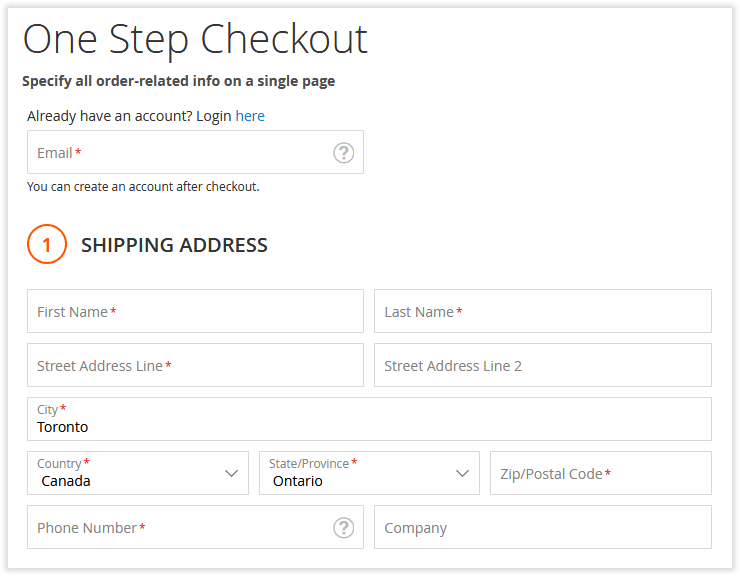
The first checkout block offers customers to log in and fill in the information about their shipping address.
Customers are suggested to enter an email address. If there is already an account at the store with such email, the system will recognize it and provide the appropriate suggestions.
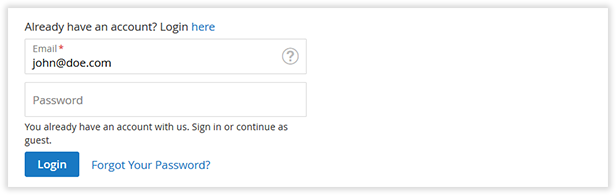
Additionally, customers can click the 'Login here' active link to log in manually. Whenever the link is clicked, customers will see a pop-up window suggesting them to enter their login data.
Shipping Address
Below the login and registration fields, you can see the 'Shipping Address' block. With every field, all the entered information is cached within the session. This way, if unexpected page reloads take place, all the already submitted info will be saved.
Shipping Method
Next, customers are presented with the 'Shipping Method' block.

Here customers can choose the preferred shipping method and define a delivery date and time (if allowed by the extension settings).
The 'Delivery Date' and 'Delivery Time' options are flexible and set in the admin area. Any dates and time intervals can be specified depending on the delivery options available.
Preferred delivery date and time are displayed on the order details page.
Payment Method
Next comes the 'Payment Method' block.
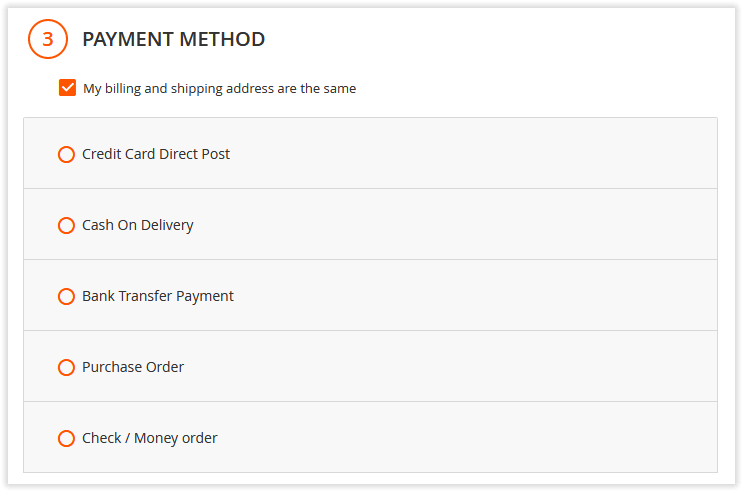
Here customers are suggested to specify the preferred payment method and billing address if it doesn't correspond to the shipping address.
Depending on the selected payment method, customers will be either suggested to fill in the required fields or redirected to the payment method side. This solely depends on the configuration and peculiarities of the chosen payment method.
Order Review
On the right side of the checkout page, customers are presented with the 'Order Review' block.
The block provides an overview of all the products added to the cart. Here, customers can remove products, change product quantity, and apply discount codes. Whenever the product quantity is adjusted or the product is removed from cart, the order total is adjusted automatically without page reloading.
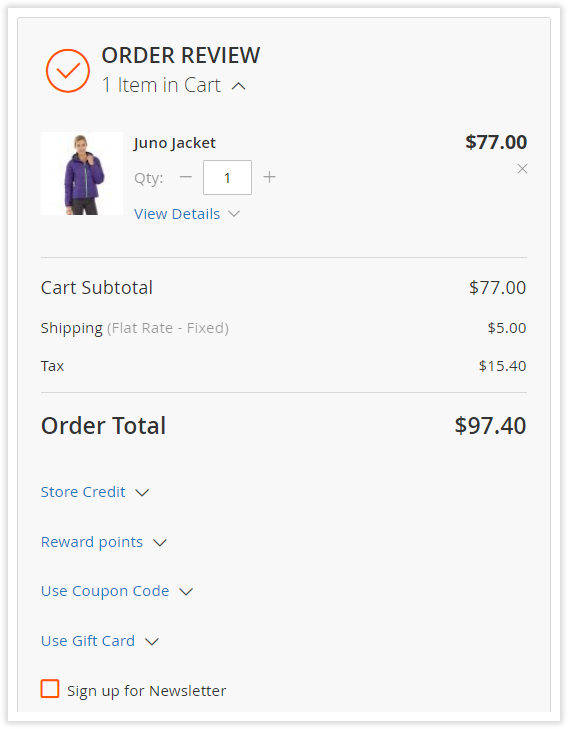
Know your customers! Should they be eager to place orders with 150+ products, limit the number of items featuring in the Overview section to prevent page freezing. To do so, go to Stores → Configuration → Sales → Checkout → Maximum Number of Items to Display in Order Summary, enable the field and indicate the value.
Supported Payment Options
Smart One Step Checkout is integrated with several Aheadworks extensions, including Payment Restrictions, Shipping Restrictions, Store Credit and Refund, Gift Card, and Reward Points.
Further to the above, the extension supports a few payment methods and payment gateways: B2B Company Credit, NET.30, Authorize.net, Bambora APAC, NMI, PayPal via Braintree, PayPal Payflow, Amazon Pay, Affirm and Klarna.
Authorize.net
The extension is compatible with new Authorize.Net payment method that has been added to M2.3.1 instead of Authorize.Net Direct Post (Deprecated).
When using Authorize.net, make sure each customer profile is set up to include up to 10 payment profiles and up to 100 shipping profiles (this is an official restriction by Authorize.net).
Amazon Pay
We added integration with Amazon Pay, meaning that you can easily register and login to your Magento website and complete checkout using the information and payment methods stored in your Amazon accounts.
Bambora APAC
Bambora payment support is possible with a standalone module Bambora APAC, available for purchase on the Aheadworks store.
NMI
NMI payment support is possible with a standalone module NMI Payment available on the Aheadworks store.
On Credit Payment
The On-Credit payment support is possible with a standalone module B2B Company Credit available on the Aheadworks store.
NET 30 Deferred Payment
Deferred payment (NET 30) support is possible with a standalone module NET 30 available on the Aheadworks store.
PayPal
Should you be planning to enable Paypal via Braintree, make sure you install the official Braintree module developed by Gene Commerce.
Since January 1, 2017, the PayPal In-context Checkout method has become obsolete. PayPal continues to support the merchants who began using this method prior to that date. Please note that new features and enhancements will not be applied to these integrations:
https://developer.paypal.com/docs/classic/express-checkout/in-context/enable_in_context_checkout/.
Klarna
We added integration with Klarna payment method, which means that you can register and login to your Magento website and complete checkout using Klarna.
To configure payment methods to be available at checkout, please refer to Stores > Settings > Configuration > Sales > Payment Methods. The official Magento 2 guide will be of help here. To extend the native Magento 2 functionality and specify payment methods to be available at checkout to selected groups of customers install the Payment Restrictions module (extra fee may apply).
Adding Notes and Placing an Order
The last block of the one-step checkout page is the field for notes.
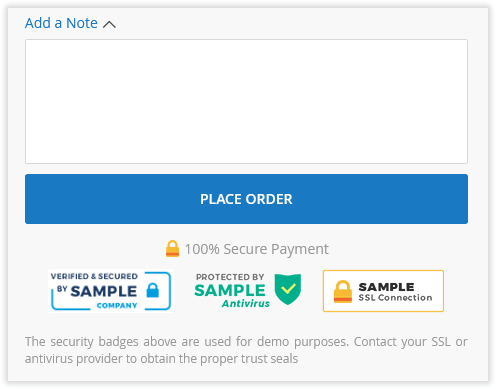
Here customers can leave any note to the admin that will be available on the order details page. Additionally, the admin can upload trust seals of the payment methods available and specify a secure payment label. In the above image, you can see the uploaded official PayPal trust seal and the '100% Secure Payment' secure payment label specified.
Extension Settings
The extension settings page can be found under Stores > Configuration > AHEADWORKS EXTENSIONS > One Step Checkout. On this page, you can control the overall extension behavior, adjust checkout field names, display order, upload trust seals, and more!
General Settings
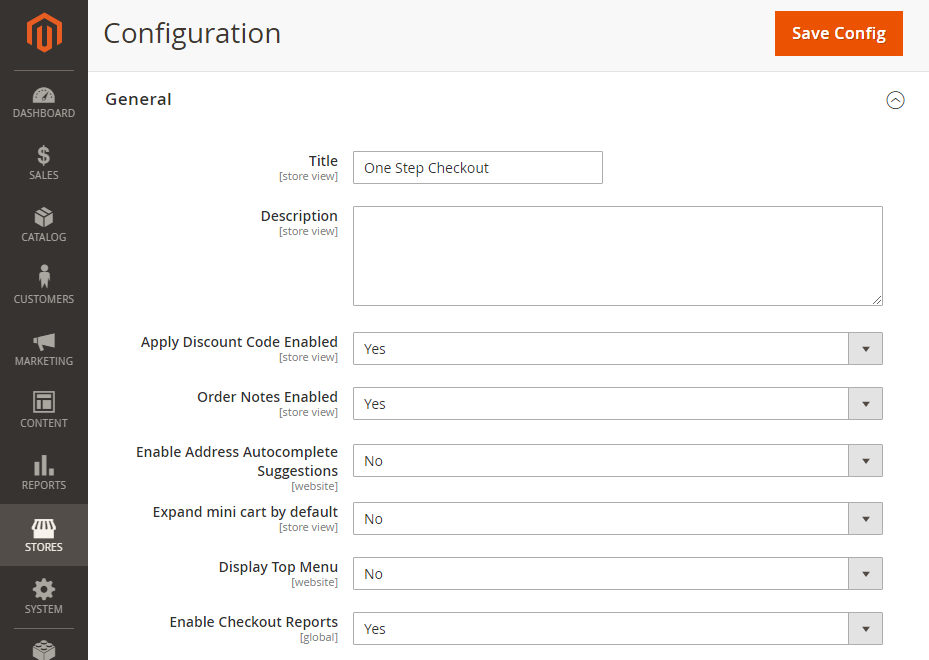
The 'General' section comes with the following settings:
- Title - defines the title of the one step checkout page;
- Description - adds a message below the checkout page's title;
- Apply Discount Code Enabled - defines if customers can apply discount coupons right on the checkout page;
- Order Notes Enabled - defines if customers can leave notes to the admin. Order notes are available on the order details page;
Enable Address Autocomplete Suggestions - enables automated address suggestions provided by the Google Maps service;
Google API Key (available when 'Yes' in the above) - the Google Maps API key required to identify your store;
- Expand mini cart by default - sets the default layout for the mini cart;
- Display Top Menu - enables/disables the top menu of the store at checkout;
- Enable Checkout Reports - enables/disables reporting. When disabled, the report pages are unavailable from the menu.
Newsletter Subscription Option
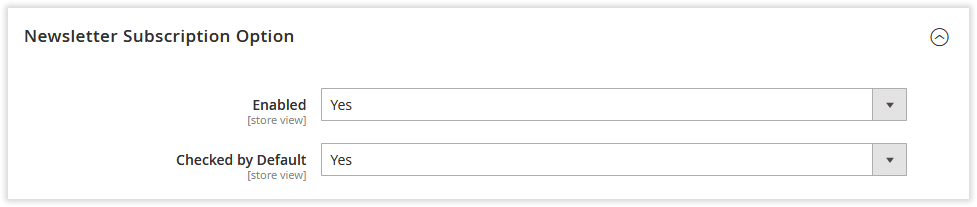
The 'Newsletter Subscription Option' block controls the behavior of the newsletter subscription field if it is available on the checkout page.
- Enabled - defines if customers can subscribe to the newsletter right from the checkout page;
- Checked by Default - defines if the subscribe to newsletter checkbox is checked by default.
Default Values
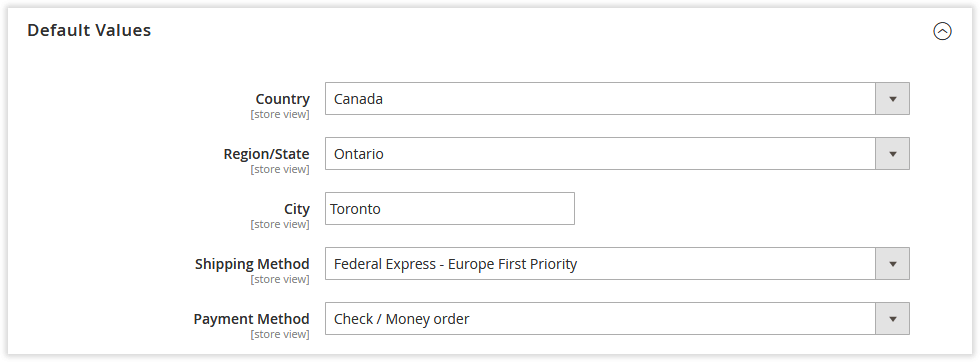
The 'Default Values' section controls whether particular fields have predefined values. Helpful for the stores that mostly ship the goods to a single country or work with a particular shipping or payment method company.
- Country - selects the predefined value for the country checkout field;
- Region/State - defines the default region/state;
- City - defines the default city;
- Shipping Method - specifies the default shipping method;
- Payment Method - defines the default payment method.
Delivery Date Options
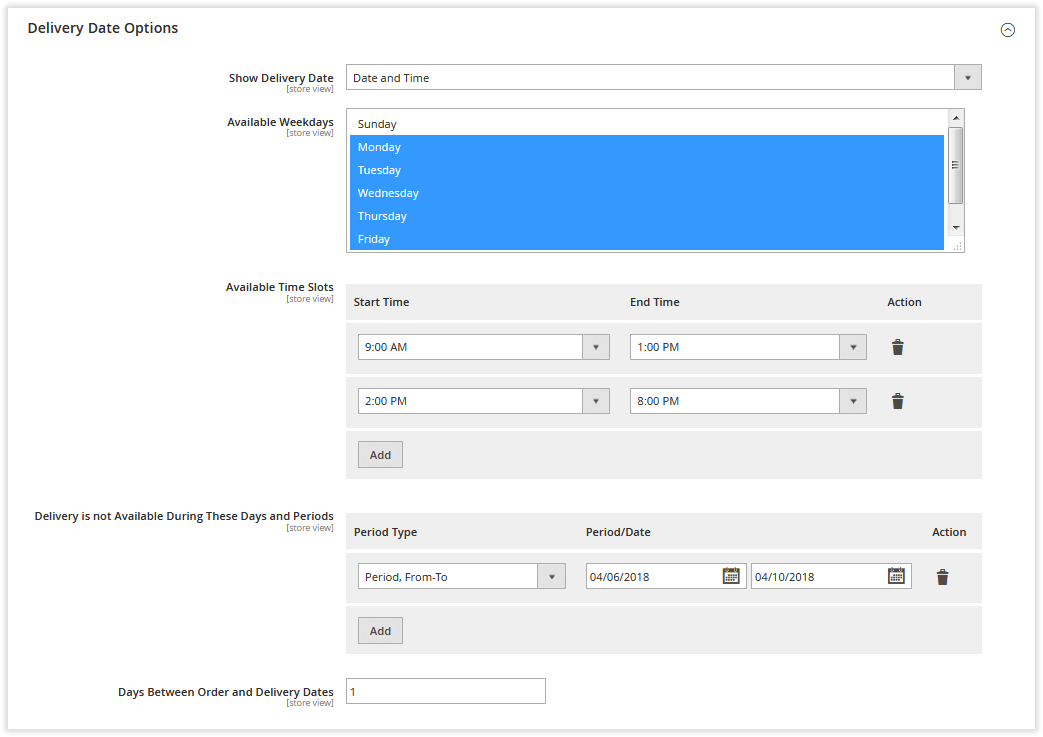
This configuration section defines the date and time slots available for order delivery and whether customers can specify a delivery date and time.
- Show Delivery Date - defines if the 'Delivery Date' and 'Delivery Time' fields are available on the checkout page;
- Available Weekdays - defines on which days of the week orders can be delivered to customers;
- Available Time Slots - defines on which time slots orders can be delivered to customers;
- Delivery is not Available During These Days and Periods - defines which time periods are excluded from the available delivery options;
- Days Between Order and Delivery Dates - defines the number of days from the order date when customers can start booking delivery.
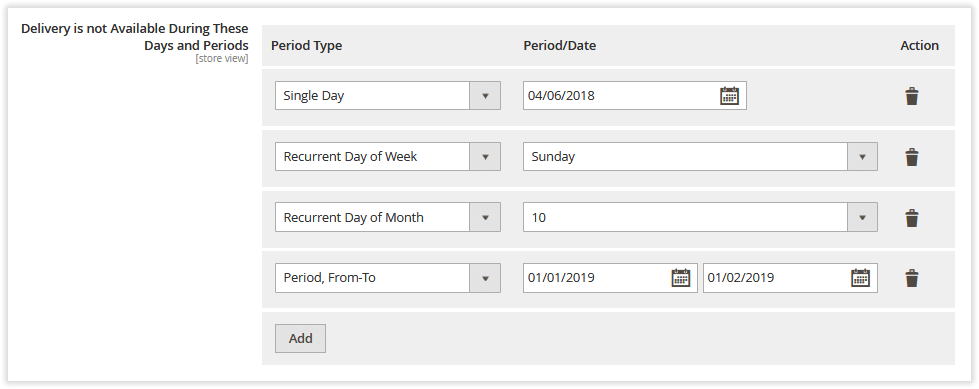
In the 'Delivery is not Available During These Days and Periods' section, you are presented with a set of available periods:
- Single Day - excludes a particular date from the delivery options (useful for national holidays);
- Recurrent Day of Week - excludes a particular day of the week from the delivery options (for example, if you don't deliver on weekends);
- Recurrent Day of Month - excludes a particular day of the month from the delivery options (for example, if you have to perform accounting);
- Period, From-To - excludes a particular period from the delivery options (for example, your best delivery-guy went on vacation).
You can combine these periods and dates by clicking the 'Add' button .
To display delivery dates in order confirmation emails, you need to manually insert the following Magento 2 variables into the template:
- Order Delivery Date;
- Order Delivery Time.
Shipping and Billing Field Customization
With these two configuration sections, you can rearrange fields in the shipping and billing address blocks, mark fields as Mandatory, and furthermore, rename fields.
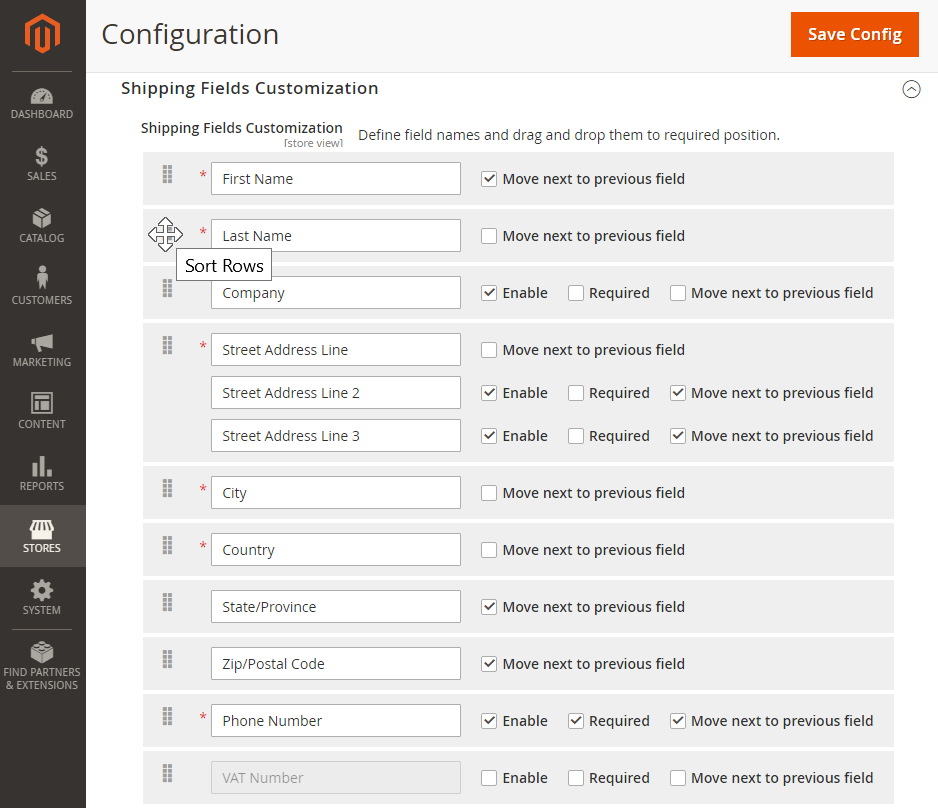
Some of the shipping and billing address fields cannot be disabled because most of the payment methods require them present and will not process payments that lack customer information. This is done to avoid conflicts with payment processors.
Almost every field of this section can be either enabled or set as required. Required fields are mandatory, customers will not be able to complete checkout leaving them blank. Use the correspondent check-box to enable/disable fields.
To rearrange the field blocks on the checkout page, use the mouse to drag & drop them. Arrange the fields in an ordered layout with the Move next to previous field option.
Trust Seals Block
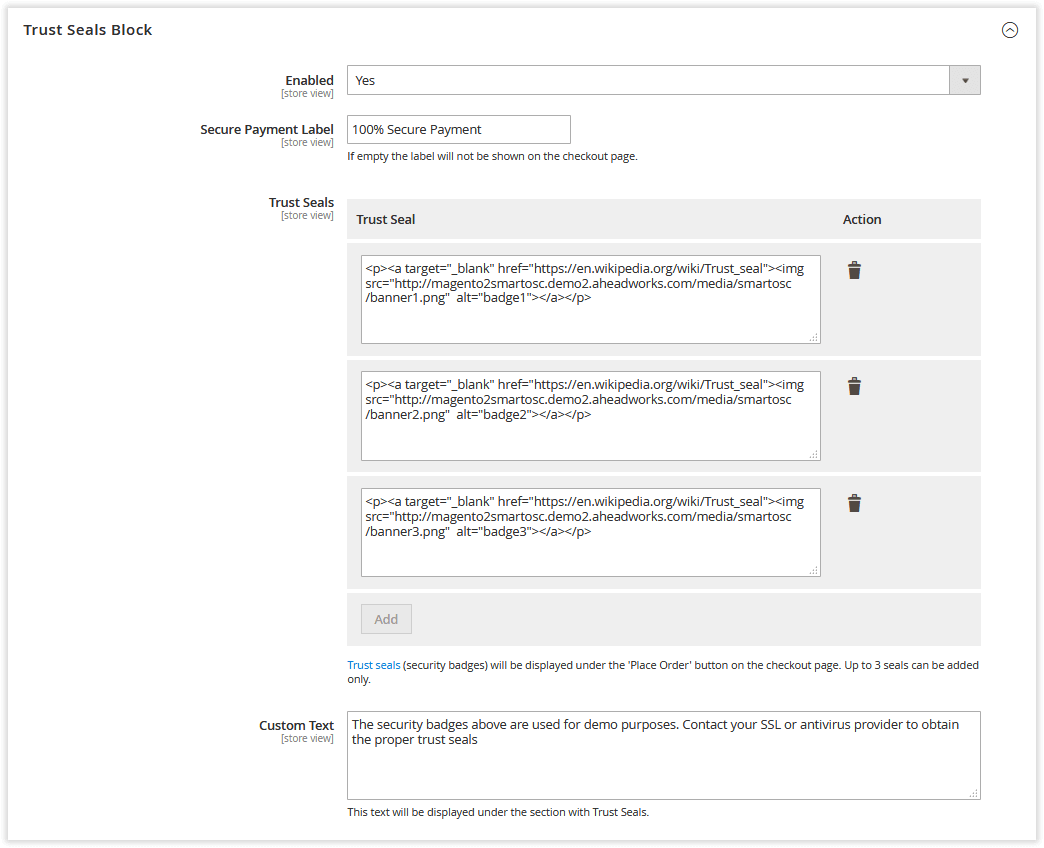
With the 'Trust Seals Block' setting section, you can upload the security badges provided by payment processors.
- Enabled - defines if the trust seals displayed below the dropdown.
- Secure Payment Label - defines the wording that anticipates the trust seals
- Trust Seals - uploads trust seals to the checkout page.
- Custom Text - the additional text block to be displayed below the uploaded trust seals. Most of the payment processors offer a couple of lines of code to insert trust seals into the page. You can upload multiple seals by clicking
 ;
;
Trust seals might be useful for introducing new payment methods and gaining customers' trust.
JS is not supported.
GeoIP Settings
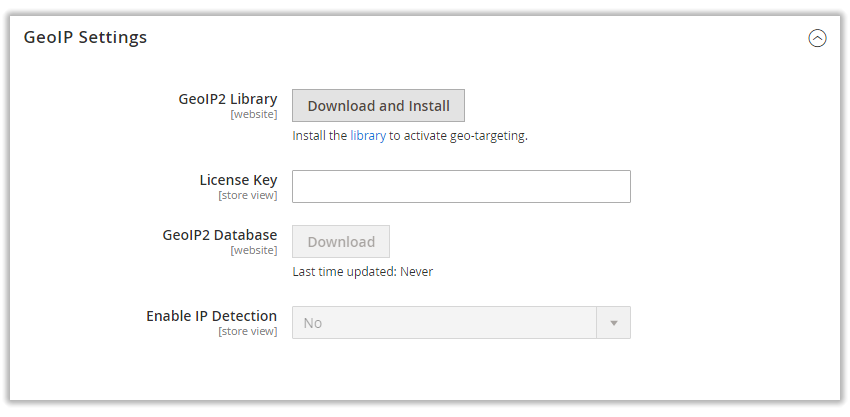
The 'GeoIP Settings' section provides you with the address detection by IP functionality.
GeoIP2 Library - downloads and installs the GeoIP2 library;
- License Key - your license key to the GeoIP solution in use;
GeoIP2 Database - downloads or updates the existing GeoIP2 database;
Enable IP Detection - enables the functionality if the GeoIP library is installed.
If specified, the 'Default Country' option has a higher priority over the above functionality.
How can I get a License Key?
Expand the text below for sample guidance on retrieving a license key from the MaxMind GeoIP solution.
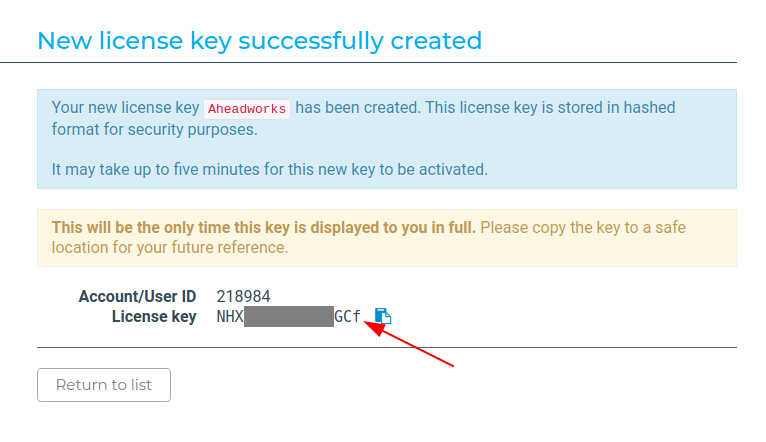
Follow the steps below to retrieve a license key from the MaxMind GeoIP solution:
- Start your account at https://www.maxmind.com/
- Log in and go to Account → Services → License Key
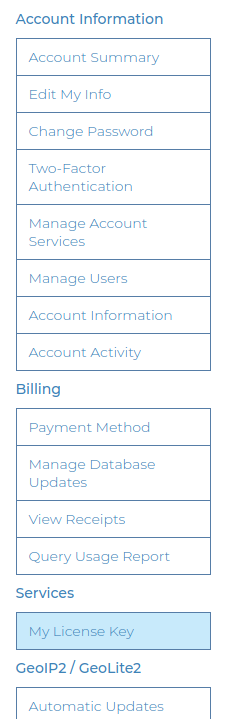
3. Click on Generate new licence key and complete the form
4. Click on the Confirm button
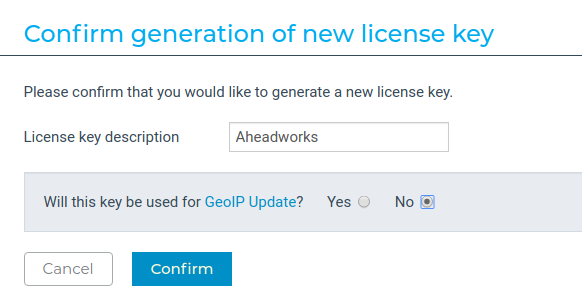
5. You can now copy-paste your license key
Checkout Performance Reports
The extension is the first extension on the market to offer a full range of checkout performance reports for meaningful checkout page layout adjustments.
The checkout performance reports can be found under Reports > One Step Checkout by Aheadworks.
Abandoned Checkout Statistics Report
The 'Abandoned Checkout Statistics' report shows the number of abandoned checkouts, the abandoned checkout revenue (the additional possible revenue), the number of orders, the order revenue, and checkout conversion rates for the set period.
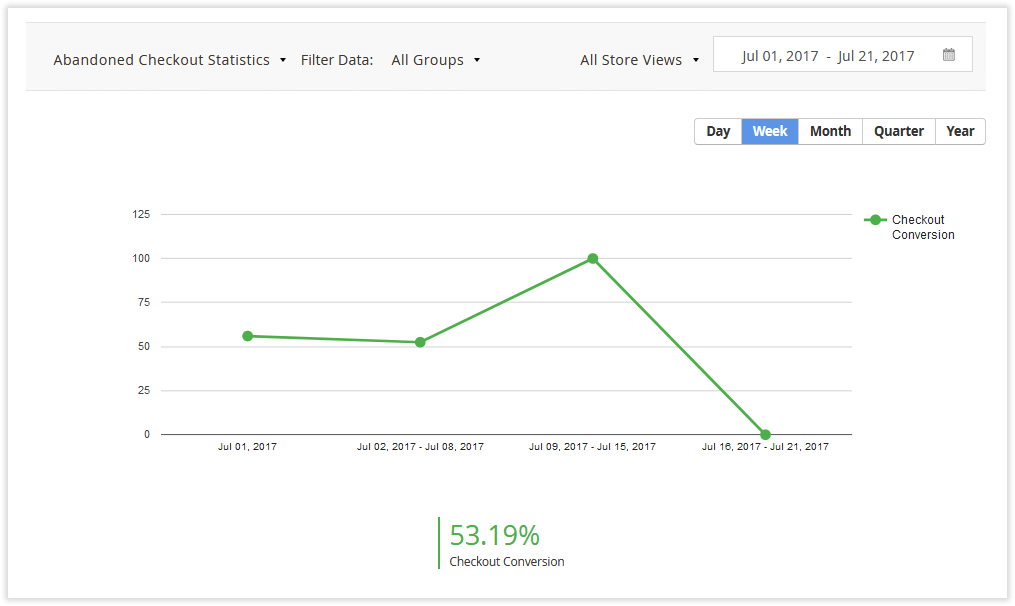
For simple segmentation, the reports come with filtering options. Those include the store view and customer group filters.
The date range can be selected in the flexible calendar:
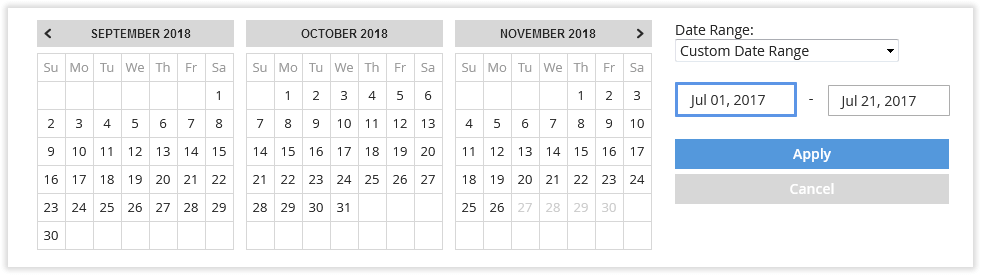
In the provided calendar, you can specify any date or date range either by clicking the required dates or indicating the interval manually. Once the date has been selected, click 'Apply' to refresh the report page.
Below the checkout conversion chart, you can see the reporting table and chart providing an abandoned checkout overview.
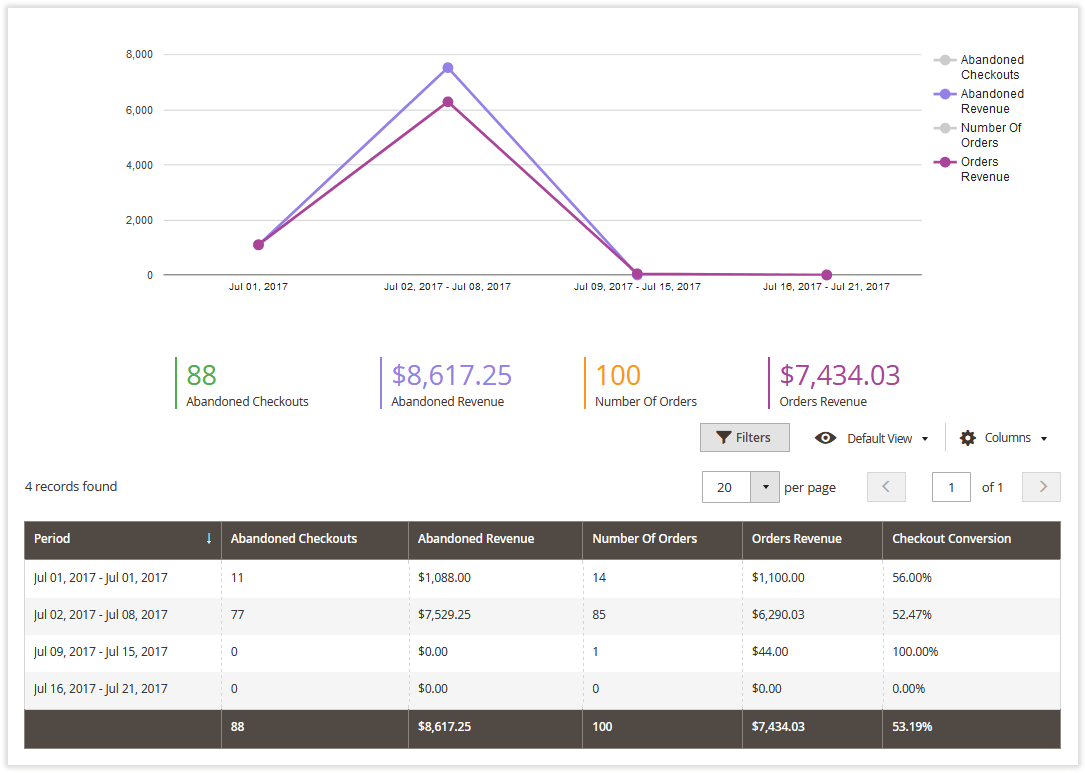
You can also define which values should be displayed in the chart.
Checkout Behavior Report
The Checkout Behavior Report provides you with the per-field statistics of the checkout page's performance. Thus, you can make the appropriate changes to the checkout page depending on how well particular fields perform in terms of conversion rates.

Tips and Tricks
Custom Email Variable
The Smart One Step Checkout extension comes with a single custom email variable:
{{var order.getAwOrderNote()}}
The variable inserts the notice a customer left for an order into a notification email.
We added the compatibility with the themes that do not support LESS compilation. To enable the compatibility, you need to find the following lines in the app / code / Aheadworks / OneStepCheckout / view / frontend / layout / onestepcheckout_index_index.xml file:
<head>
        <!-- Uncomment to enable compatibility with themes that do not support LESS compilation -->
        <!-- <css src="Aheadworks_OneStepCheckout::css/aw_osc_styles.css"/> -->
</head>
and change them to:
<head>
        <!-- Uncomment to enable compatibility with themes that do not support LESS compilation -->
        <css src="Aheadworks_OneStepCheckout::css/aw_osc_styles.css"/>
</head>
Uninstalling M2 One Step Checkout
Manual Removal
1. Disable the module by executing the following commands:
php bin/magento module:disable Aheadworks_OneStepCheckout
php bin/magento setup:upgrade
2. Remove the extension files from the following folder:
app/code/Aheadworks/OneStepCheckout
Automatic Removal (via Composer)
1. Disable the module by executing the following commands:
php bin/magento module:uninstall Aheadworks_OneStepCheckout
Need Customization?
.png?version=1&modificationDate=1559827932545&cacheVersion=1&api=v2)
You can always find the latest version of the software, full documentation, demos, screenshots, and reviews on http://aheadworks.com
License agreement: https://aheadworks.com/end-user-license-agreement
Contact Us: https://aheadworks.com/contact
Copyright © 2021 Aheadworks Co. http://www.aheadworks.com