...
...
...
...
...
...
...
...
...
| width | 50% |
|---|
| Table of Contents |
|---|
| Warning |
|---|
Firefox user notice: Please use another web browser to view this document. Sorry for the inconvenience. |
...
| width | 30% |
|---|

Magento 2 B2B Company Credit helps encourage sales by offering credit as a payment method to the customers you trust. With the present extension admins are able to enable paying on credit to selected customers and groups of customers, stipulating essential credit controls like the maximum sum of purchase and etc. Furthermore, they are able to set the limit of the credit, and later track and manage the credit balance of the customer. Admins set credit limits in the base currency, and customers see them in the currency of their store view. Thus the module allows for automatic conversion of currencies. Finally, Company Credit supports automatic email notifications on various operations with the given credit.
The module integrates with Aheadworks M2 Company Accounts, Payment Restrictions, and One Step Checkout.
Compatibility: Magento Open Source 2.3.X - 2.4.X, Magento Commerce 2.3.X - 2.4.X
Thank you for choosing Aheadworks!
Installing Magento 2 Company Credit
...
| Panel | ||||
|---|---|---|---|---|
| ||||
1. Backup your web directory and store database |
| Panel | ||||
|---|---|---|---|---|
| ||||
2. Download the Company Credit installation package |
| Panel | ||||
|---|---|---|---|---|
| ||||
3. Upload contents of the Company Credit installation package to your store root directory |
...
| borderWidth | 2px |
|---|---|
| borderStyle | solid |
4. In SSH console of your server navigate to your store root folder:
| No Format |
|---|
cd path_to_the_store_root_folder |
run:
| No Format |
|---|
php -f bin/magento module:enable Aheadworks_CreditLimit |
then:
| No Format |
|---|
php -f bin/magento setup:upgrade |
after:
| No Format |
|---|
php -f bin/magento setup:static-content:deploy |
| Panel | ||||
|---|---|---|---|---|
| ||||
5. Flush store cache; log out from the backend and log in again |
| Note |
|---|
Make sure the installation is done from the FTP administrator account. Otherwise, set 775 permissions to the store root directory after the extension is deployed. |
...
| width | 50% |
|---|
...
| borderWidth | 2px |
|---|---|
| borderStyle | solid |
If you are installing an extension from Aheadworks for the first time, you need to add our composer repository to your Magento store:
| Panel | ||||||||||||||
|---|---|---|---|---|---|---|---|---|---|---|---|---|---|---|
| ||||||||||||||
1. Login to your ssh console and navigate to your store folder:
Run the following command:
On successful execution of the command you will be able to use the composer to install the extensions. |
...
| borderWidth | 2px |
|---|---|
| borderStyle | solid |
To install the extension:
2. Login to your ssh console and navigate to your store folder:
| Panel | ||||
|---|---|---|---|---|
| ||||
| cd path_to_the_store_root_folder |
...
| borderWidth | 2px |
|---|---|
| borderStyle | solid |
3. Run the following command to install the latest version of the extension:
| Panel | ||||
|---|---|---|---|---|
| ||||
composer require aheadworks/module-credit-limit |
if you need to install a specific version, run this command:
| Panel | ||||
|---|---|---|---|---|
| ||||
composer require aheadworks/module-credit-limit:<version> |
| Tip |
|---|
Specify the version of the extension in <version> |
| Panel | ||||
|---|---|---|---|---|
| ||||
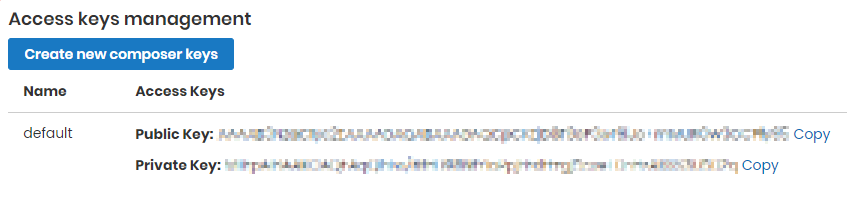
When prompted, enter Public Key (Username) and Private Key (Password): |

| Note |
|---|
Both Public Key (Username) and Private Key (Password) can be found in My Projects and Licenses in your personal account on our site:
|
| Panel | |||||||||||||||||||||||||||||||||||
|---|---|---|---|---|---|---|---|---|---|---|---|---|---|---|---|---|---|---|---|---|---|---|---|---|---|---|---|---|---|---|---|---|---|---|---|
| |||||||||||||||||||||||||||||||||||
4. Enable the extension:
Next, register the extension:
Recompile your Magento store if you are in the Production mode:
To verify that the extension is enabled, run this command:
Clean store cache, by running the following command:
Log out and Log in the backend again. |
...
| borderWidth | 2px |
|---|---|
| borderStyle | solid |
To upgrade the extension:
5. To update or upgrade an extension:
Download the updated extension file. Take note of the module-name and version. Export the contents to your Magento root.
If a composer package exists for the extension, run one of the following.
| Code Block | ||
|---|---|---|
| ||
composer update aheadworks/module-credit-limit |
| Code Block | ||
|---|---|---|
| ||
composer require aheadworks/module-credit-limit:<version> |
Run the following commands to upgrade, deploy, and clean the cache.
| Panel | ||||
|---|---|---|---|---|
| ||||
php bin/magento setup:upgrade --keep-generated php bin/magento setup:static-content:deploy php bin/magento cache:clean |
Set up cron
...
| width | 50% |
|---|
If you have already configured cron jobs for your Magento installation then you can skip this step. Read the following instructions on setting cron job for your Magento store: Magento user guide.
Generally, it would be enough to run in SSH console of your server:
| Code Block | ||
|---|---|---|
| ||
crontab -e |
And insert the following line:
| Code Block |
|---|
*/3 * * * * php -c <ini-file-path> <your Magento install dir>/bin/magento cron:run
*/3 * * * * php -c <ini-file-path> <your Magento install dir>/update/cron.php
*/3 * * * * php -c <ini-file-path> <your Magento install dir>/bin/magento setup:cron:run |
Remember to confirm the Save request when exiting the installation.
Introducing the Magento 2 Company Credit extension
| Section |
|---|
B2B Company Credit for Magento 2 is a module to specify credit limit and offer credit as a payment method to selected customers, due management of customers' credit histories provided. Features and Highlights:
Business valueAheadworks B2B Company Credit extension for Magento 2 facilitates ooffering credit to encourage customers to speed up and increase the amount of their spending. Company Credit for Magento 2 allows individual and bulk offers to customers, groups and even companies they represent. The module helps tackle potential risks in offering credit by arranging accurate records of credit history and enabling updates to the limits and balances when need be. Selling on credit you state the stability of your business and stand up against the competition. |
Configuring Magento 2 Company Credit
| Section |
|---|
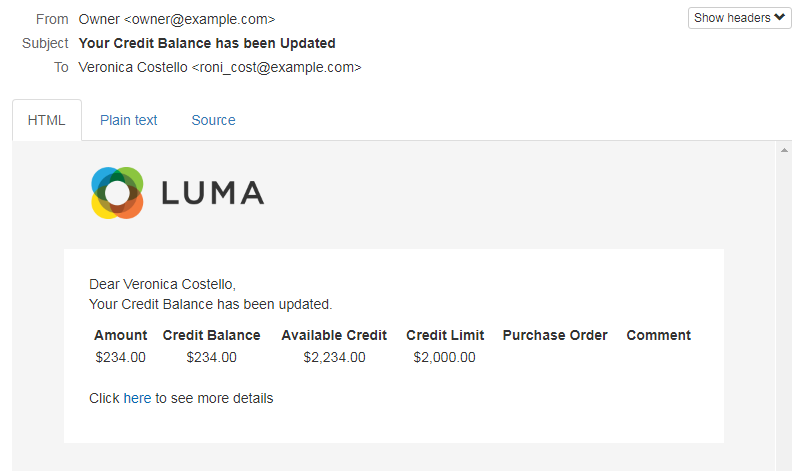
To configure the extension follow Stores > Configuration > Aheadworks Extensions > Credit Limit. The page suggests setting up three parameters of email notifications to keep customers updated on changes to their credit balance. The parameters come as follows:
A reminder on an update to a credit balance may look as follows:
In the given example (default template) the text of the email contains an active link to take the customer to the My Account area on the storefront of the shop. |

On Backend
...
Enabling Credit Payment
To start working with the extension enable credit as a payment method in Stores > Configuration > Sales > Payment Methods. Find the Aheadworks Credit Limit payment method in the given list and unfold the section for configuration.
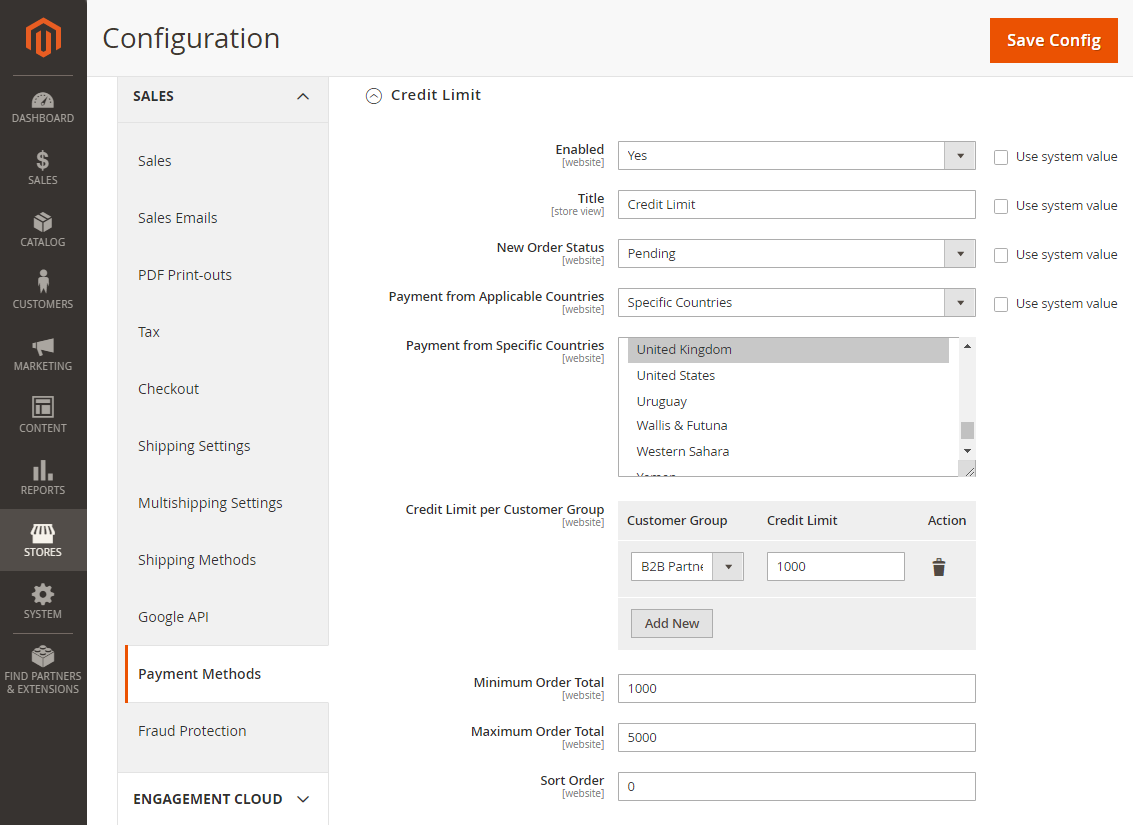
The section suggests setting up the following parameters:
- Enabled - a Yes/No folding list to enable or disable Credit Limit as a payment method in the store ('No' by default).
- Title - the name of the payment method ('Credit Limit' by default);
- New Order Status - the status of a new order when placed with the Credit Limit payment method ('Pending' by default);
- Payment from Applicable Countries - a folding list to suggest specification of the payment method to selected countries (enables the list of countries below) or all countries (by default);
- Payment from Specific Countries - a list of countries available for specification of the payment method (disabled by default);
| Info |
|---|
Untick the Use System Value checkbox to the right of the fields above to change the default values. |
- Credit Limit per Customer Group - specify a credit limit: select a customer group, indicate the limit (in the base currency), click the Add New button to add another customer group and specify the limit for it. Clicking on the bucket icon will delete the credit limit entry;
- Minimum Order Total - indicate the minimum order total for customers to be eligible for the Credit Limit in the list of payment methods at checkout;
- Maximum Order Total - indicate the maximum order total for customers to be eligible for the Credit Limit in the list of payment methods at checkout;
- Sort Order - the whole numeric to tell the order of the Credit Limit in the list of payment methods at checkout.
| Info |
|---|
The amount of the credit limit set for a customer group will automatically be assigned to all customers within the group. |
...
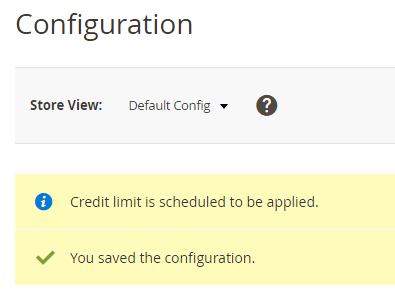
Once finished, click on the Save Config button at the top of the page to finalize the configuration. Though the newly configured parameters will be saved, the updates will come into force only on next scheduled cron update. A corresponding message will appear to notify on thereof.
...
Use the following command in the command line to run cron, should you not want to wait for the scheduled update.
| Code Block |
|---|
bin/magento cron:run |
Credit for Individual Customers
To assign/adjust a credit limit to a customer, go to Customers > All Customers, find the customer in the grid and click Edit to proceed to the Edit Customer page. This is where the Credit Limit tab will appear available in the Customer Information block.
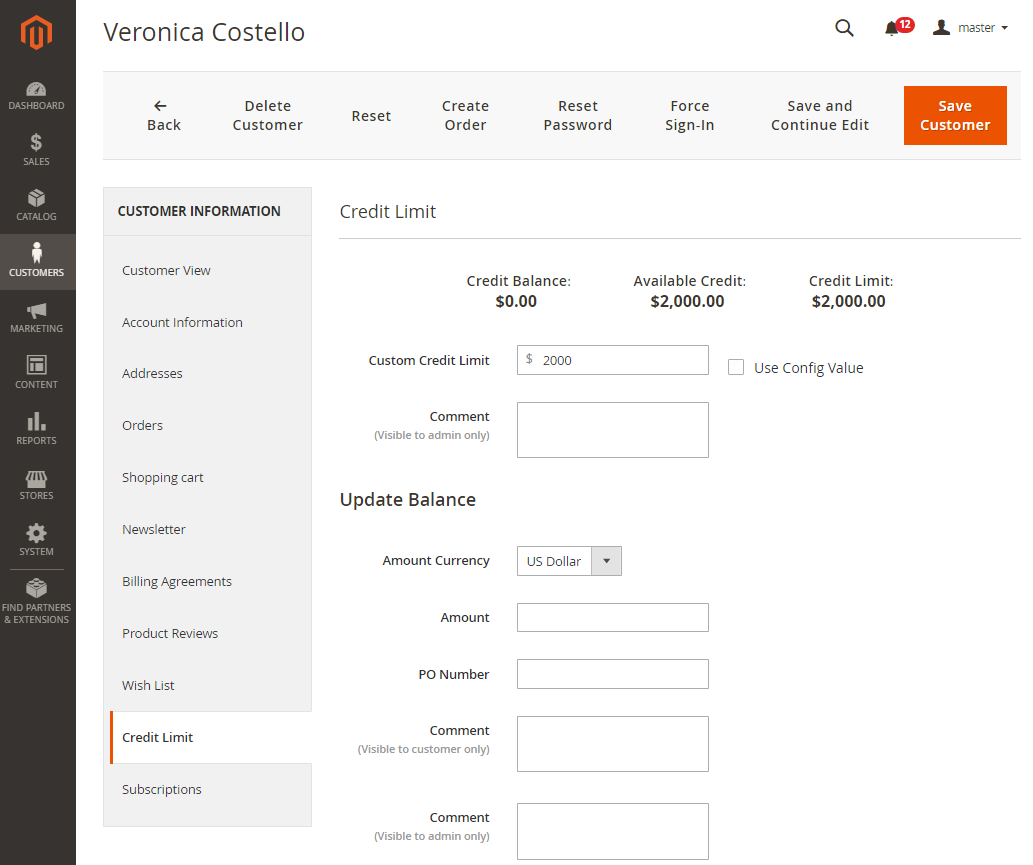
The tab will feature three sections in the following fashion:
- Credit Limit - the amount of money that is set as the maximum for the customer to pay for a purchase on credit;
- Credit Balance - the amount of money the customer owes you (negative value) / you owe the customer (positive value) (= Available Credit - Credit Limit);
- Available Credit - the amount of money available for the customer to pay for a purchase on credit (= Credit Limit + Credit Balance);
- Custom Credit Limit - the text-field to contain the amount of credit limit set to the customer (disabled by default, containing the amount as set in Payment Configuration);
- Comment - the comment to support the credit limit (for example, a brief explanation of the changes to the default value) [disabled by default].
| Note |
|---|
The numbers herein are stated in the base currency of the store. |
| Tip |
|---|
To change the default value of the Credit Limit amount, untick the Use Config Value to the right of the Custom Credit Limit field, and type-in the new amount. This is when the Comment field gets enabled too. |
The Update Balance section is where you are able to make alterations to the customer's credit balance. This is where you account for the payback of the credit (when a bank transfer is received), amends or miscalculations.
- Amount Currency - the dropbox to select the currency (as per the enabled store views) of the customer - no need of conversion or recalculations!
- Amount to Add - the amount of money you wish to add to the given credit balance;
- PO Number - the number of the order this credit transaction will belong to;
- Comment - any comments to the transaction for either internal use or for the customer.
| Note |
|---|
Should there be a third-party accounting system integrated with your Magento 2 store, all updates to the credit amount made therein will be automatically copied to Magento via web API. Manual updates to the above fields will not be necessary then |
Scroll down to the Credit (Balance) History block. This is where you can browse the history of the credit transactions for the given customer. The incoming payments will be in green color, the outgoing - in red.
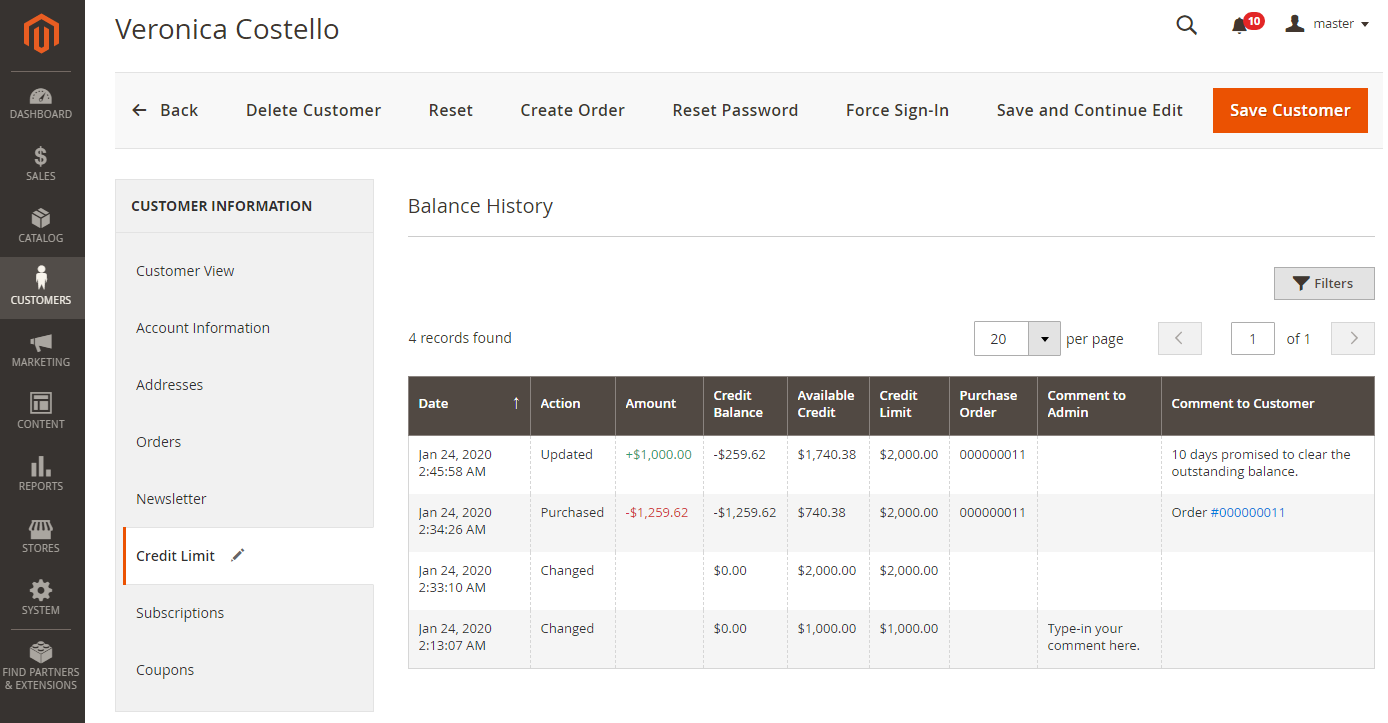
The history is aggregated into a grid, which supports pagination and filtering. The grid is made up of the following columns:
- Date - the date and time of the transaction;
- Action - the name of the transaction (Assigned, Changed, Purchased or Updated)
- Amount - the amount to be added or charged from your account as per a credit transaction (both in the base currency and in the currency of the customer);
- Credit balance - the amount of the credit balance (in base currency);
- Available credit - the amount of the credit available to the customer (in base currency);
- Credit Limit - the amount of the credit limit (in base currency);
- Purchase Order - the id of the order;
- Comment to Admin - the comment to the admin (visible only on the backend);
- Comment to Customer - the comment to the customer (visible on the frontend too).
| Info |
|---|
The comment to purchase on credit will automatically feature the number of the purchase order in the above grid. The order number here is an active link to the corresponding page in Orders. |
When the amendments are done, click the Save Customer button at the top of the page to save changes.
Credit for Companies
Should you have the Company Accounts module installed, the present extension will allow specifying credit limit to customer companies too.
Go to Customers > Companies and select a company from the grid. Click on the Edit active link in the Action cell and proceed to the Edit Company page. Scroll down the page to find the blocks to manage the credit. The layout and the functionality will be the same as above. The only difference is that the Balance History grid will have an extra field - Updated By to tell the company member/customer to perform the transaction.
We have separated the histories of credit transactions of companies and company members, when/if the latter were registered as individual customers in the store.
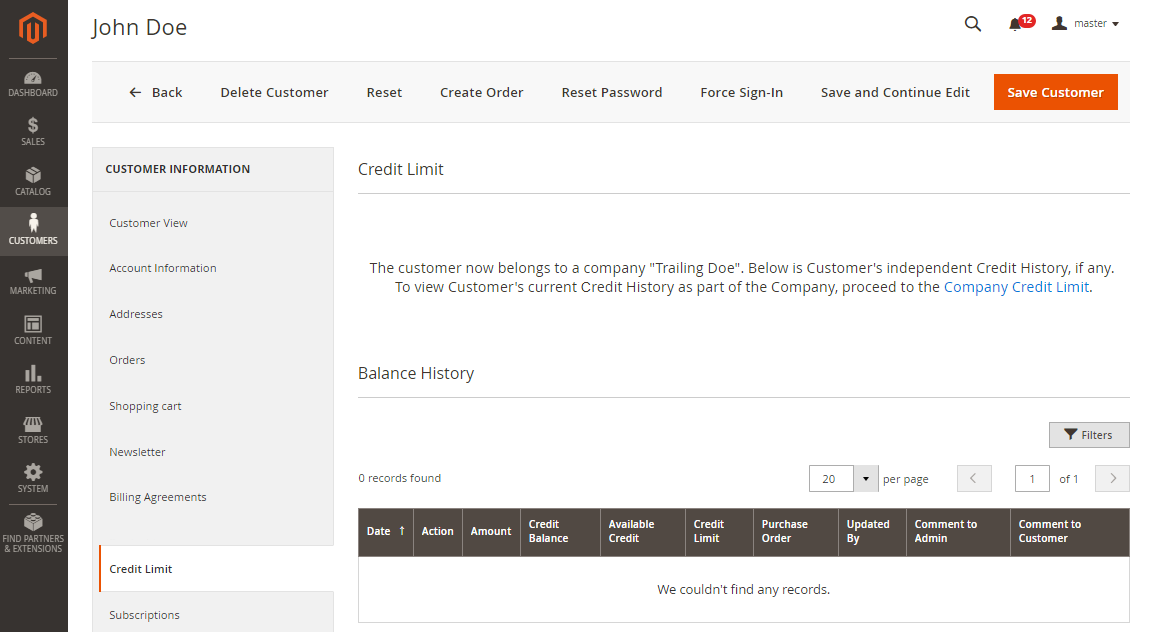
In the example above John Doe used to be registered as individual customer in the store. Later the person was moved to a company profile, and made the admin of thereof. All transactions made by John Doe now belong to the company the person represents. Though, John Doe had made no credit transactions before joining the company, we are able to see the above information in his Customer Profile, within the Credit Limit tab. The grid will feature individual transactions, if any. The Update Balance section will notify on the customers' belonging to a group and will suggest to proceed to the Company Profile page for details on current transactions of John Doe, as a part of the company.
Credit Summary Grid
To view the summary of the credit balances as per all eligible customers/companies, go to Sales > Credit Limit by Aheadworks > Credit Summary (Balances).
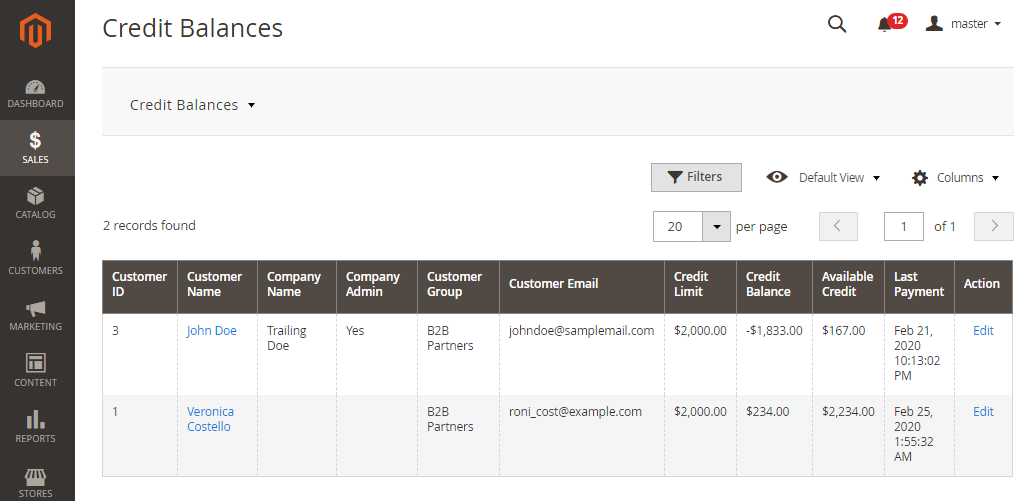
The page features a grid with the following columns:
- Customer ID - the identification number of the customer;
- Customer Name - the name of the customer (active link to the customer profile);
- Company Name - the name of the company;
- Company Admin - Yes/No to indicate if the customer is the admin of the company;
- Customer Group - the group the customer belongs to on the store;
- Customer Email - the email address of the customer;
- Credit limit - the amount of money (in the base currency) available to the customer for paying on credit;
- Credit Balance - the amount of money (in the base currency) the customer owes you (negative value) / you owe the customer (positive value);
- Available Credit - the amount of money (in the base currency) the customer is eligible to at checkout;
- Last Payment - the date and time of the most recent credit transaction;
- Action - the Edit active link to the Credit Limit tab within the Customer Profile page.
| Note |
|---|
Partial or full refunds (when done to orders on credit terms) proceeded via the Sales Operations functionality will not be displayed in the grid above. These data pertain to the Orders entity and will be available in the relevant grids in Sales. Thereby, Last Payment herein refers only to the most recent transaction involving a change in the credit balance of the Customer. |
On Frontend
...
At Checkout
The B2B Company Credit extension for Magento 2 lists payment on credit as a payment method at checkout. Customers are to meet the following criteria to see Credit Limit/Company Credit as payment method on the list:
- the method is enabled on the store,
- the method is assigned to the customer (group, company),
- the total price of the cart is between the Maximum and Minimum Order Totals.
Should the above criteria be met the Cart page will look as follows:
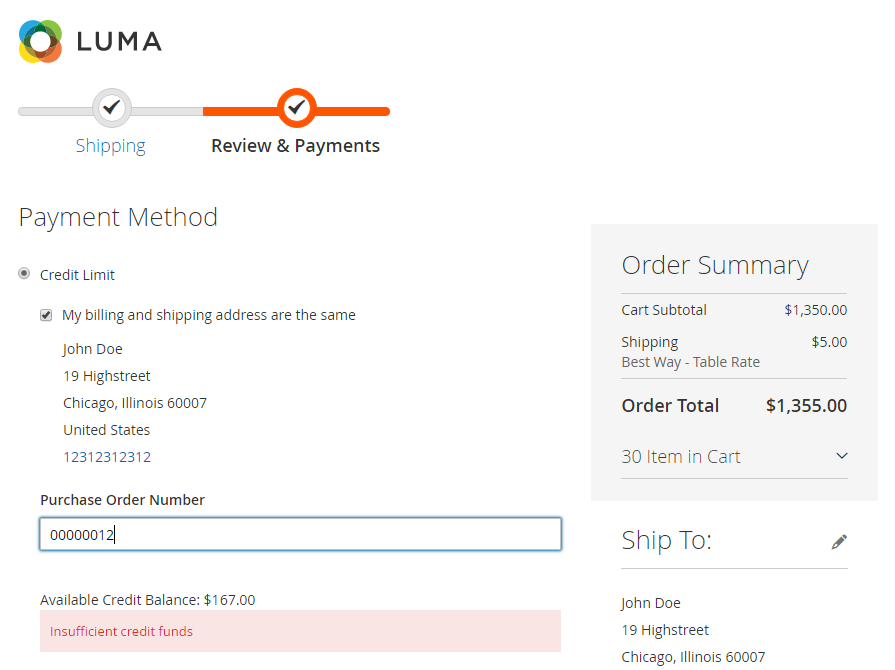
Picking up the Credit Limit (or whatever name was given to the method on the backend) the customer will be asked to type-in the number of the Order. This could be made up voluntary, though in agreement with the personal/company account documents and practices.
Below the Purchase Order Number field customers will be notified on the available credit. Should there be insufficient funds on the customer's credit, a corresponding message will indicate thereof.
Credit Transactions in Customer Profile
To view all credit transactions, customers proceed to their profile on the store Sign In > My Account > Credit Limit.
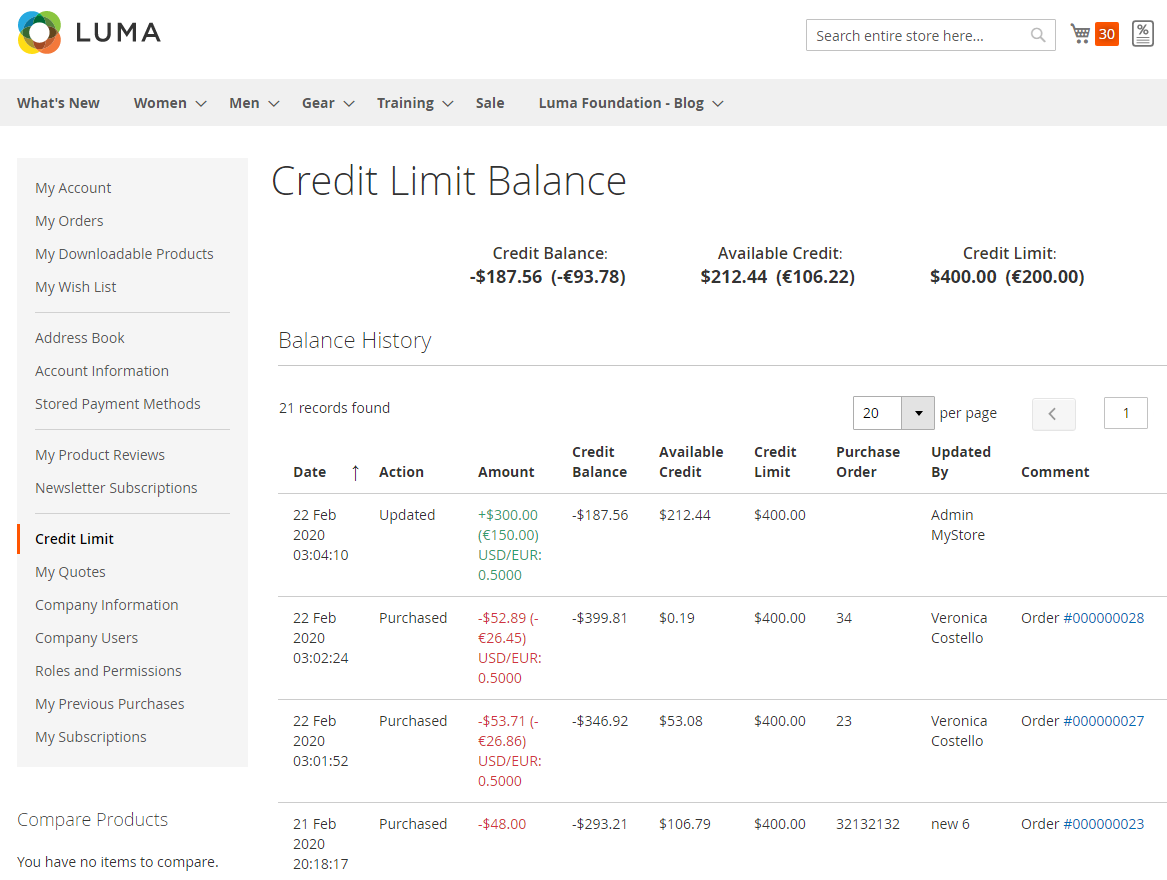
The page features a summary of the credit to estimate the balance of the credit, the credit sum available to the customer and the limit of the credit as set by the admin on the storefront.
Alongside the above, the page contains a grid to showcase the history of credit transactions of the customer. The grid supports pagination and sorting, and comes as a set of the following columns:
- Date - the date of the transaction;
- Action - the name of the transactions;
- Amount - the amount of the transaction (in the store base currency and in the customer store-view currency);
- Credit Balance - the amount of money the customer owes the store (when negative) / the store owes the customer (when positive);
- Available Credit - the amount of money (in the store base currency) available to the customer to purchase on credit at the time of the transaction;
- Credit Limit - the amount of money (in the store base currency) to indicate the limit of the credit as assigned to the customer by the admin on the backend;
- Purchase Order - the identification number of the purchase order as set by the customer on purchase;
- Updated By - the name of the customer/store admin to initiate the transaction;
- Comment - the comment the store admin left to the customer in support of the transaction.
| Info |
|---|
The comment to purchase on credit will automatically feature the number of the purchase order in the above grid. The number here is an active link to the corresponding page in My Orders. |
Integrations
...
Company Accounts
Install Company Accounts to enable credit limit specification to customer companies.
One Step Checkout
When One Step Checkout is installed, credit payment gets available on the enhanced checkout page.
Payment Restrictions
When Payment Restrictions is installed, Company Credit does not show credit in the list of payment methods in Stores > Configuration > Aheadworks Extensions > Payment Restrictions to avoid conflicts of restricting payments to customer groups.
Uninstalling Company Credit
...
| width | 50% |
|---|
Manual Removal
...
1. Disable the module by executing the following commands:
| No Format |
|---|
php bin/magento module:disable Aheadworks_CreditLimit
php bin/magento setup:upgrade |
...
2. Remove the extension files from the following folder:
| No Format |
|---|
app/code/Aheadworks/CreditLimit |
...
| width | 50% |
|---|
Automatic Removal (via Composer)
...
1. Disable the module by executing the following commands:
| No Format |
|---|
php bin/magento module:uninstall Aheadworks_CreditLimit |
...
| Warning |
|---|
For more information follow the product user manual on our website |
Thank you for choosing Aheadworks!
Need Customization?
.png?version=1&modificationDate=1582119533051&cacheVersion=1&api=v2)
You can always find the latest version of the software, full documentation, demos, screenshots, and reviews on http://aheadworks.com
License agreement: https://aheadworks.com/end-user-license-agreement
Contact Us: https://aheadworks.com/contact
Copyright © 2021 Aheadworks Co. http://www.aheadworks.com