Firefox user notice:
Please use another web browser to view this document.
Sorry for the inconvenience.

Magento 2 Cart to Quote facilitates negotiations between selected customers and store admins over prices of products in a quotation. Negotiations are implemented in a sequence of consecutive requests for quotations and responds to them followed by various automatic notifications. A quote herein is a temporary state of either a product cart or quote list over the period of price negotiations.
Compatibility: Magento Open Source 2.3.X - 2.4.X, Magento Commerce 2.3.X - 2.4.X
Thank you for choosing Aheadworks!
Installing Cart to Quote
| Command Line Installation | Composer Installation |
|---|---|
1. Backup your web directory and store database 2. Download the Cart to Quote installation package 3. Upload contents of the Cart to Quote installation package to your store root directory 4. In SSH console of your server navigate to your store root folder: cd path_to_the_store_root_folder run the following command: : php -f bin/magento module:enable Aheadworks_Ctq then: php -f bin/magento setup:upgrade after: php -f bin/magento setup:static-content:deploy 5. Flush store cache; log out from the backend and log in again Make sure the installation is done from the FTP Administrator account. Otherwise, set 775 permissions to the store root directory after the extension is deployed. | If you are installing an extension from Aheadworks for the first time, you need to add our composer repository to your Magento store: 1. Login to your ssh console and navigate to your store folder:
cd path_to_the_store_root_folder
Run the following command:
composer config repositories.aheadworks composer https://dist.aheadworks.com/
On successful execution of the command you will be able to use the composer to install the extensions. To install the extension: 2. Login to your ssh console and navigate to your store folder:
cd path_to_the_store_root_folder
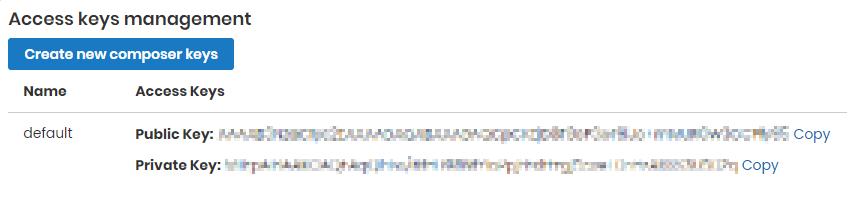
3. Run the following command to install the latest version of the extension: composer require aheadworks/module-Ctq if you need to install a specific version, run this command: composer require aheadworks/module-Ctq:<version> Specify the version of the extension in <version> When prompted, enter Public Key (Username) and Private Key (Password): Both Public Key (Username) and Private Key (Password) can be found in My Projects and Licenses in your personal account on our site:
4. Enable the extension: php -f bin/magento module:enable <Module_Name> Add the name of the product into the <Module_Name> Next, register the extension: bin/magento setup:upgrade Recompile your Magento store if you are in the Production mode: bin/magento setup:di:compile To verify that the extension is enabled, run this command: bin/magento module:status Clean store cache, by running the following command: bin/magento cache:clean Log out and Log in the backend again. To upgrade the extension: Download the updated extension file from Marketplace or another extension developer. Take note of the module-name and version. Export the contents to your Magento root. Run one of the following with the composer:
composer update aheadworks/module-Ctq
composer require aheadworks/module-Ctq:<version>
Run the following commands to upgrade, deploy, and clean the cache. php bin/magento setup:upgrade --keep-generated 6. Make sure that the Composer finished the installation without errors. Flush store cache, log out and log into the backend again. |
.png?version=1&modificationDate=1613404238295&cacheVersion=1&api=v2&width=450&height=83)
Uninstalling Cart to Quote
| Automatic removal | Manual Removal |
|---|---|
To uninstall the extension, run the following command: php bin/magento module:uninstall Aheadworks_Ctq Please note: uninstall script works correctly only if the module was previously installed via Composer Note for a developer: To use the uninstall script in the standard workflow, see Magento\Setup\Console\Command\ModuleUninstallCommand::validate(). The function should return an empty array for further correct processing. You can simply comment out the lines 319-338. | 1. Disable the module by executing the following commands: php bin/magento module:disable Aheadworks_Ctq php bin/magento setup:upgrade 2. Remove the extension files from the following folder: app/code/Aheadworks/Ctq |
About Cart to Quote
Business Advantages
The Cart to Quote extension for Magento 2 is to support natural negotiations when customers strive to get the precise and quantifiable product at the lowest possible price, and merchants aim at higher profit, hoping to sell more and sell stuff faster. Furthermore, negotiations let shoppers experience merchants' flexibility, generosity and appreciation of their needs. The module allows clients to easily shape requests for quote (RFQ) while browsing the catalogues and topping-up carts. Admins get able to manage the quotes, suggest counter-offers, set email notifications and react to responses with change of quotation status - to shape an order and close the deal in a mingle of an eye.
What Makes It Different
- Multiple products per quote
- Adding products to an unlocked quote from various pages
- Cart-to-Quote and Quote-List-to-Quote methods of adding products to a quote
- Alternating cession of control over a quote
- Explicit quote management on backend
- Adaptive discount calculator on backend
- Quote expiration reminder and other notifications
- Various quotation statuses
- RFQ restriction for selected customer groups
- Integration with Company Accounts and Sales Representative
What's New
Version 1.4.0 of the extension comes with the following improvements and new features:
- Integration with the Magento 2 Sales Representatives module. With the two modules installed on the store, the Admin gets able to specify Sales Representatives to quotes and limit their access to store data.
- Displaying of the name of the company ( active link to the Edit Company page) in Quote & Account Information for a quote (integration with M2 Company Accounts is required).
- Improvements to the *.doc file for exported quotes: styling and formatting.
The latest version of the extension (1.5.0) enables to do the following:
- Not Logged-In users can request quotes;
- Email notifications for Not Logged-In users.
Cart to Quote Use
Customizing the Extension
Start work with the extension customizing the three blocks of settings: General, Email Notifications and File Attachments.
General Settings
To get access to the settings proceed to Stores > Settings > Configuration > Aheadworks Extensions > Cart to Quote.
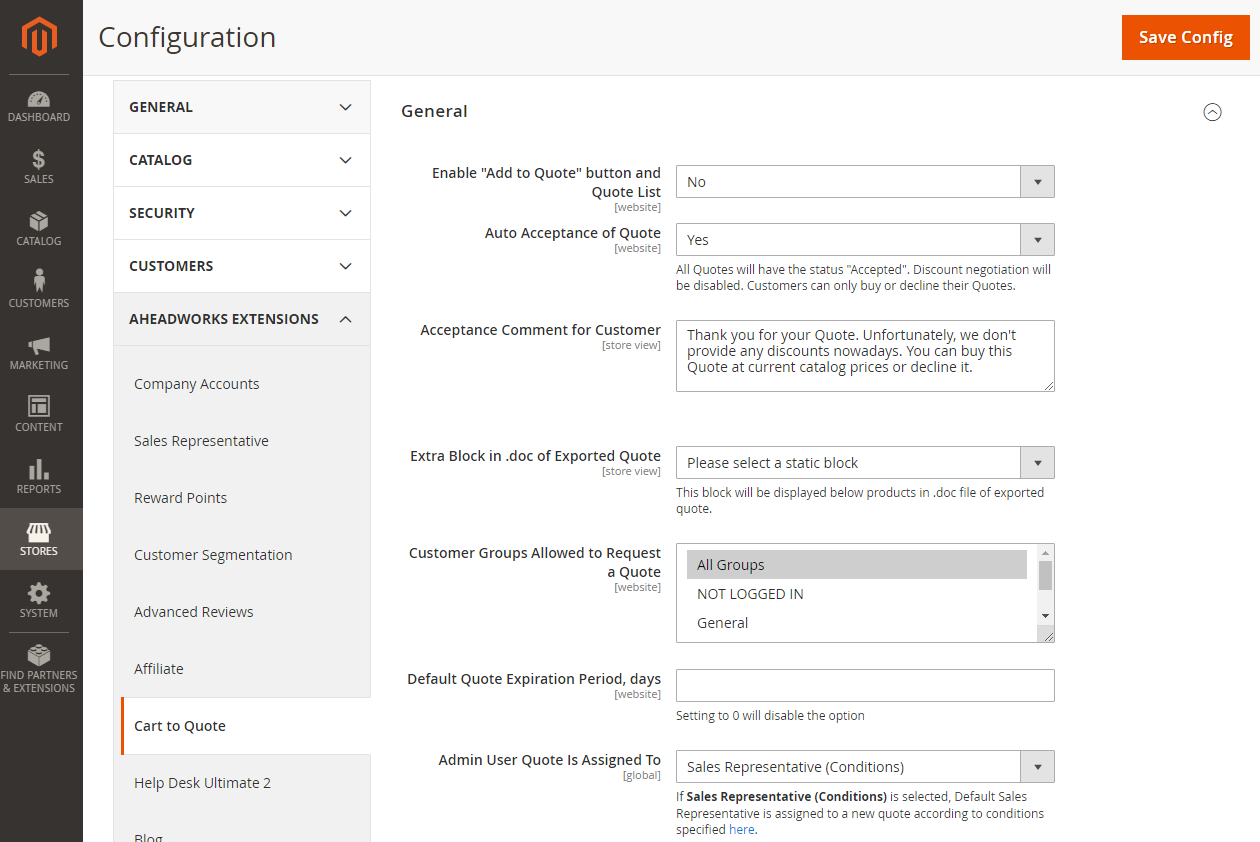
This is where you can set up the following parameters:
- Enable "Add to Quote" button and "Quote List" - when enabled, the two elements will appear on the storefront switching the Cart-to-Quote mode to Quote-List-to-Quote;
- Auto Acceptance of Quote - when enabled, quotes will be automatically assigned the Accepted status;
- Acceptance Comment for Customer (displayed when Auto Acceptance of Quote is enabled) - an automatic comment as sent to the customer to support automatically accepted quotes;
- Extra Block in .doc of Exported Quote - select one of the eighteen informative blocks to be added to the .doc file of an exported quote (the block is added below the quoted products);
- Customer Groups Allowed to Request a Quote - select the groups of customers who will have access to the functionality of the module (Not Logged-In customers can request a quote as well);
- Default Quote Expiration Period (in days) - indicate the default period of quote validity in days (setting to 0 will disable the option);
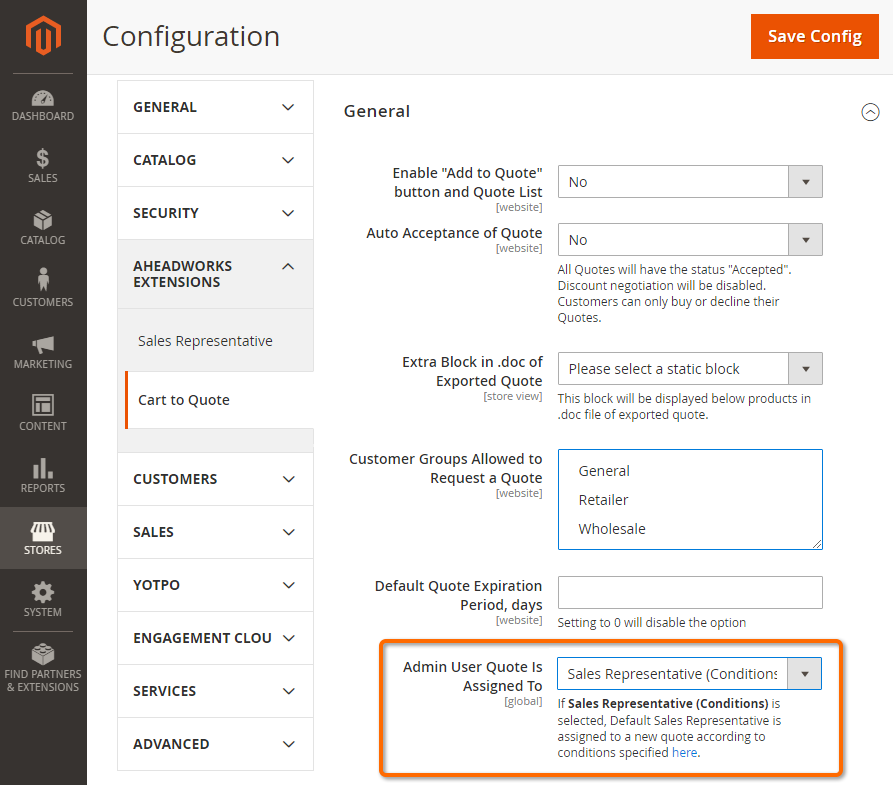
- Admin User Quote Is Assigned To - choose a store admin to manage quotations.
How does Auto-Approval of Quotes Work?
With regard to the feature, the following logic is employed within the present version of the extension (1.3.0):
- A quote receives Accepted status.
- An automatic comment/notification is sent to the customer (By default, the text is “Thank you for your Quote. Unfortunately, we don’t provide any discounts nowadays. You can buy this Quote at current catalog prices or decline it”). The comment is displayed in the Quote History Log and Quote Comments tab, both on the front- and backend.
- Discount negotiations are disabled.
- The customer is able to either place an order against the quote or decline it.
- The behavior of the quote on the backend matches the status “Pending Buyer Review”: Admins can only view the quote;
- “Submit for Approval” is hidden from the Quote page on the frontend.
The Quote Auto-Approval function can be used, for example, during massive sales or promo campaigns - when no further discounts are stipulated for a time being. It is a marketing means to put price negotiations on hold, without taking away the visual functionality of the module from the storefront.
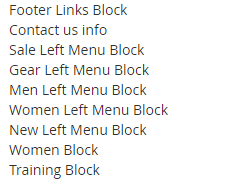
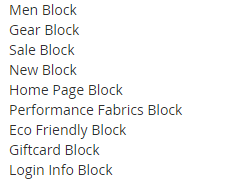
The following eighteen blocks are available for support of the quote product list, when the latter is exported to a *.doc file:
|
|
|---|
To finalize the configuration click the Save Config button in the top right, or proceed to the next step.
Email Notifications
This is where you configure how customers and admins are notified on each consecutive act of negotiations over the quotation.
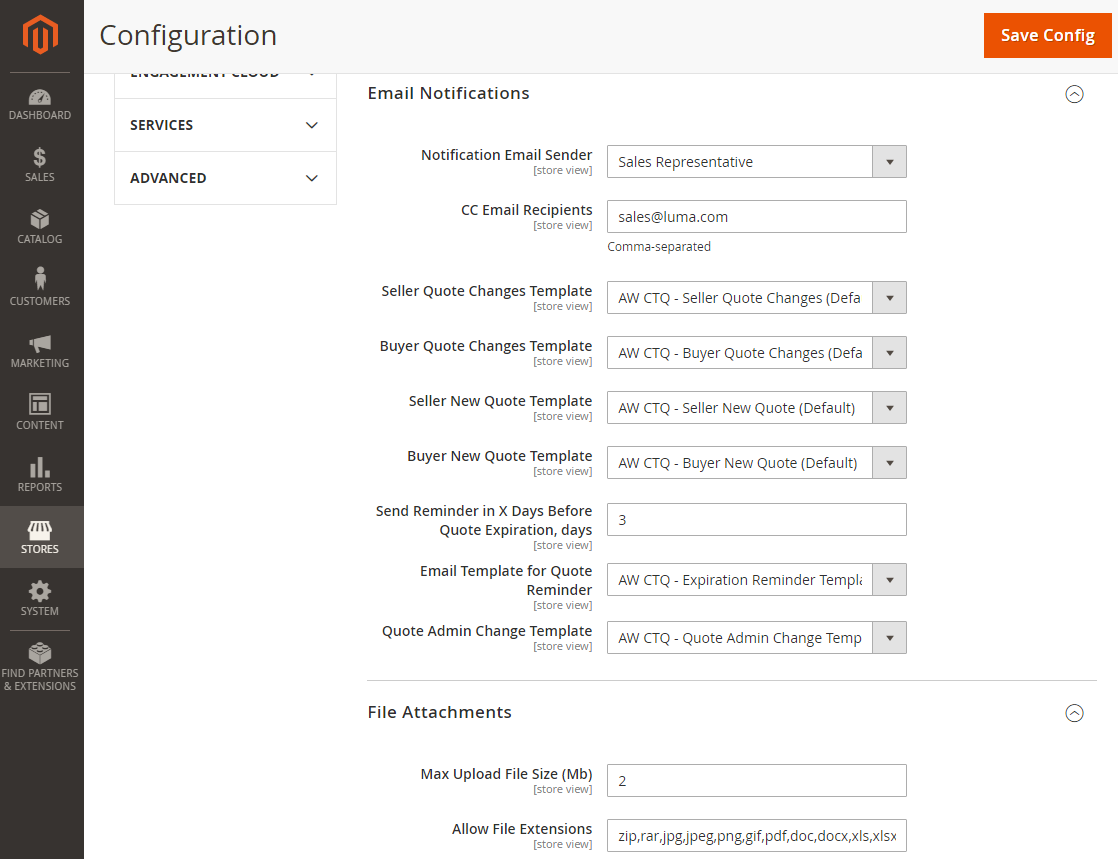
The Email Notifications block provides the following configuration settings:
- Notification Email Sender - Choose one of the roles to feature as an addresser in the email: General Contact, Sales Representative, Customer Support of Custom Email;
- CC Email Recipients - Type in the recipients of the copies of the notifications (emails separated with comma ',');
- Seller Quote Changes Template - Select a template for the notification on change to the quote, as seen by the seller/admin;
- Buyer Quote Changes Template - Select a template for the notification on change to the quote, as seen by the buyer;
- Seller New Quote Template - Select a template for the notification on a new quote receipt, as seen by the seller;
- Buyer New Quote Template - Select a template for the notification on a new quote receipt, as seen by the seller;
- Send Reminder in X Days Before Quote Expiration (in days) - indicate the number of days to remain before the expiration of the quote for a reminder be sent to the buyer;
- Email Template for Quote Reminder - Select a template for the reminder on quote expiration;
- Quote Admin Change Template - Select a template for the reminder on admin change.
To finalize configuration click the Save Config button in the top right, or proceed to the next step.
File Attachments
The extension allows attaching files to the comments to support the quote. This is where you can configure (see the picture above):
- Max Upload File Size (Mb) - maximum size of the file to upload (in Mb);
- Allow File Extensions - a list of file extensions permitted for uploading.
To finalize the configuration click the Save Config button in the top right, or get back to the steps above.
Quotations Grid
To get access to all the quotations, past and present, proceed to Sales > Quotes.
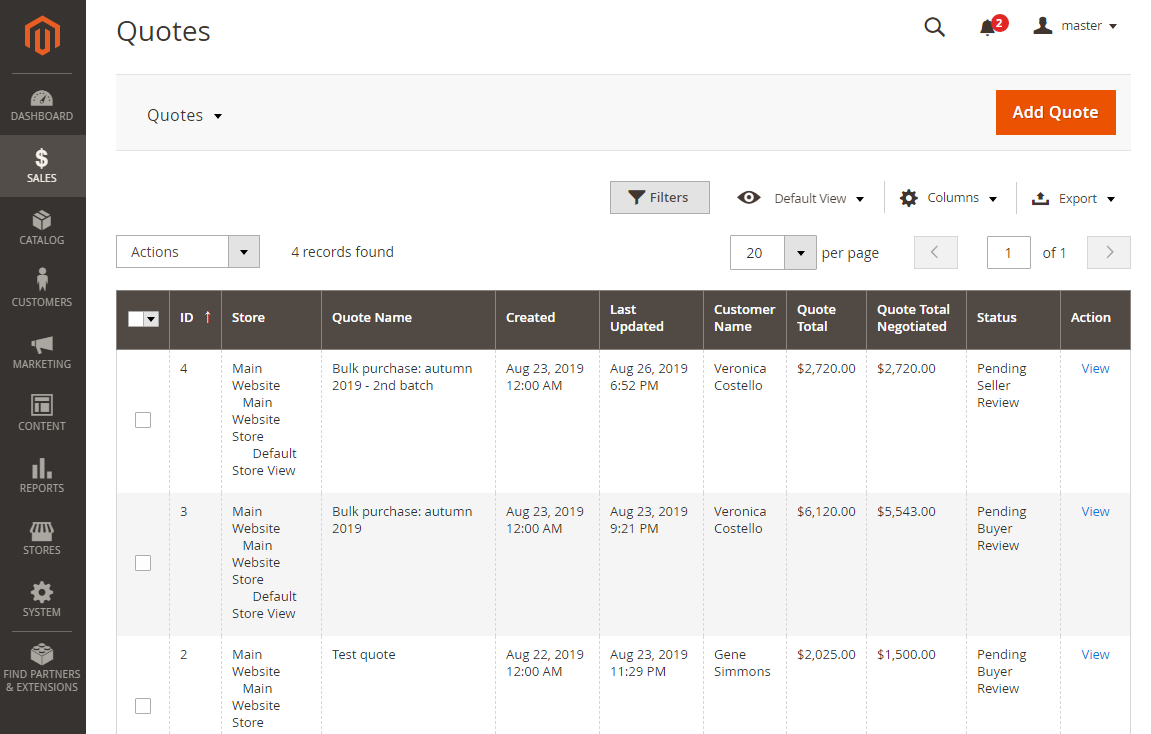
The page shows a grid of the following columns:
- ID - the identification number of the quotation;
- Store - the store where the quotation comes from;
- Quote Name - the name of the quotation as indicated by the customer;
- Company (available when the Company Accounts modules is installed) -
- Created - the date and time of quotation creation;
- Last Updated - the date and time of most recent updates to the quote;
- Customer Name - the name of the customer who initiated the negotiations (was assigned the quotation to, by the admin);
- Quote Total - the total price of the quotation;
- Quote Total Negotiated - the total cost of the quotation (with the discount negotiated);
- Status - the status of the quotation indicating the progress of the negotiations;
- Action - the View active link redirecting to the Edit Quotation page.
How are negotiations over a quote implemented in the extension?
Negotiations are implemented here as a series of alternating changes to the quotation when customers and admins swap cession of control over the quote. Please refer to the table below for further explanations on the control rights with regard to the status of the quotation:
| Status | Admin Actions | Customer Actions |
|---|---|---|
pending seller review | Approve (and set to pending buyer review), decline, edit, convert to new order | Locked |
declined by seller | Locked | Locked |
| declined by buyer | Requote | Requote |
pending buyer review | Locked || requote | Submit for approval, decline, buy || requote |
ordered | Requote | Requote |
expired | Requote | Requote |
| accepted | Locked | Decline, buy |
"Locked" means that the user can not perform any actions with the quote.
"Requote" means that on clicking the "Requote" button a new quote with the same content will be created. The page will be reloaded and the user will see a duplicate quote, which can be edited, submitted or approved, depending on the user role (buyer or seller).
You can decline quotes individually or in bulk with the help of the Actions drop-box field on the left above the grid. Editing is only possible for each individual quote via the View active link in the correspondent cell of the Action column. To create a quote from the backend click the Add Quote button in the top right of the page.
Create / Edit Quote
To create a quote on the backend click the Add Quote button in the top right of the page. To edit the quote click the View active link in the correspondent cell of the Action column of the Quotes Grid.
Starting a quote on the backend
Once Add Quote is clicked, the module suggests choosing a customer from the Create New Customer for New Quote grid.
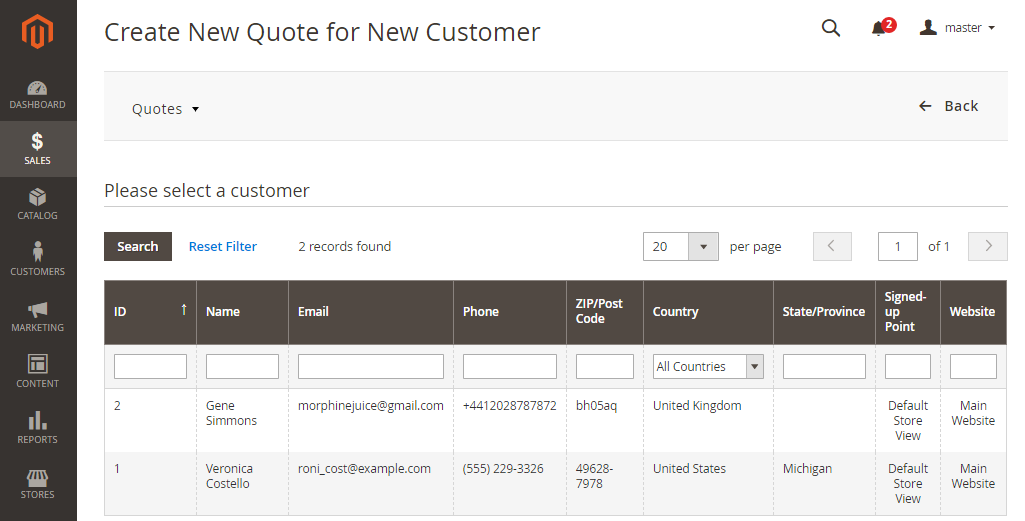
The grid lists all customers who fall under the Request for Quote selection, giving information on their contact details and points of sign-up. For user convenience, there is a filter available on the page with value-boxes above each column of the grid. Fill-in the box(es) with some data you are looking for (parts of known data) and click the Search button above the grid. Click on the row of the chosen customer and proceed to creating the quote. You will then be redirected to the Create/Edit Quote page.
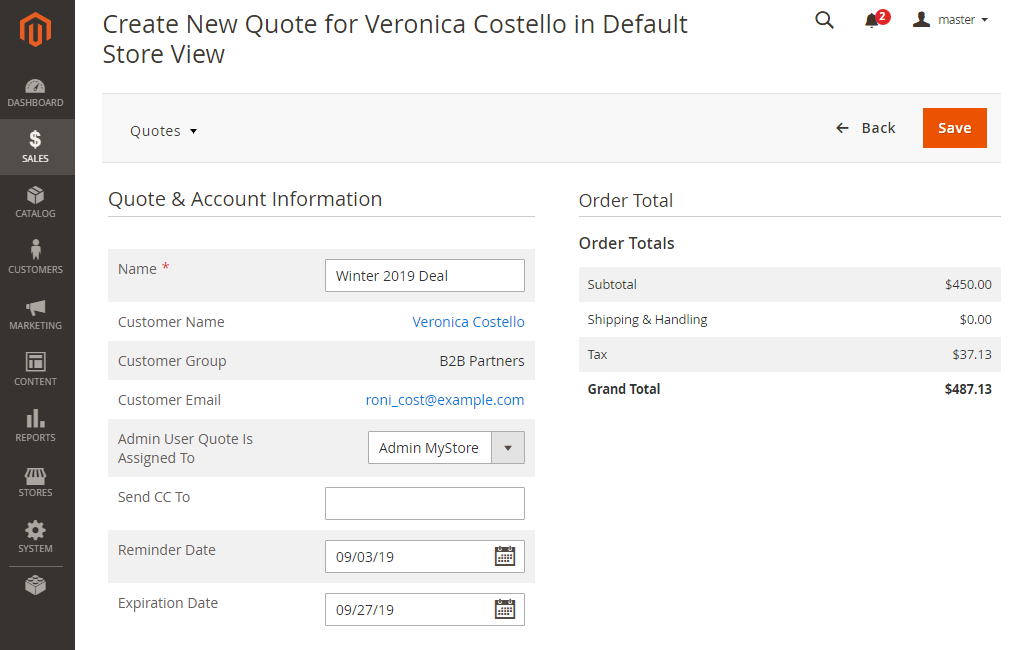
The page is split into 6 sections: Quote and Account Information, Quote Total, Products, Shipping Details, Comments and History, and Quote Totals / Discount Calculator.
Quote and Account Information
The block features the following elements:
- Name - the title of the quotation (* required field);
- Customer Name - the name of the chosen customer (active link, redirects to the Customer Account page on backend);
- Customer Group - the name of the customer group the customer belongs to;
- Customer Email - the email of the chosen customer (active link, redirects to the mailing system popup);
- Admin User Quote Is Assigned To - the dropbox to select the store user to deal with the quote (by default, the admin selected in the Settings);
- Send CC to - the email addresses of the people, you would like to receive a copy of the present quote (in addition to those entered in the Settings);
- Reminder Date - the date of a reminder to be sent to the customer to prompt action regarding the quote;
- Expiration Date - the date of quotation expiration (the quote will get the Expired status on reaching this date, and will become unavailable for the customer).
When in the Edit Quote mode, the Quote and Account Information block will feature three more fields:
- Status - current status of the quotation;
- Created - the date of creation of the quote;
- Order (only when status is Ordered) - the number of the order as per the quote (active link to the corresponding Order page).
Order Total
The block briefs on some financial details of the quote: Subtotal, Shipping and Handling, Tax, and Grand Total. This information, for convenience reason, will appear again at the bottom of the page in the Quote Totals / Discount Calculator.
Managing products in the quote
The Product block of the Edit / Create Quote page allows adding products to the quote and removing them from it, changing quantity of products, configuring product parameters, altering the proposed price of each product, browsing the discounts and totals.
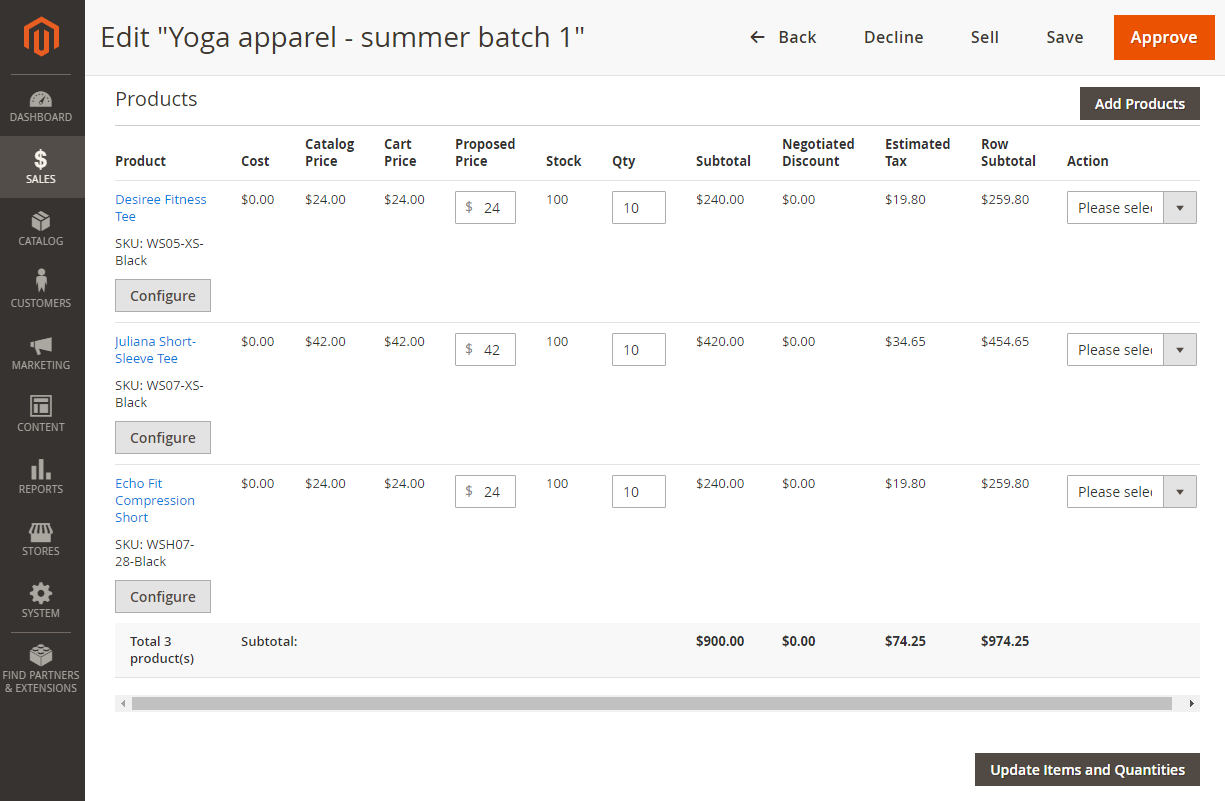
The grid here is a financial summary of the quotation, split into products, and featuring the grand totals at the bottom. This is where admins can see the price (catalog, cart and proposed), stock availability, quantity of each product on the quote, alongside the discounts, taxes and subtotals.
The name of the product here is an active link. If the product is simple, then clicking on the name will redirect you to the Product Page. If the product is configurable, then clicking on the name will launch a popup to suggest editing product parameters.
To alter the quantity of a product on the quote, use the Qty text-box. When done, click the Update Items and Quantities button behind the grid to update the figures in the table. Alternatively, you can use the Configure button below the name of the product. When clicked, it calls out the Configure Product popup.
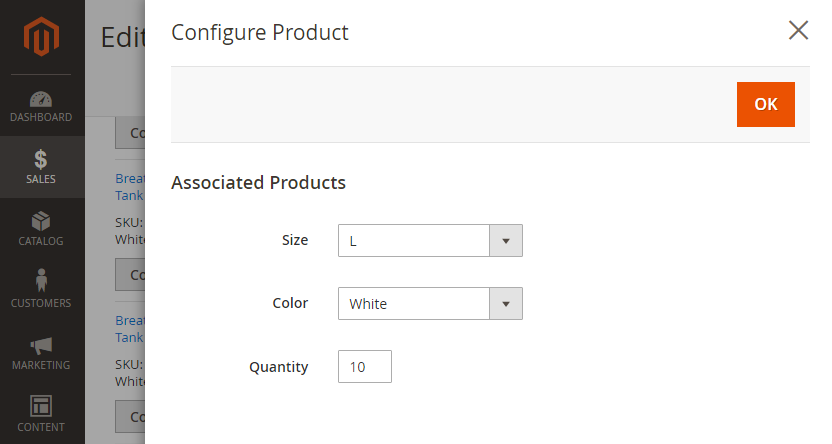
The Configure Product popup allows selecting a different size, color (for configurable products only) and quantity of the chosen product. When done, click the OK button in the top right corner to call the popup away. The quote summary grid will get updated automatically.
To alter the proposed price of a product (by default - product catalog price), use the Proposed Price text-box. When done, click the Update Items and Quantities button behind the grid to update the figures in the table.
On update of the quantity of a product, the proposed price does not change to the default value.
To remove a product from the quote, use the Action dropbox next to the chosen product, select "Remove" and click the Update Items and Quantities button behind the grid.
To add a product to the quote, click the Add Products button on the top right of the grid. The Please Select Products block will appear on the page. The block features a grid and a filter, with filter boxes above each column of the grid:
- id - the identification number of the product;
- Product - the name of the product;
- SKU - the stock keeping unit number of the product;
- Price - the catalog price of the product;
- Select - the select box for bulk action;
- Quantity - the text-box to hold a decimal number of items of the product you want to include in the quote.
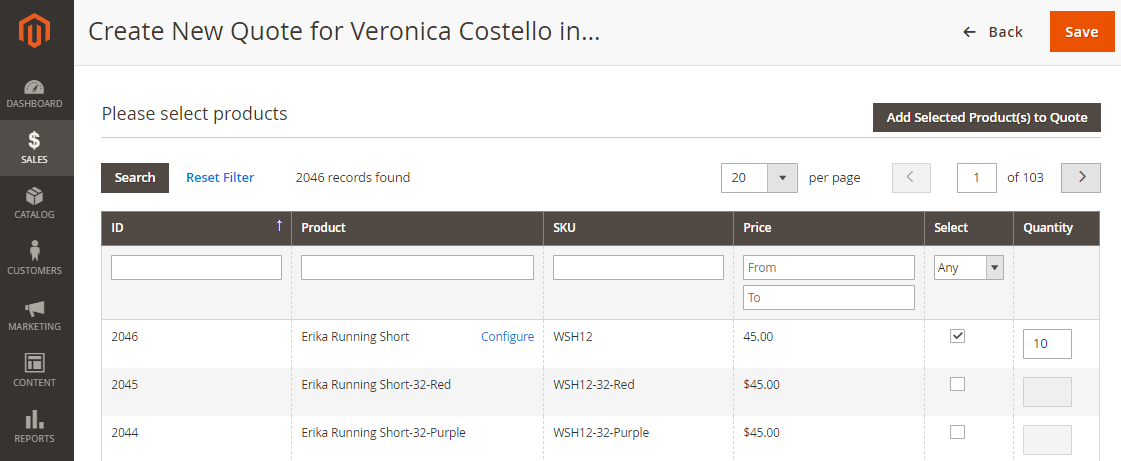
The Configure active link next to the product name tells you it is a parent-product, and when clicked calls out the Configure Product popup (see above), where you may set the child-parameters of the given parent-product. Alternatively, use the grid to select the child-products.
Once all target products selected, click the Add Selected Products to Quote button in the top right of the grid. The products will be added to the quote summary grid.
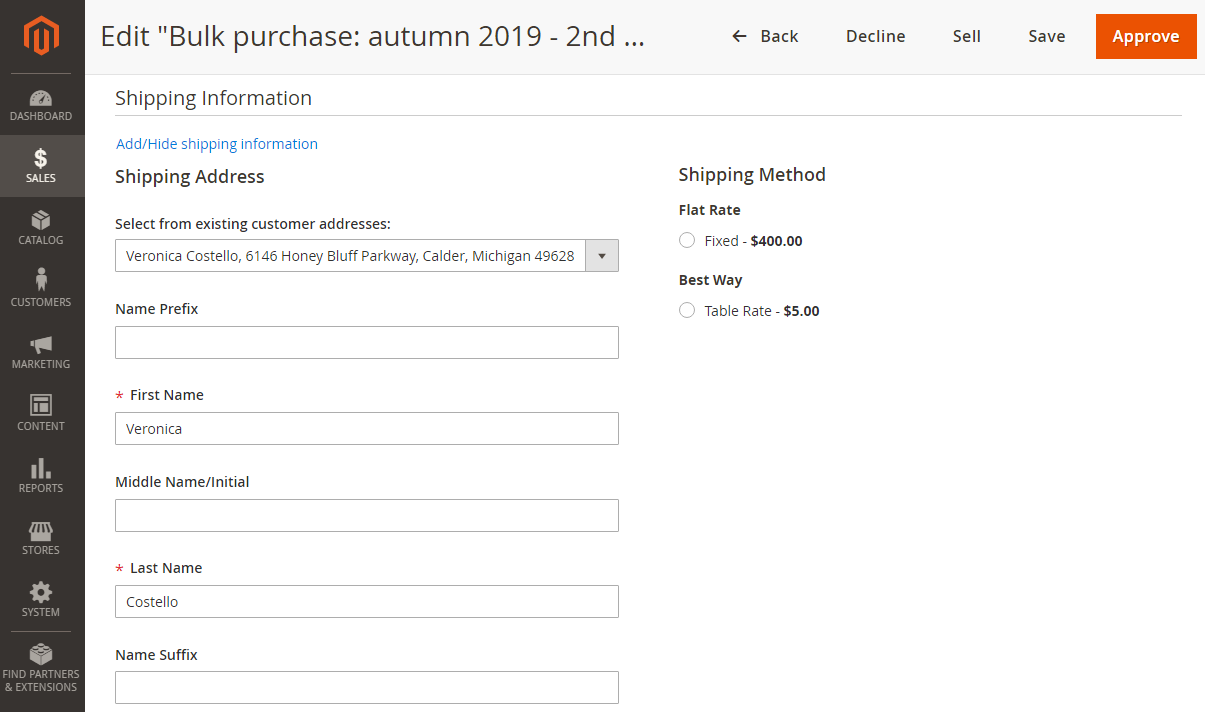
Managing shipping details
The Shipping Information block features the Shipping Address form and Shipping Method radio-button list.
For convenience reasons, the block is rolled-up by default. To roll it down click the Add/Hide shipping information active link. Shipping address is part of the data stored about a customer, and thereby the form herein will show the default shipping address as indicated in the customer profile. If need be, you may select a different address from the Select from existing customer address dropbox or suggest a new address by filling-in the required fields in the form.
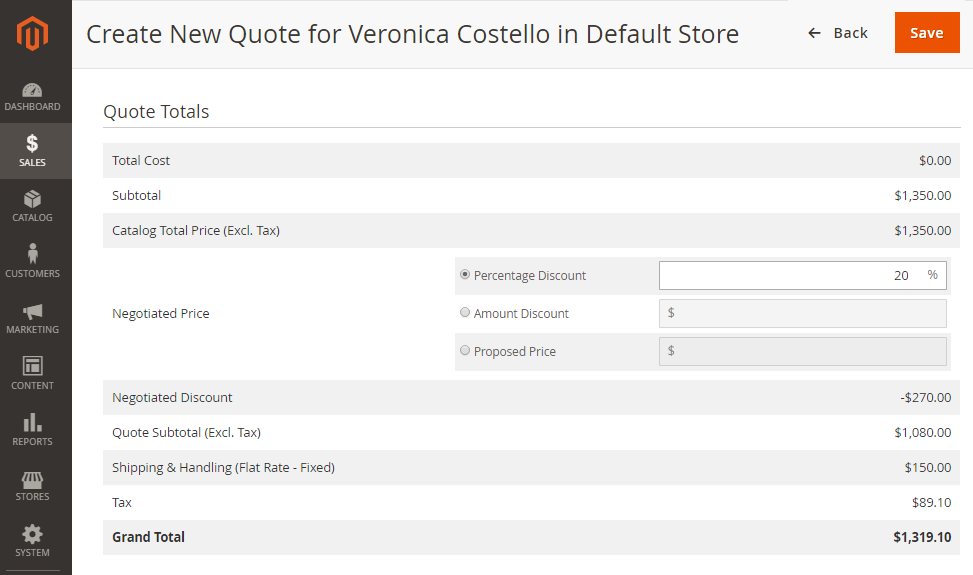
Discount calculator
This is the block to adjust your discount to the quote. It features all sort of totals: Total Cost, Subtotal, Catalog Total, Total Discount, Quote Total (excluding Tax), Tax Total, as well as shipping - an extended total summary as compared to the Quote Total block.
To figure out your best offer, use either of the three:
- Percentage Discount - a % applied;
- Amount Discount - a numeric rebate;
- Proposed Price - a new suggested Subtotal.
The % or numeric rebate is applied to the Subtotal of the quote.
When a value is entered in one of the fields, the whole Quote Totals block will get updated and the figures recalculated.
Comments and History
The Comments and History block features two tabs which, in an alternating mode, give access to the comments which support the quotes and the history of changes to the quote.
The Comments tab takes you to where you can support the quote with a cover comment, or send a comment as a separate message. This is also your chatbox for negotiations.
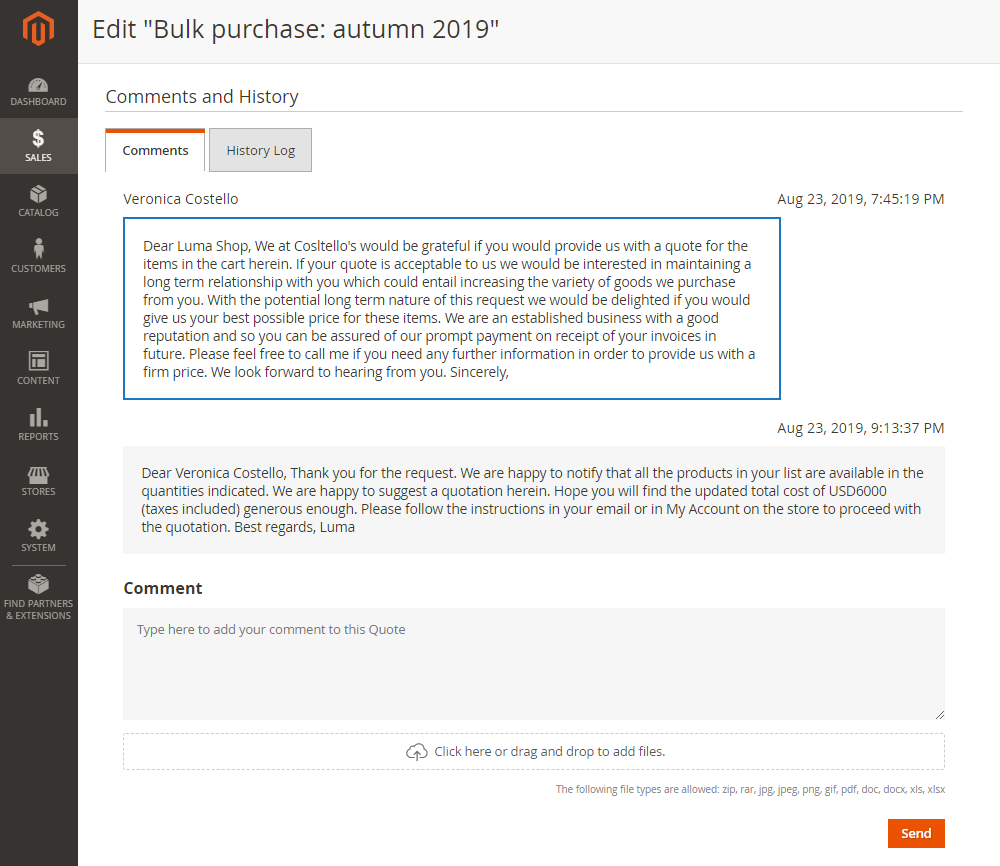
To leave a comment type it into the Comment text field, attach any files, if need be, and click the Send button (at the bottom of the page). The comment will appear both in your customer's email inbox and in My Account on the store front. Mind the file types allowed for uploading, as configured in the Extension Settings above.
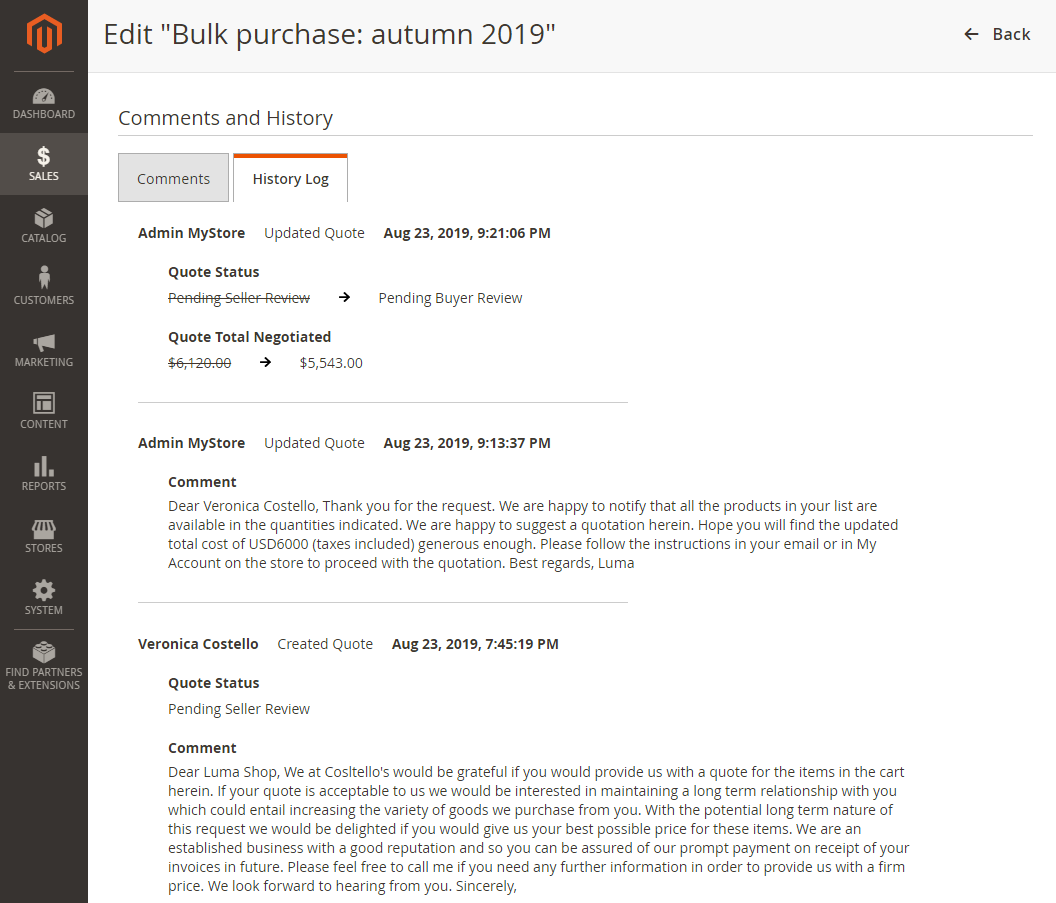
To browse the history of the negotiations opt for the History log tab. This is where all the updates to the status and total price of the quote, alongside the history of commenting, are available.
When the status of the quote is Ordered, the top History Log entry will also feature the number of the order (active link of the corresponding Order Page).
When all in the quote seems sorted and looks all right, depending on whether you have created it from scratch or been editing, there are a few ways to finalize it:
- To save the quote, click the Save button on the top right of the page (you will have to save first the new quote, created from the backend, only then apply other actions);
- To discard changes, click Back on the top right (you will be redirected to the Quotes Grid);
- To approve the quote, click Approve (you will remain on the same page, but only the Back button will be available. The control over the quote will pass onto the customer);
- To decline the quote, click Decline (you will remain on the same page, the quote will get available for requoting);
- To requote the quote, click ReQuote (you will get onto the active duplicate of the quotation);
- To sell the quote, click Sell (the quote will get converted into an order, you will be redirected to the order page).
On the Frontend
Cart-to-Quote Mode
The Request a Quote option is available for specified users from Cart. In a usual way customers add products to Cart from wherever they can find an option to do so: catalog page, product page, wish list or search results. Once in Cart, shoppers will find the Request a Quote button, just beneath the Proceed to Checkout one.
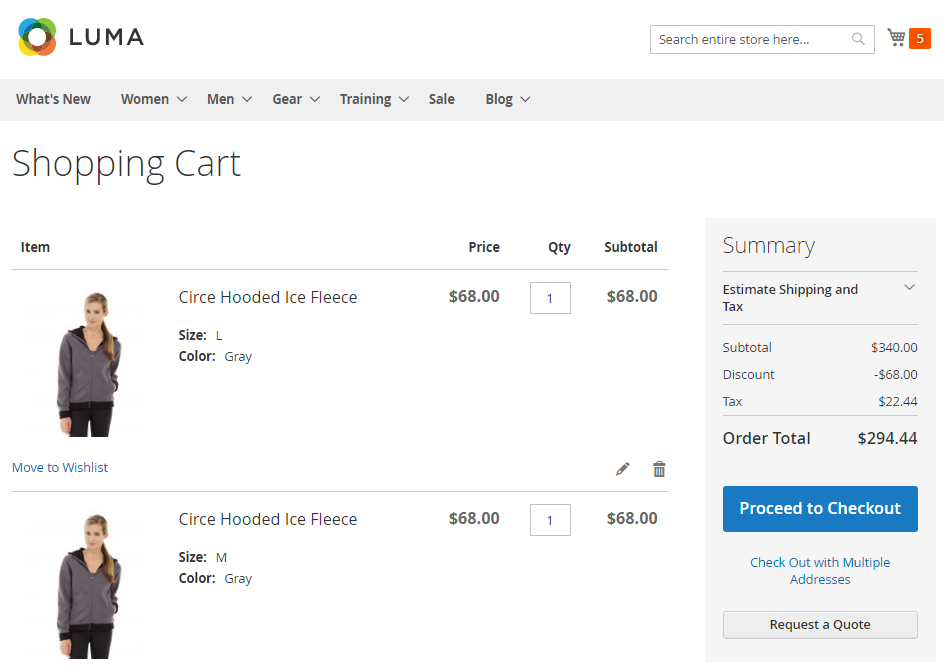
Clicking the Request a Quote button will open the New Quote popup. This is where the customer will be asked to type in the name of the request, provide the details as plain text and attach, if necessary, any files.
Any discounts applied to the cart price will be discarded in the request for a quotation.
All products in the cart will fall into the quote request.
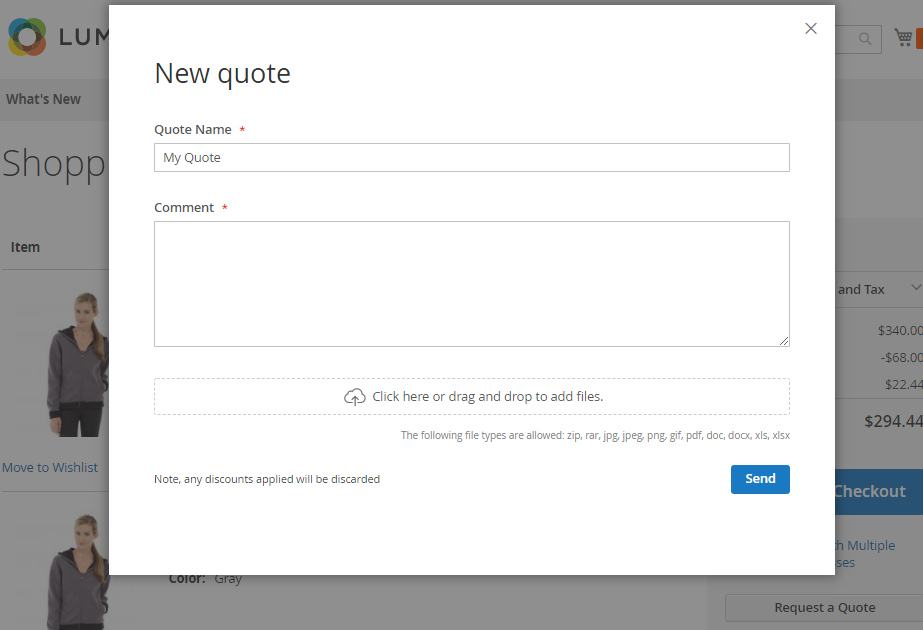
Click the Send button to forward your request to the admin.
Once the request is forwarded to the admin, the customer will not be able to add any products to the quote, neither will he/she be able to remove or alter the products in the request. Not until the reply comes from the admin.
At the same time, customers are free to start a new cart and, if need be, convert it into a new quote.
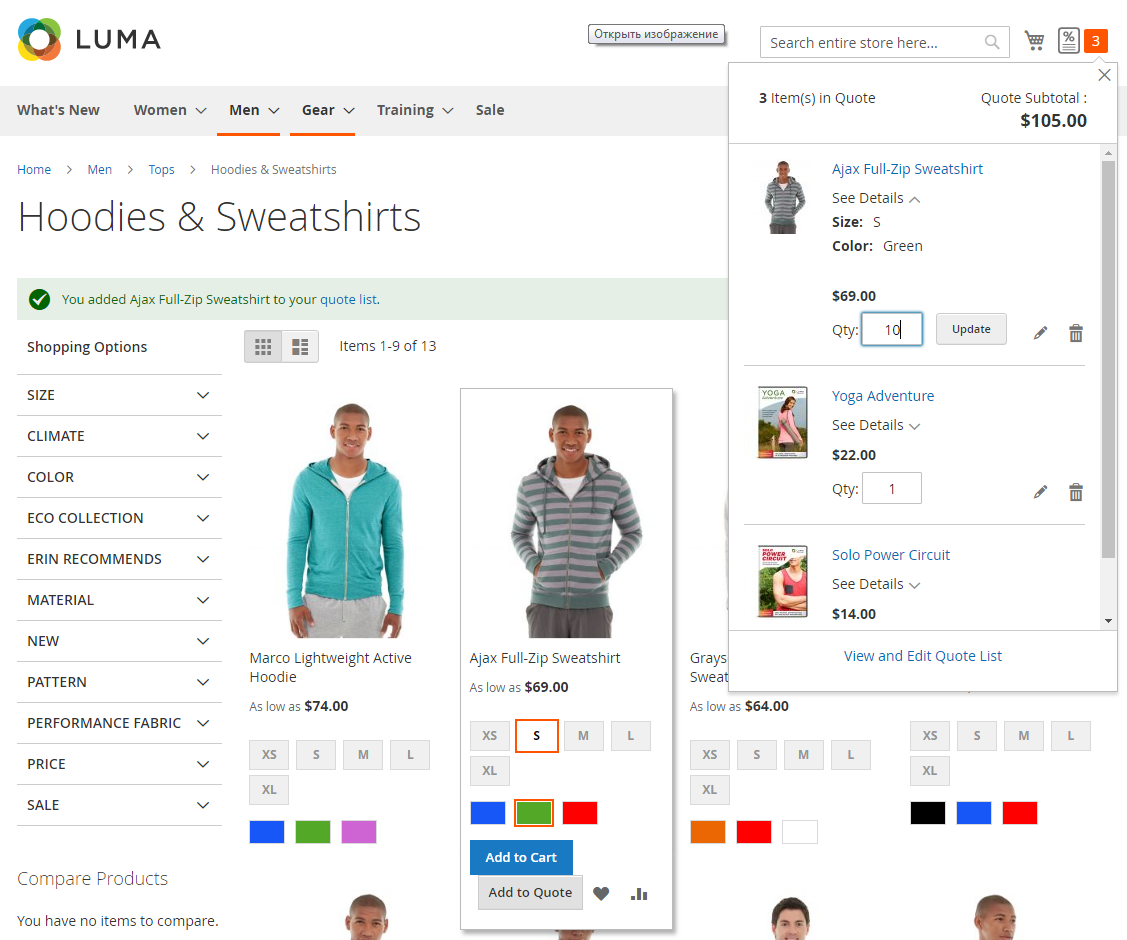
Quote-List-to-Quote Mode
The Quote-List-to-Quote is another mode of arranging products into a quote to substitute the Cart-to-Quote mode should relevant set-up be done on the backend. The module adds the Add to Quote button next to Add to Cart. In this mode customers are able to add products to a quote either from a catalog or product page. However, the products selected with the Add to Quote button do not get into Cart, but get aggregated into the Quote List. Thus in the Quote-List-to-Quote mode customers are able to populate Cart and Quote in parallel.
The present version of the extension does not support displaying the Add to Quote button in the following places:
Compare page
Wishlist page
Widgets
Furthermore, the Add to Quote button is currently not displayed on a product page, in case a customer navigates to a product page from one of the following:
Wishlist page
Mini-cart
Cart page
The Quote List comes alike the Shopping Cart. Its icon will be available next to the cart icon in the top right corner of the page. Adding products to a quote will activate a numeric indicator next to the Quote List icon. The indicator will tell the number of products on the quote list.
Clicking the Quote List icon will open a mini quote list, where customers can browse the details of the products, update product quantities, check prices and delete items.
To update the quantity of the product, click the Qty text-box and enter a new digital number. The Update button will appear next to the text-box. Clicking the button will save the changes, no page reload required.
To update the product on the list, click the pen icon next to the Qty text-box. You will then be redirected to the page of the product, where necessary changes can be done. On completing the new configuration, click Update Quote List to confirm the changes.
To view the product and add its alternatives either to Cart of Quote List, click the name of the product. You will be redirected to the product page, usual functionality ensured.
To view the full Quote List, click the View and Edit Quote List active link at the bottom of the mini Quote List.
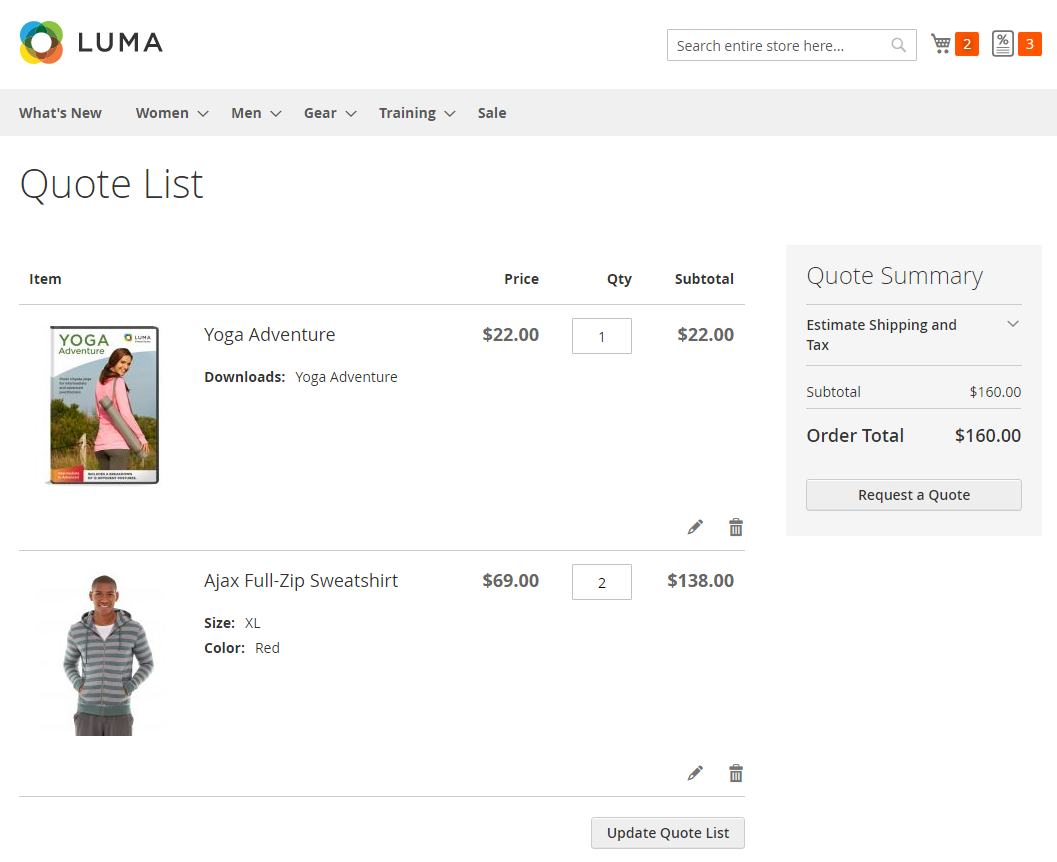
This is where customers are able to browse the products on the quote list, update their quantities, delete products from the list, and update products. The functionality of thereof is the same as that of the mini Quote List as described above.
In addition, the full Quote List page features the Quote Summary. This is where customers can see an estimated price of shipping and tax, alongside the subtotal and total prices. Finally, the Request a Quote button will take you to the New Quote popup (see above) where you will be able to finalize the RFQ.
Managing quotes
To browse and manage requests for quotes, go to My Account > My Quotes.
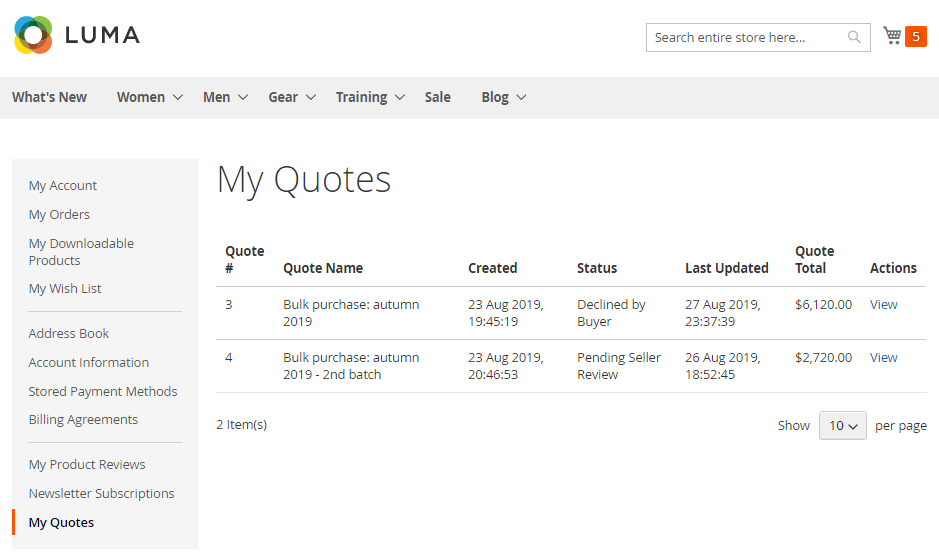
The My Quotes grid will give you some vital details of the quotes: Status, Total Price, Name, Dates (created and last updated). Each cell in the Actions column has the View active link, which will redirect you to the Quote Page.
Depending on the status of the quote, the Quote Page will feature various alternatives to proceed with:
| Status: Declined by Buyer Action: ReQuote / Export to .doc Comment: Click the ReQuote button to create a duplicate of the quotation and start negotiations anew. |
| Status: Declined by Seller Action: Export to .doc Comment: Click the ReQuote button to create a duplicate of the quotation and start negotiations anew. |
| Status: Pending Seller Review Action: Export to .doc Comment: Wait until a response arrives from the seller, and the status changes. |
| Status: Pending Buyer Review Action: Decline / Buy / Submit for Approval Comment: Click Decline and cancel the quote. Click Buy to convert the quote to Cart and proceed to the checkout. Edit the quote and click Submit for Approval to continue negotiating the price.
|
| Status: Accepted Action: Buy / Decline / Export to .doc Comment: The status on auto-acceptance of quotes. In this case the “Submit for Approval” button is hidden on Quote page. |
| Status: Ordered Action: ReQuote / Export to .doc Comment: Click the ReQuote button to create a duplicate of the quotation and start negotiations anew. Ordered quotes will feature the number of the corresponding order (active link to the Order Page). |


When the status of the quote is either Pending Buyer Review or Accepted, the Quote page allows changing the order of the items in the quote.
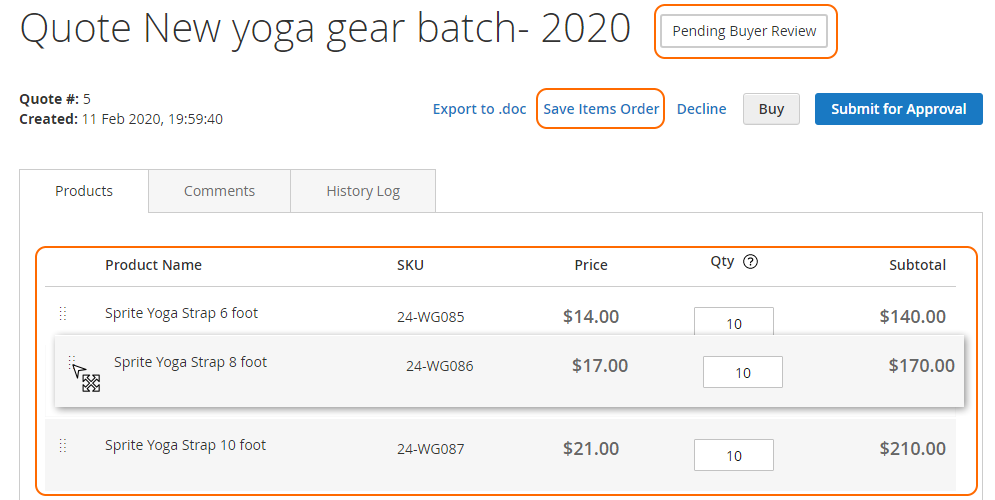
When at least one item is moved along the list, the “Save Items Order” button is displayed above the list on the right side. It is only after clicking on the Save Items Order button, that the new order is saved.
Other features of the My Quotes page will not differ drastically with regard to the quote status. Therefore, let's see the one below as an example.
The Quote Page explicitly tells the following information about the quote: title, status, id, date of creation/expiration, the summary on the products on the list, the comments to the negotiations and the log of the negotiations history. The latter three blocks of information are available via the Products, Comments and History Log tabs.
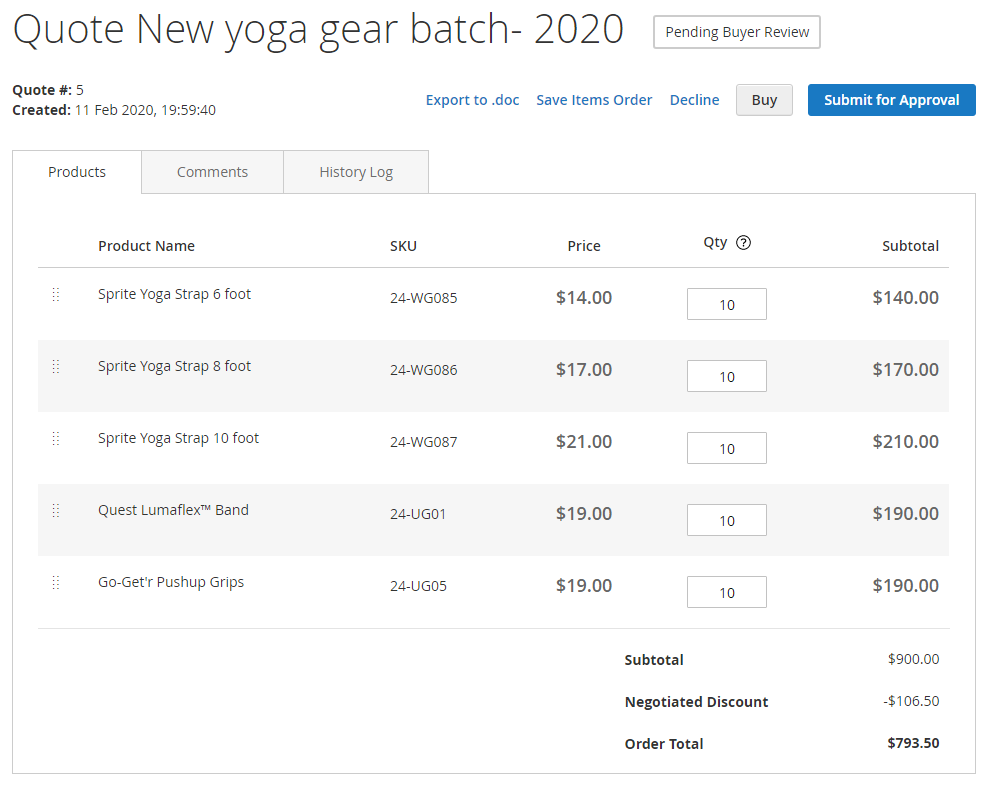
The Products tab gives access to the short summary of the quote: the products listed in the cart, their prices, quantity, as well as the Subtotal, Negotiated Discount, Tax and Order Total (the sum of the previous three). This is where customers can alter the quantity values of the products, should they wish to renegotiate the quote.
If you wish to remove the product from the quote (and subsequently, renegotiate it) change the value in the Qty field into '0'.
To alter the products (for example, if the size is wrong) or to add new products to the quote, you will have to write a comment to the admin, indicating the details of the alterations and renegotiate the quote. The admin, in turn, will satisfy your favor manually on the backend.
To leave a comment to the Seller, proceed to the Comments tab. The tab opens the negotiation chatbox between the customer and the seller. Read the previous messages, type in the new ones in the Comment text field, attach files and click Send to forward the comments to the admin. The functionality and layout of the tab look the same as the ones on the backend.
To browse the history of the negotiations, refer to the History tab. This is where you will find information on the changes to the status of the quote, as well as the history of messages between the parties.
In addition to the above, The Quote Page contains a block of buttons and active links. The combination of thereof may change from quote status to quote status (see the beginning of the chapter), but the Export to .doc button/active link remains always on the block.
When a customer clicks on the Export to .doc button, the file in the .doc format is downloaded automatically.
The following data is exported in the file:
Quote name
Quote # (Order # if this Quote has status Ordered)
Created date
Expired date
Products on the quote (as displayed in the Products tab)
If a customer changes the order of the items on the quote list, and then exports the quote into .doc without clicking on the button “Save items order”, items are exported in their original order.
Not Logged-In customers request for quotes
When a Quote is created by Not Logged-In customer, the workflow of requesting and negotiating quotes is quite the same as with Logged-In users:
When Admin clicks the “Approve” or “Send” buttons (in the comments section), an email notification is sent to the customer as usual. Additionally, an external link is attached to each email. This link is generated automatically once and then sent to a customer each time when he receives email notifications from Admin. When the customer follows the link, he is redirected to the Quote page on the frontend. The frontend view is the same as for Logged-In user.
If the user requested a quote as a guest and after it registered - he will have the quote available in the account and can continue negotiations.
Notifications
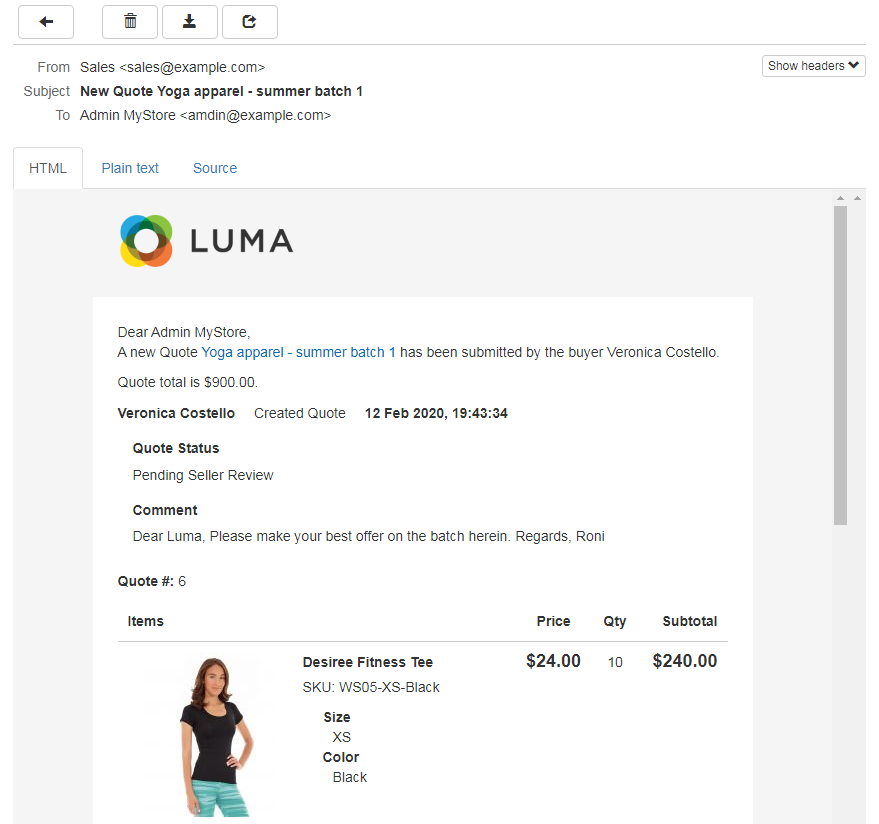
Any updates to the active quotations, as well as the comments to the ones, will come as email messages both to the customer and admin. Furthermore, the copies of the messages will be forwarded to the address stated in CC in Settings and in Edit / Create Quote.
The message will have the name of the quote, an active link to the corresponding quote page, alongside the comments, change log and quote summary for quick review.
Integrations
Company Accounts
M2 Company Accounts glides into M2 Cart To Quote with few visible changes but a powerful update of the inside core. Now, as multiple users of a corporate account represent one company, they get able to take part in negotiations together. Store admins will receive messages from various users within a company, and will deal with them in a regular way as described above.
Company is a customer attribute in the M2 Company Accounts extension, thereby on integration with Cart To Quote it will be added to the layouts of the Create/Edit Quote page and Quotes grid.
Sales Representative
When M2 Sales Representative is installed on the store alongside M2 Cart To Quote, the Admin gets able to assign Sales Representatives to quotes. Sales representatives can be appointed to quotes automatically in compliance with the customers belonging to a customer group, or manually and individually to each quote. By assigning quotes to sales representatives, that is users created with the help of M2 Sales Representative, the Admin can demarcate access for these users to the data on the quotes.
M2 Cart to Quote, when used on its own, has an option of assigning sales representatives to quotes. With regard to this fact, M2 Sales Representative is meant to enhance M2 Cart To Quote as follows:
Sales Representative (Conditions) is added as an option to the dropdown "Admin User Quote is Assigned to" at Stores → Configuration → Aheadworks Extensions → Cart to Quote .
A hint is added to explain the use of Sales Representative (Conditions) and to give quick access to Stores → Configuration → Aheadworks Extensions → Sales Representatives → Conditions: “If Sales Representative (Conditions) is selected, Default Sales Representative is assigned to a new company according to conditions specified here {link to SR conditions}”.
- Sales Representative (Conditions) is the default value of "Admin User Quote is Assigned to" when M2 Cart To Quote and M2 Sales Representative are installed one after another for the first time on the store. Otherwise, if M2 Cart To Quote has already been in use, and M2 Sales Representatives is added to the store, the default value of "Admin User Quote is Assigned to" remains unchanged. The latter aspect allows quotes which have been created before the installation of M2 Sales Representative to keep on being monitored by the appointed to them earlier sales representatives.
- Automatic emails are sent to users indicated as sales representatives in "Admin User Quote is Assigned to" when quotes are assigned to them.
Need Customization?
.png?version=1&modificationDate=1566818499358&cacheVersion=1&api=v2)
You can always find the latest version of the software, full documentation, demos, screenshots, and reviews on http://aheadworks.com
License agreement: https://aheadworks.com/end-user-license-agreement
Contact Us: https://aheadworks.com/contact
Copyright © 2021 Aheadworks Co. http://www.aheadworks.com