| Section | |||||||||||||
|---|---|---|---|---|---|---|---|---|---|---|---|---|---|
|

...
| Command Line Installation | Composer Installation | ||||||||||||||||||||||||||||||||||||||||||||||||||||||||||||||||||||||||||||||||||||||||||||||||||||||||||||||||||||||||||||||||||||||||||||||||||||||||||||||||||||||||||||||||||||||||||||||||
|---|---|---|---|---|---|---|---|---|---|---|---|---|---|---|---|---|---|---|---|---|---|---|---|---|---|---|---|---|---|---|---|---|---|---|---|---|---|---|---|---|---|---|---|---|---|---|---|---|---|---|---|---|---|---|---|---|---|---|---|---|---|---|---|---|---|---|---|---|---|---|---|---|---|---|---|---|---|---|---|---|---|---|---|---|---|---|---|---|---|---|---|---|---|---|---|---|---|---|---|---|---|---|---|---|---|---|---|---|---|---|---|---|---|---|---|---|---|---|---|---|---|---|---|---|---|---|---|---|---|---|---|---|---|---|---|---|---|---|---|---|---|---|---|---|---|---|---|---|---|---|---|---|---|---|---|---|---|---|---|---|---|---|---|---|---|---|---|---|---|---|---|---|---|---|---|---|---|---|---|---|---|---|---|---|---|---|---|---|---|---|---|---|---|
|
|
.png?version=1&modificationDate=1613403631808&cacheVersion=1&api=v2&width=450)
Introducing M2 Automatic Related Products
| Section |
|---|
The Automatic Related Products (ARP) module introduces a powerful set of features to manage related product offers:
|
Getting Around
| Section |
|---|
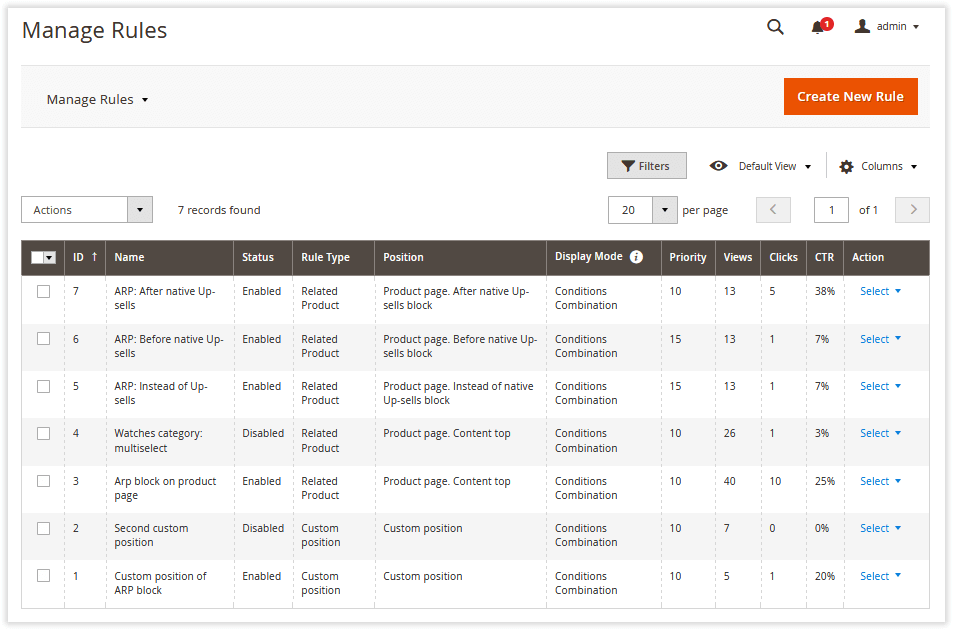
The Automatic Related Productsextension comes ready for work right after the installation. Manage Rules The first place to start is the 'Manage Rules' section available right from the backend navigation menu (Marketing > Automatic Related Products by aheadWorks > Manage Rules).
Here you are provided with rule short descriptions and performance stats:
If you already have one or several rules created, this section provides the following opportunities:
Additionally, the grid displays related product rule priorities and display modes. The rules with higher priority (10 is considered to be higher than 20) are executed first. The 'Display Mode' column shows the 'What to Display' display logic applied to a particular rule (described below). |


Creating Related Products Rules
| Section | ||||
|---|---|---|---|---|
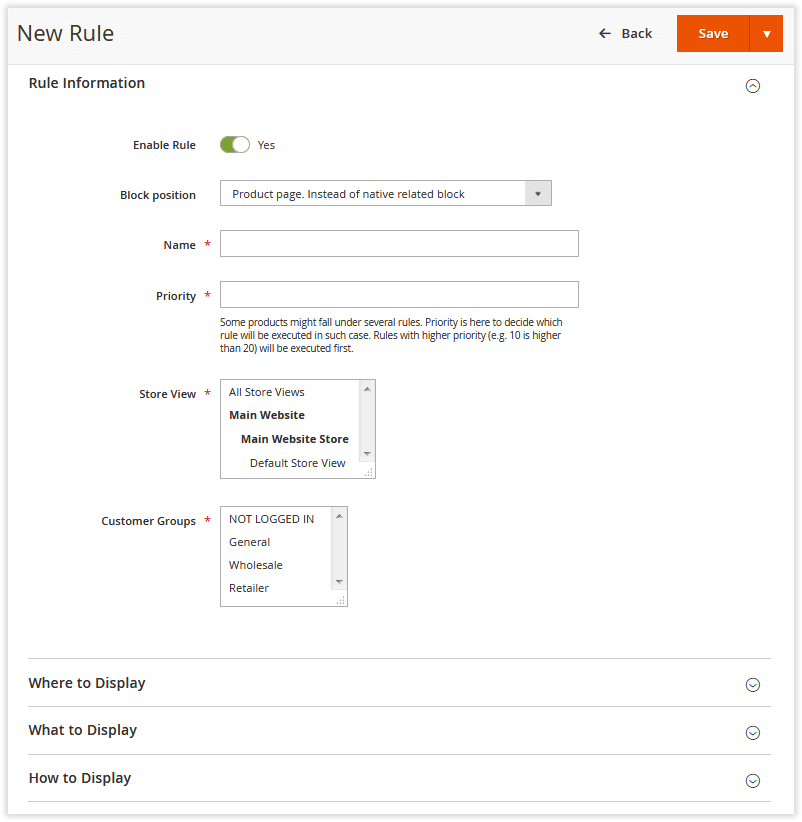
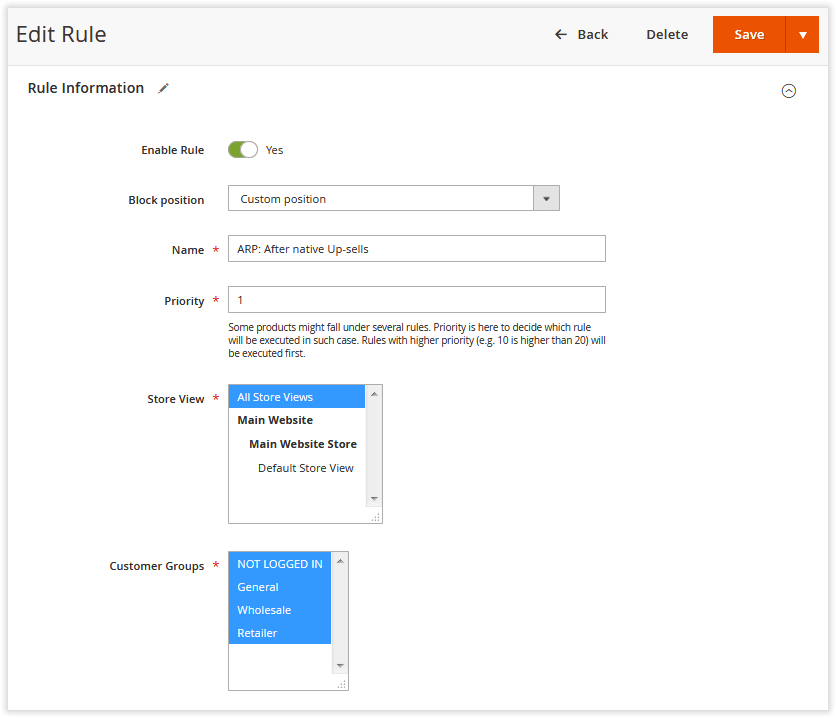
The new ARP rules can be created from the 'Manage Rules' section. To create a new rule, follow the steps below: Step 1Click
Step 2
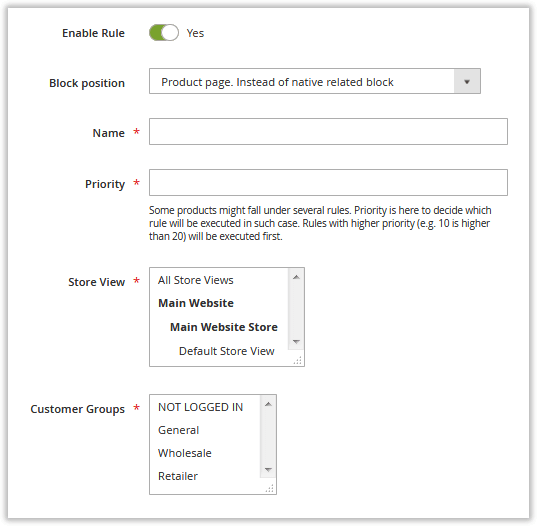
In the 'Rule Information' section, decide on the following:
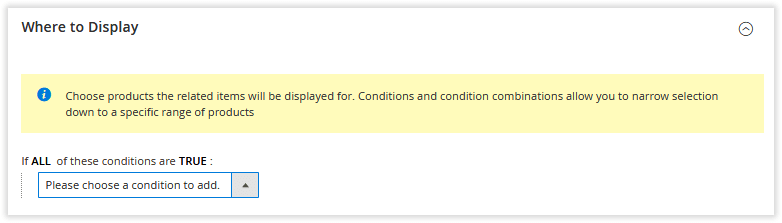
Once done with the above settings, navigate to the 'Where to Display' section. Step 3
In the 'Where to Display' section you are suggested to specify the product attributes or attribute combinations defining on which pages the ARP block should be displayed. The module uses the native Magento rules. Depending on your requirements, you can either: 1) Define a particular set of product pages that will display the ARP block (Example 1); 2) Display the ARP block on all product pages excluding a particular set of product pages (Example 2). |
.png?version=1&modificationDate=1555679089556&cacheVersion=1&api=v2&width=100)
| Section | ||||||||||
|---|---|---|---|---|---|---|---|---|---|---|
|
.png?version=1&modificationDate=1555679591509&cacheVersion=1&api=v2&width=262)
.png?version=1&modificationDate=1555679699998&cacheVersion=1&api=v2&width=264)
| Section | ||||
|---|---|---|---|---|
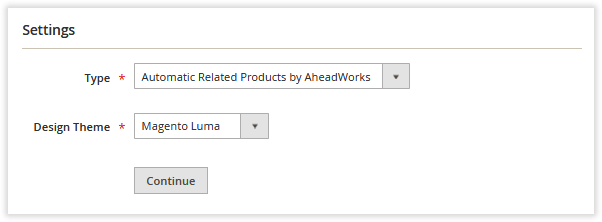
Step 4
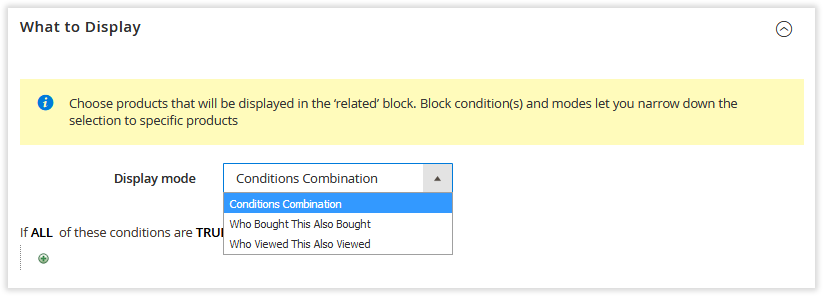
In the 'What to Display' section you are suggested to choose among the three display options:
The 'Conditions Combination' option specifies the product attributes or attribute combinations defining the products to be displayed in the ARP block. The process behind specifying the products is the same as in the Step 3. Depending on your requirements, you either include or exclude products. With the 'Who Bought This Also Bought' display option, you can select the related products that are frequently bought together with the current product.
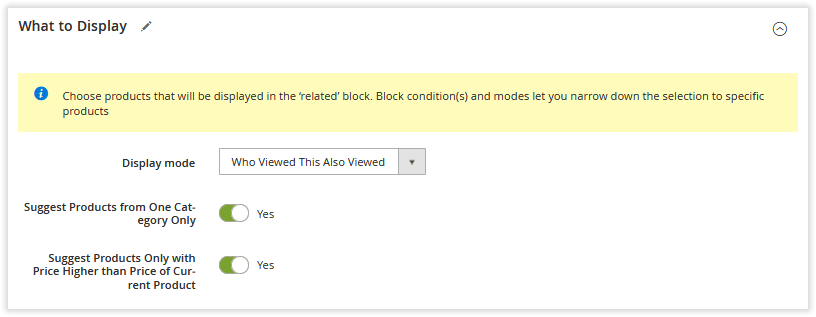
This display option can be further configured in order to filter particular products from the above selection.
The 'Suggest Products Only with Price Higher than Price of Current Product' option, accordingly, selects only the items with higher prices. And the combination of these two filters even further narrows down the list of available related products. Suitable for big stores handling numerous visits and sessions. When you are done with specifying the products you want to be displayed in the ARP block, navigate to the final 'How to Display' section. |
| Section | ||||
|---|---|---|---|---|
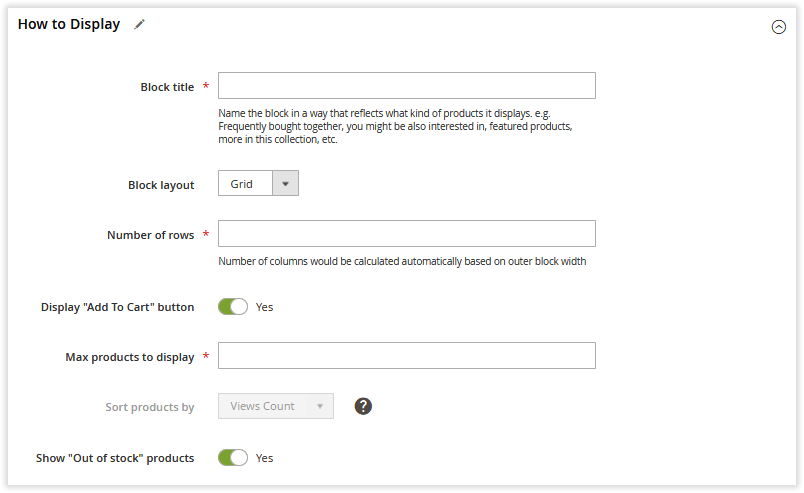
Step 5
|
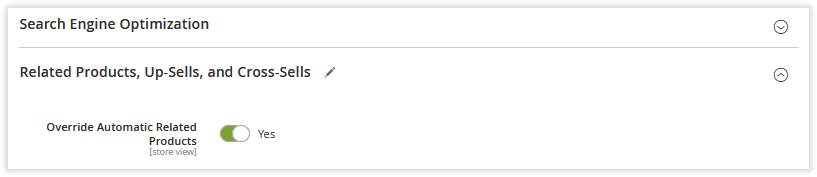
Overriding Automatic Related Products
| Section |
|---|
The ARP block can be overridden with native Magento related products on the product level. To do this, navigate to Catalog > Products, select the product you want to override with the native Magento rules, and expand the 'Related Products, Up-Sells, and Cross-Sells' section.
|
General Settings
| Section |
|---|
The 'General Settings' section is available under Stores > Configuration > AHEADWORKS EXTENSIONS > Automatic Related Products
The section contains the two setting blocks: General. In this block you can:
Who Viewed This Also Viewed. The setting block enables the ‘Who Viewed This Also Viewed’ display mode and determines the period of processed sessions (e.g. ‘Empty’ means no limitations, which might slow down your website). Note: If the WVTAV functionality is enabled, the module starts an additional cron job once in 24h updating the related product blocks working under the WVTAV display mode. |
.png?version=1&modificationDate=1555680236650&cacheVersion=1&api=v2&width=632)
Custom Block Position
| Section | ||||||||
|---|---|---|---|---|---|---|---|---|
Automatic Related Products blocks can be displayed in a custom position with the help of the Magento widget. To display a block in a custom position, follow these steps: Step 1Create the ARP rule and set the 'Block position' setting to Custom position.
Configure the rest of the settings as you need. Note that you can use the same block for different store views. Step 2Create a widget at Content > Elements > Widgets and set the widget type to Automatic Related Products by Aheadworks.
Continue to the widget settings. Set layout updates and other widget attributes. Don't forget to navigate to the 'Widget Options' tab and select the required ARP rule. Step 3Click 'Save' button. Now you can proceed to the store frontend and see the widget in the specified position.
|
Uninstalling M2 Automatic Related Products
| Section | ||||||||||||||||||||||
|---|---|---|---|---|---|---|---|---|---|---|---|---|---|---|---|---|---|---|---|---|---|---|
|
Need Customization?
.png?version=1&modificationDate=1564160187769&cacheVersion=1&api=v2)
You can always find the latest version of the software, full documentation, demos, screenshots, and reviews on http://aheadworks.com
License agreement: https://aheadworks.com/end-user-license-agreement
Contact Us: https://aheadworks.com/contact
Copyright © 2021 Aheadworks Co. http://www.aheadworks.com