Before Your StartPrior any work with the extension it is suggested you install the mPDF and QRcode libraries. The libraries ensure the full-fledged functionality of the extension, in particular that of generating PDFs of tickets and populating the pdfs with qr codes. Herein the pdfs are to be emailed to customers on purchase, and qr codes - to be read with a qr scanner on admission to the event. See Installing the Extension for details. The following sequence of actions is required to create an event and assign tickets to it: A. Arrange the location of the event - Create a venue
- Create spaces within the venue
- Create sectors within the spaces
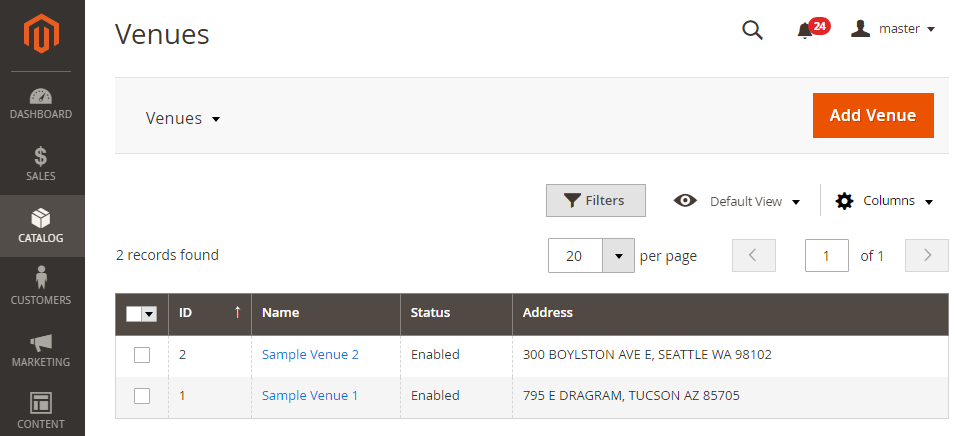
B. Create ticket types 4. Create and configure an event product: assign sectors to the event product and ticket types to the sectors VenuesVenues GridA Venue here is a location to host the event. To view all available venues, go to Catalog > Event Tickets by Aheadworks > Venues. The page features a grid of the following columns: - ID - the identification number of the venue;
- Name - the name of the venue, an active link leading to the Edit Venue page;
- Status - the status of the venue ("Enabled" or "Disabled");
- Address - the full address of the venue.
Create/Edit VenueTo create a venue go to Catalog > Event Tickets by Aheadworks > Venues and click on the Add Venue button in the top right corner of the page. To edit a venue, click on the name of the venue in the Venues grid. The New/Edit Venue page includes three sections: General Information, Storefront Description, and Assigned Spaces. 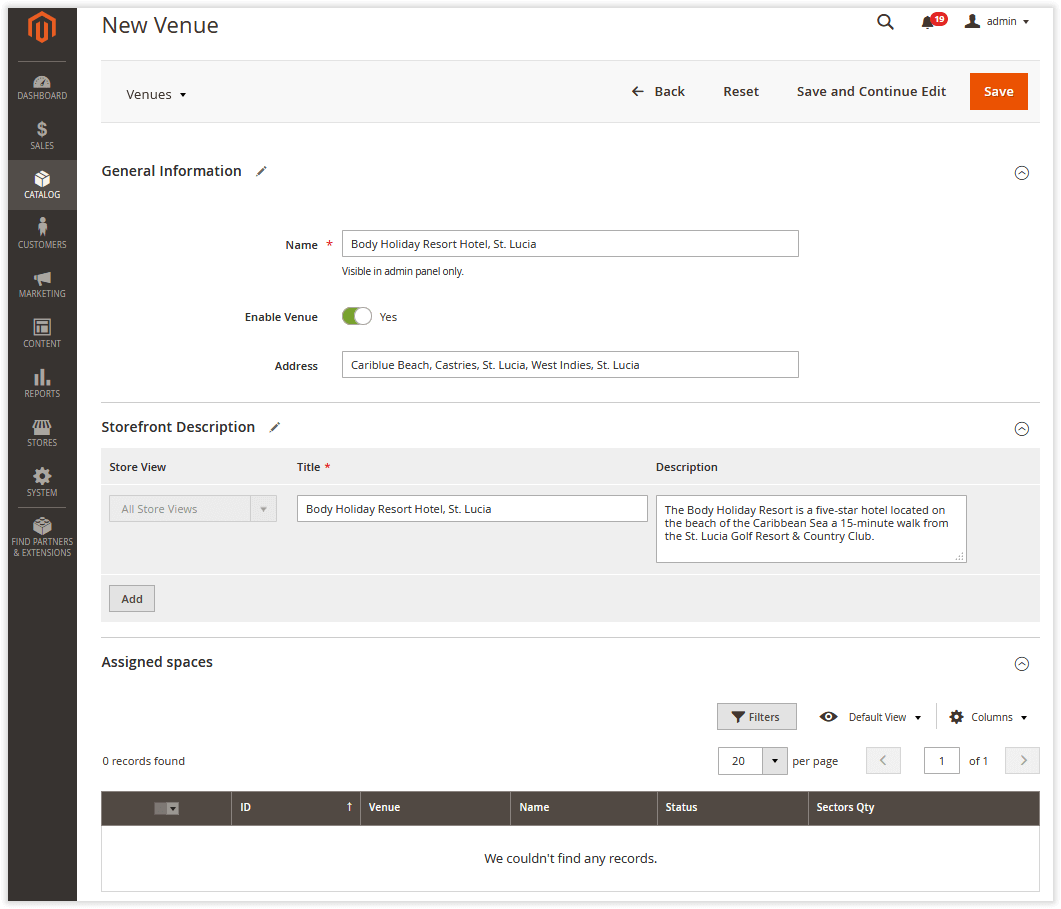
In the General Information section, you can enable the venue, and specify its name and address. The Store Description section makes it possible to define the reference store views, as well as the title and description of the venue for each view. To add a view, click on the Add button at the bottom of the section. The Assigned Spaces section encompasses all the spaces assigned to the venue. The grid consists of the following columns: ID, Venue, Name, Status, and Sectors Qty. To configure a space on the list, click on the name of the space in the grid. The space name herein is an active link to the Edit Space page. | Info |
|---|
'Venue' is a filterable layered navigation attribute that allows customers search and browse events held in various venues. |
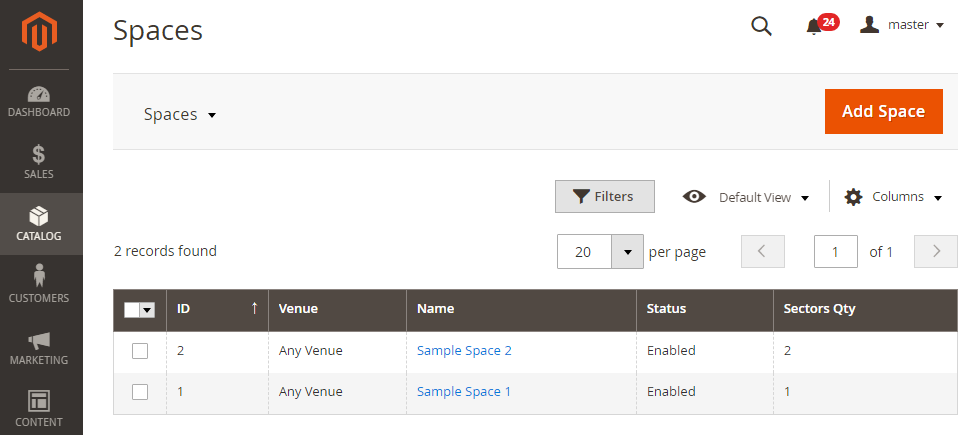
Spaces and SectorsSpaces GridSpaces are areas within a venue. For example, these could be fan zones, dance floors, or table seats of a concert hall or nightclub. To view all available spaces, go to Catalog > Event Tickets by Aheadworks > Spaces. The page features a grid of the following columns: - ID - the identification number of the space;
- Venue - the venue the space belongs to;
- Name - the name of the space (active link to the Edit Space page);
- Status - the status of the space ('Enabled' or 'Disabled')
- Sectors Qty - the number of sectors in the space.
Create/Edit SpaceTo create a space go to Catalog > Event Tickets by Aheadworks > Spaces and click on the Add Space button in the top right corner of the page. To edit a space, click on the name of the space in the Spaces grid. The New/Edit Space page includes three sections: General Information, Storefront Description, and Sectors. 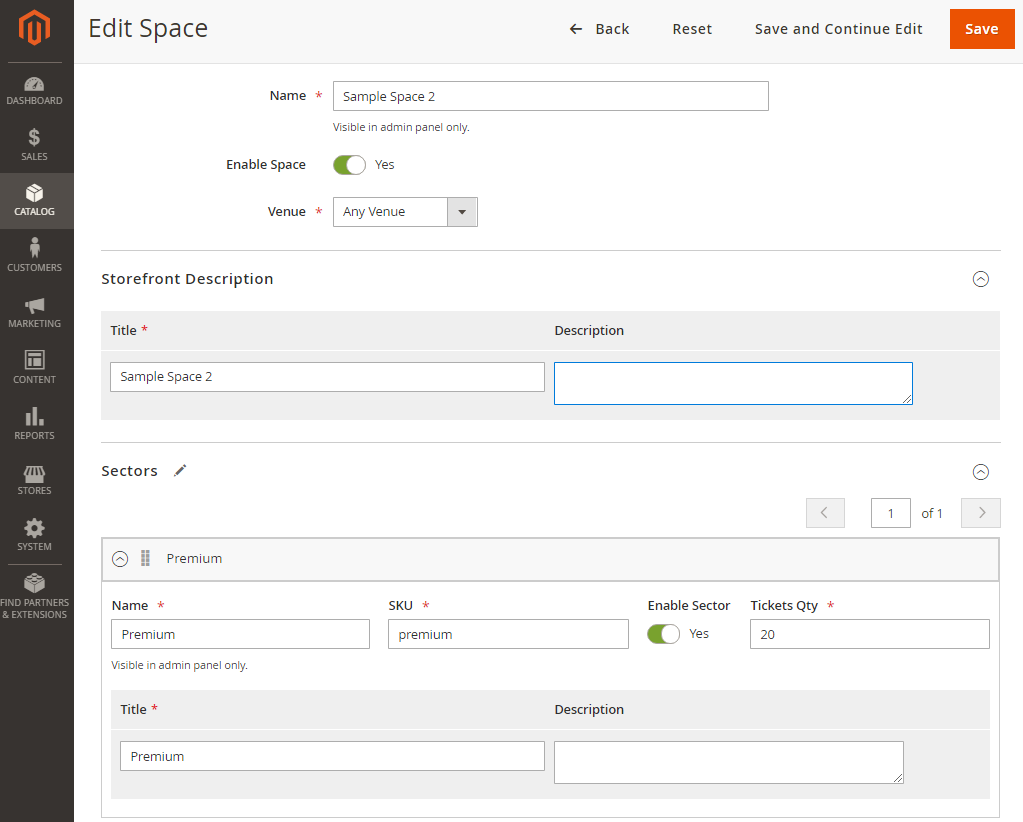
The General Information sections requires the following information on the space: - Name - the name of the space;
- Enable Space - the status of the space (enable/disable options);
- Venue - the venue of the space: one of the existing venues or Any Venue. The Any Venue option assign the space to all available on the store venues.
The Store Description section defines how the information on the space will look like on the storefront. - Title (mandatory) - the name of the space as it will appear on the storefront;
- Description (optional) - some additional information on the space that might be useful to customers.
The Sectors section allows assigning multiple sectors to the space. To add a sector, click the Add Sector button at the bottom of the Sectors section. The following fields become available on click of the button: - Name - the name of the sector as it will appear on the backend ;
- SKU - the SKU of the sector as it will appear on the backend;
- Enable Sector - the toggle to enable/disable the sector;
- Tickets Qty - the number of tickets available for the sector;
- Title - the title of the sector as it will appear on the storefront;
- Description - the description of the sector as it will appear on the storefront.
The sum of all sector tickets determines the entire ticket capacity of the venue. | Info |
|---|
The Sectors section allows you to add any number of sectors. |
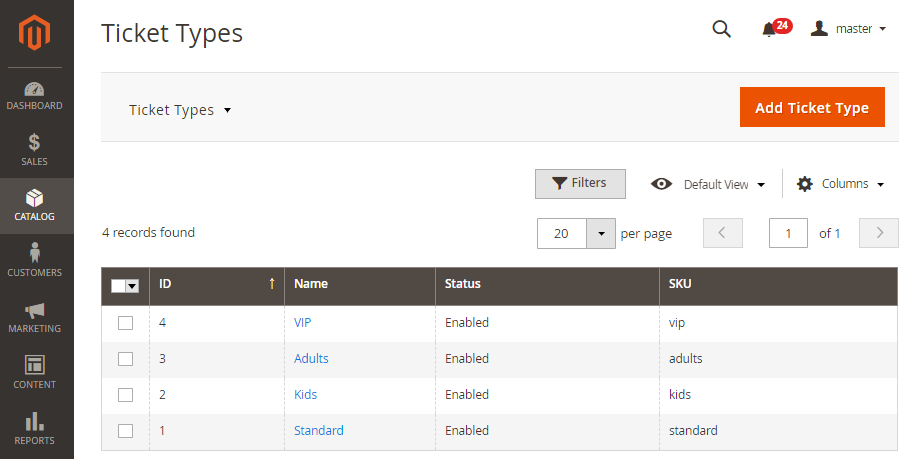
Ticket TypesTicket Types GridTickets can be differentiated by types, e.g. tickets for kids or adults, standard or VIP tickets. To view all available ticket types, go to Catalog > Event Tickets by Aheadworks > Ticket Types. The page features a grid of the following columns: - ID - the identification number of the ticket type;
- Name - the name of the ticket type (active link to the Edit Ticket Type page);
- Status - the status of the ticket type ("Enabled" or "Disabled");
- SKU - the stock keeping unit name/number of the ticket type.
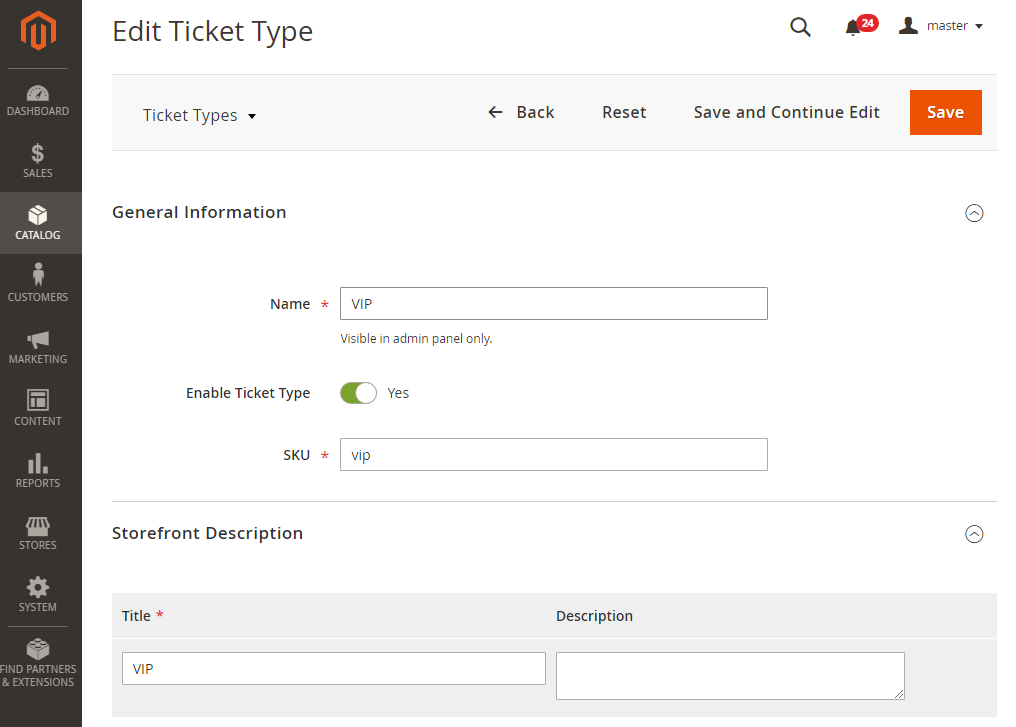
Create/Edit Ticket TypeTo create a ticket type go to Catalog > Event Tickets by Aheadworks > Ticket Types and click on the Add Ticket Type button in the top right corner of the page. To edit a ticket type, click on the name of the type in the Ticket Types grid. The New/Edit Ticket Type page includes three sections: General Information and Storefront Description. The General Information sections requires the following information on the ticket type: - Name - the name of the type;
- Enable Space - the status of the type (enable/disable options);
- SKU - the stock keeping unit name/number of the ticket type.
The Store Description section defines how the information on the ticket type will look like on the storefront. - Title (mandatory) - the name of the ticket type as it will appear on the storefront;
- Description (optional) - some additional information on the ticket type that might be useful to customers.
| Warning |
|---|
An attempt to Reorder tickets of several ticket types throws an error. It will be fixed in the next release (1.5.1). |
EventsAs of version 1.4.0 the extension allows creating two types of events: one-time events and recurring events. One-Time Events One-Time Events GridAs the name suggests, one-time events take place only once in a life-time, they are not scheduled and are not meant to repeat on a regular basis. To view all available one-time events, go to Catalog > Event Tickets by Aheadworks > One-Time Events. The page features a grid of the following columns: - ID - the identification number of the event;
- Name - the name of the event (active link to the New/Edit Event Product page);
- Start Date - the date and time of the start of the event;
- End Date - the date and time of the end of the event;
- Status - the status of the event (past, running or upcoming);
- Total tickets qty - the overall number of available tickets for the event;
- Used tickets qty - the number of the checked-in tickets;
- Available tickets qty - the difference between the number of all available and used tickets;
- Action - the active link to the detailed ticket page of the event.
The Events grid aggregates all past, running, and upcoming one-time events. 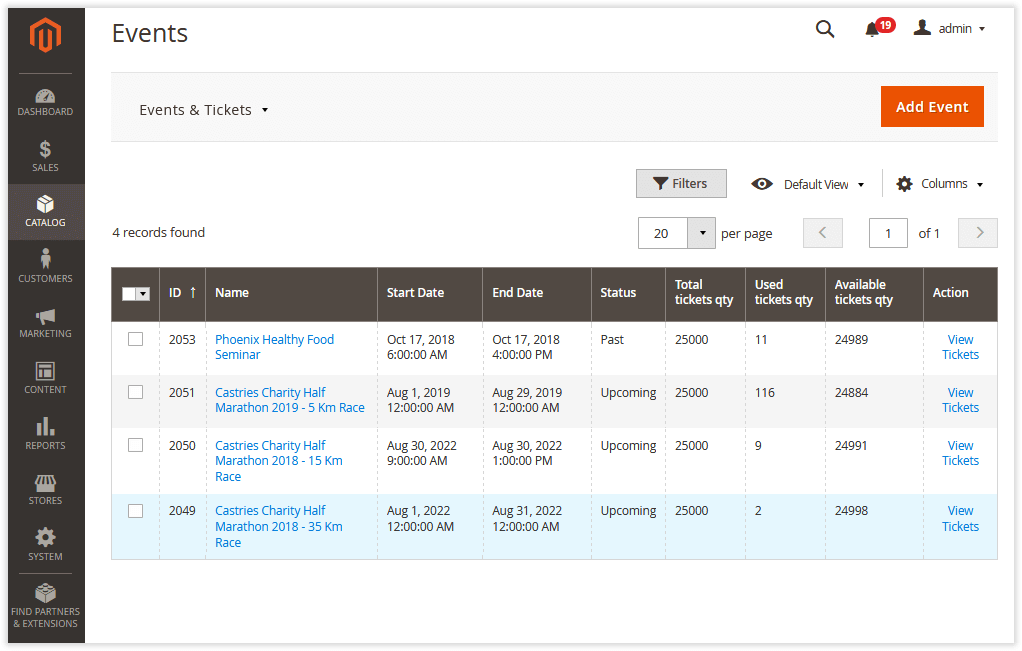
| Info |
|---|
By default, the Events page shows upcoming and running one-time events only. Past events can be fetched using the grid filtering options. |
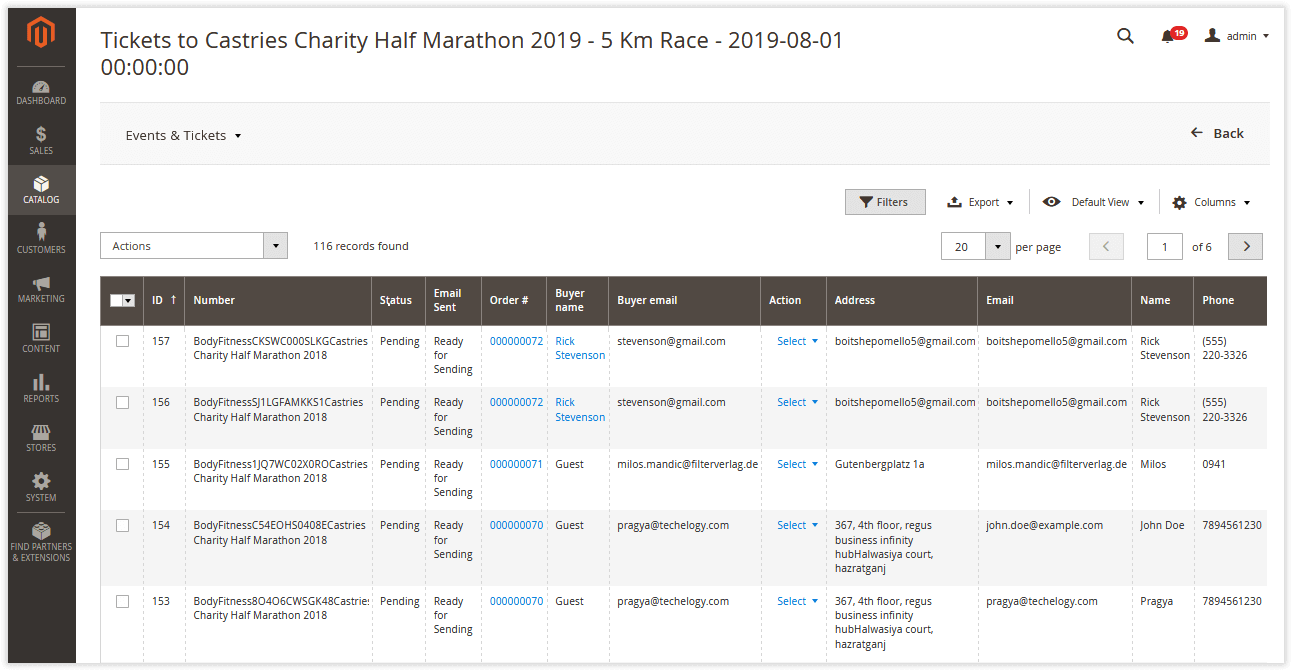
Tickets GridTo see tickets that were generated for the event use the View Tickets link in the corresponding Action cell. The Tickets to [Event Name] page contains a grid with the following columns: - ID - the identification number of the ticket;
- Number - the auto-generated identification number of the ticket;
- Status - the status of the ticket:
- Pending - for tickets within pending orders. To prevent double booking, tickets with status Pending will be temporarily taken from stock (until a change to the Pending status of the corresponding order);
- Unused - for active but not yet used tickets;
- Used - for tickets that were used to enter the event;
- Canceled - for tickets that were cancelled for any reason.
- Email Sent - the status of the email to contain the ticket ("Ready for Sending", "Sent" or "Not Sent");
- Order - the number of the order that was created for the purchase of the ticket (active link to the corresponding Order page);
- Buyer Name - the name of the customer who purchased the ticket;
- Action - the Select dropdown of the following options for processing of the ticket:
- Used tickets: a) Cancel; b) Undo Check-in;
- Unused tickets: a) Cancel; b) Check in; c) Resend; d) Download Ticket;
- Pending tickets: a) Cancel; b) Activate.
- Custom columns. The Tickets grid may contain custom columns which correspond to the Event Ticket Personalisation options specified on the Product page. (Address, Email, Name and Phone in the example below)
| Info |
|---|
The 'Tickets to...[Even Name]' page allows the Admin to export data in the grid to an Excel Xml or CSV file. Use the Export option on top of the grid to export data on the tickets of the given One-Time event. |
Creating a New One-Time EventGo to Catalog > Event Tickets by Aheadworks > One-Time Events and click on the Add Event button to create a new one-time event. Events are much similar to native Magento products except for the two specific configuration sections: Event Ticket Options and Event Ticket Personalization. Event Ticket Options The options herein can be distinguished into two categories: General Ticket Options and Event Ticket Space Configuration. General Ticket Options come as the following list: - Require Shipping - overrides the Tickets Require Shipping value in the Configuration of the extension. The option is used for either virtual (shipping is not required) or digital (shipping required) tickets.
- Schedule Type - the dropbox to select the type of the event: One-Time (our choice here) or Recurring;
- Event Start Date - the date and time of the start of the event;
- Event End Date - the date and time of the end of the event;
- Tickets Selling Deadline - event tickets selling deadline date and time: Event Start Date, Event End Date, Custom Date.
- Tickets Selling Deadline Custom Date * - the date of the deadline for the sale of the tickets.
- Early Bird Tickets Sale End Date - the date of the end of the promotional fee for customers who buy tickets in advance.
- Last Day(s) Price Start Date - the date of the start of the promotional fee for customers who buy tickets closer to the event. When set, the end date of the Last Days price is the Ticket Selling Deadline date.
* The Tickets Selling Deadline Custom Date is available when Custom Date is selected in Tickets Selling Deadline. 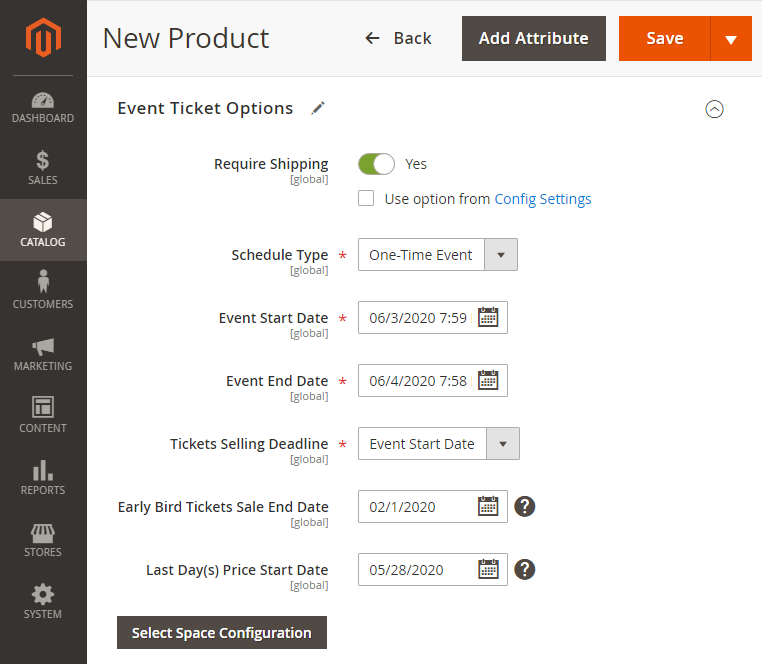
| Note |
|---|
Make sure that the Early Bird Tickets Sale End Date, if any, must be between the date of creation of the event product and the last Days Price Start Date or the Tickets Selling Deadline. The Early Bird Tickets Sale End Date and Last Days Price Start Date fields are optional, and do not affect the operation of the extension when not configured. |
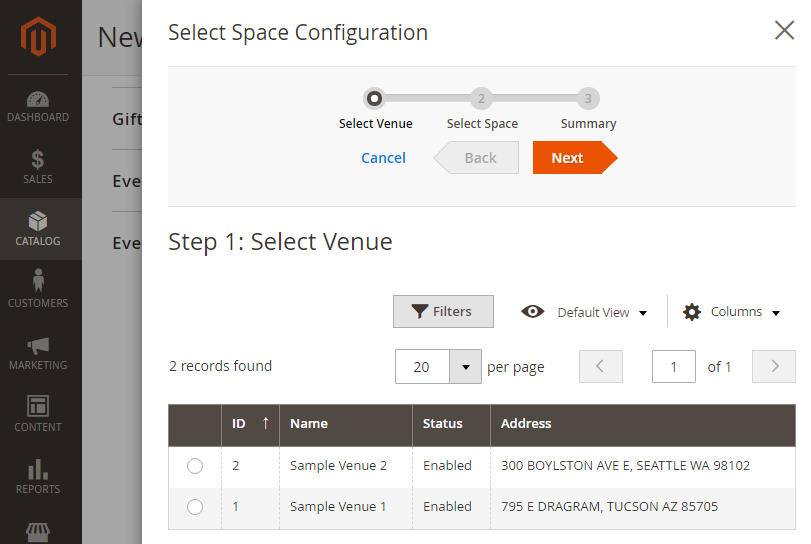
Event Ticket Space Configuration To assign a venue and space to the event, click on the Select Space Configuration button. The emerged popover will guide you through the three consecutive steps to configure spaces for the event: - Select Venue. Assign a venue to the event by picking out one from the list. Click on the Next button to continue and let the popover load the next step. Click on Cancel to break the operation and get back to the New/Edit Product page.
2. Select Space. Assign a space to the event by picking out one from the list. Click on the Next button to continue and let the popover load the next step. Click on Back to get back to the venue selection step. Click on Cancel to break the operation and get back to the New/Edit Product page. 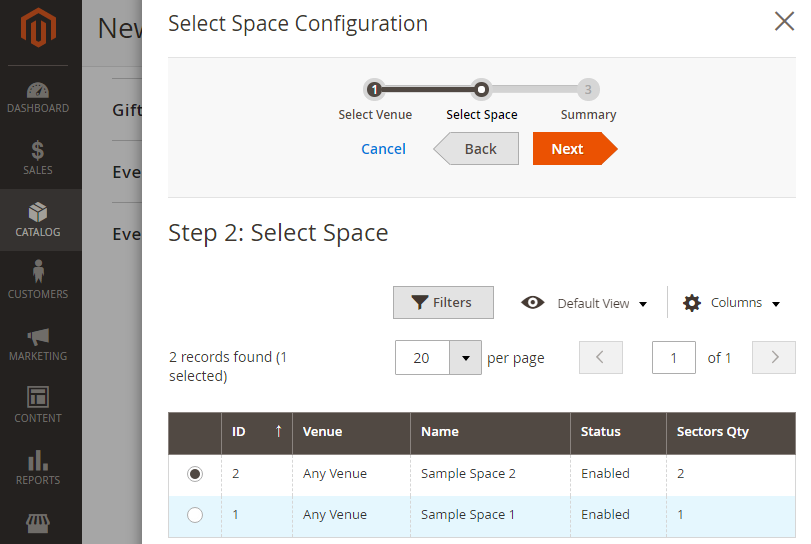
3. Summary. The popover will show a summary of the choices made within the previous two steps. The details herein will also include the list of sectors related to the space. Click on Back to get back to the venue selection step. Click on Cancel to break the operation and get back to the New/Edit Product page. Click on Save Space Configuration to save the configuration and get back to the New/Edit Product page. 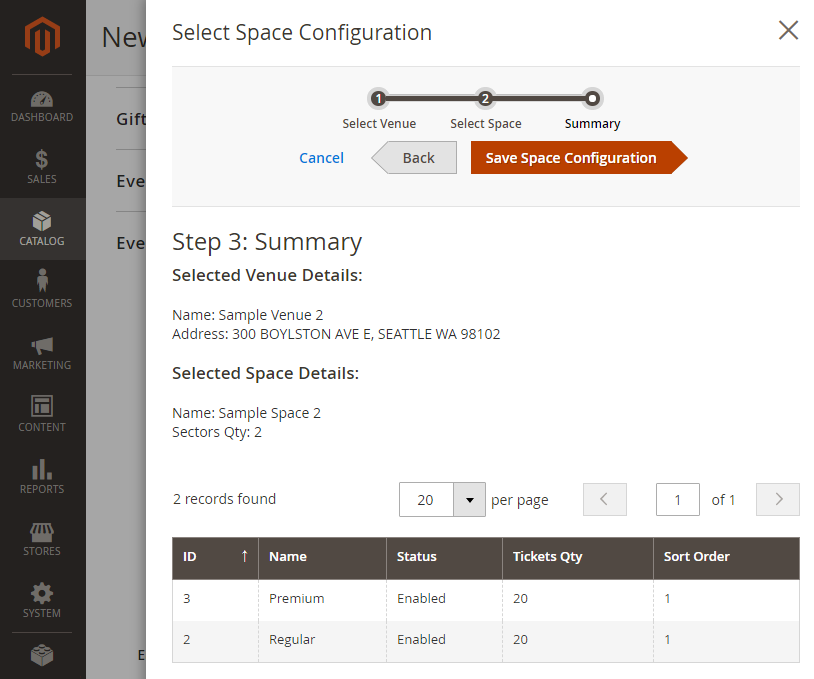
| Info |
|---|
Only one venue and space can be assigned to an event. |
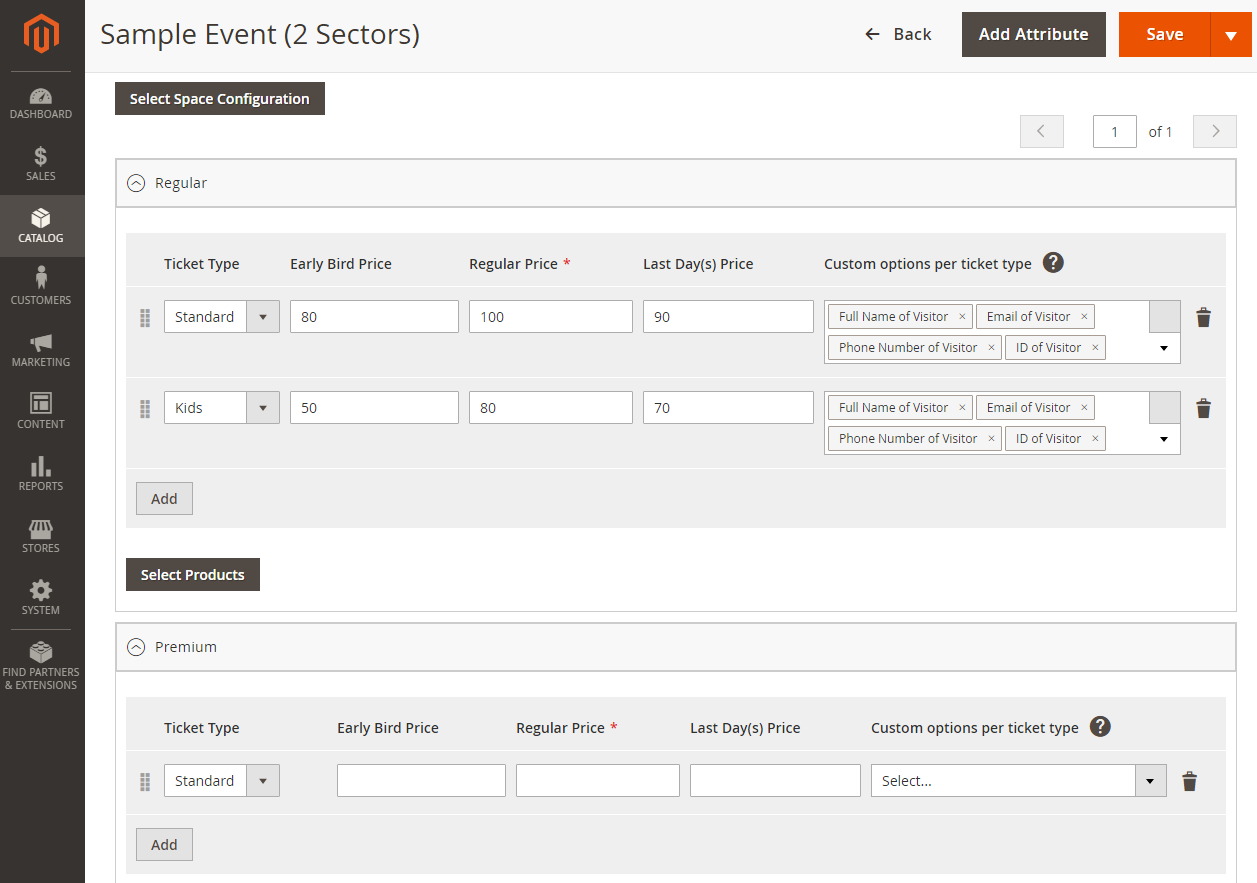
The sectors of the chosen space will be shown below the Select Space Configuration button. The block of a sector allows the following: - adding ticket types
- indicating the early-bird, regular and last-day prices
- selecting custom ticket options
To add a ticket type, click on the Add button at the bottom of the sector block. To delete the type, click on the bucket icon on the right of the 'Custom options per ticket type' box. | Tip |
|---|
You can set the order for the ticket types to appear on the storefront. Use the drag-and-drop icon to the left of the Ticket Type field to change the order of ticket types in the sector block. Push on the icon, drag the ticket type row to the desired place within the sector block, and drop it there. This order will be reproduced on the frontend too. |
Next, the extension allows specifying product suggestions per sector. Those could be products which are needed for one's participation in the event (and customers are able to buy them on your store), or products which match your cross-sells strategy for the event. Suggested products will appear on the storefront below the ticket types on choice of a sector. To add products to a sector, click on the Select Products button at the bottom of the sector block. The Select Products popover will emerge, showing the list of all available products on the store. Tick the products you wish to feature as suggested to the sector and click on the Add Selected Products button in the top right. 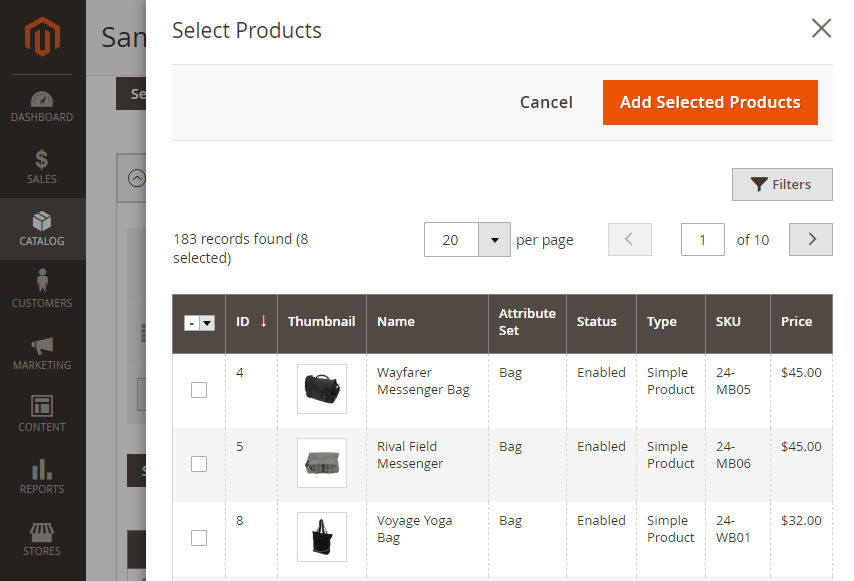 Image Modified Image Modified
Selected products will then be displayed in a grid at the bottom of the sector block. The grid will feature the following columns: ID, Thumbnail, Name, Status, Attribute Set, SKU, Price and Actions. The Actions cells will have the Remove active link, which enables removing items from the Suggested Products grid. | Tip |
|---|
The Suggested Products grid is sortable. To change the order of the products, make use of the drag-and-drop icon on the left of the ID column. Push on the icon, drag the product row to the desired place within the grid, and drop it there. This order will be reproduced on the frontend too. |
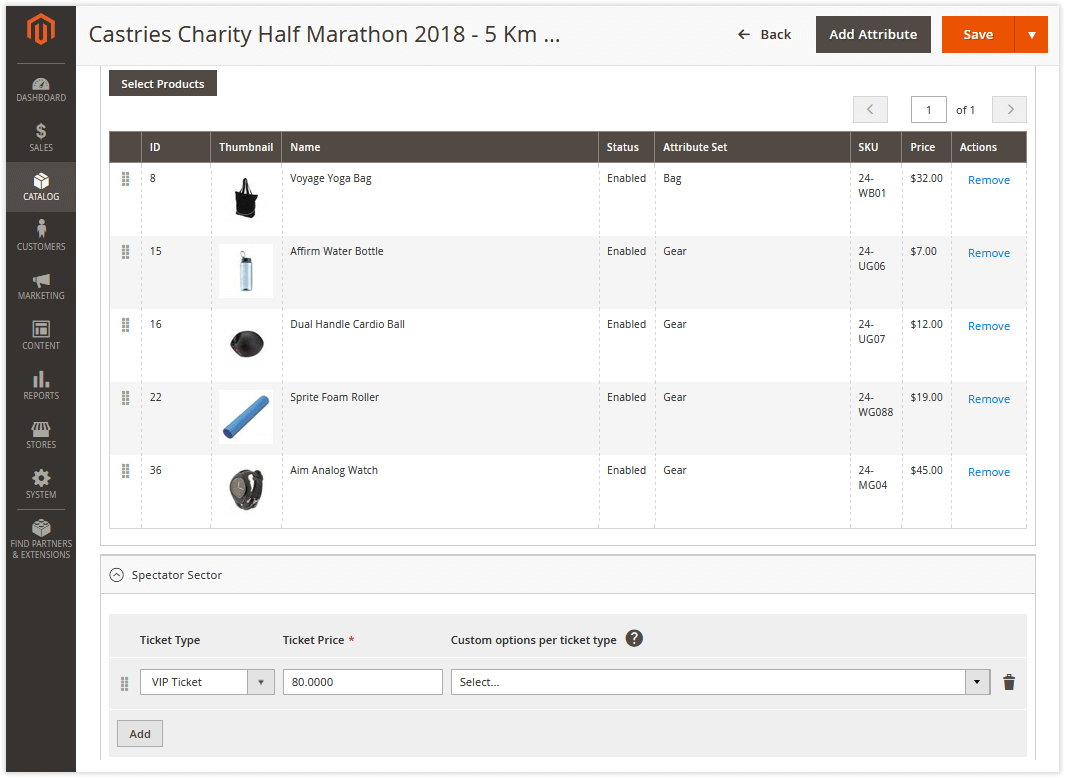 Image ModifiedEvent Ticket Personalization Image ModifiedEvent Ticket Personalization
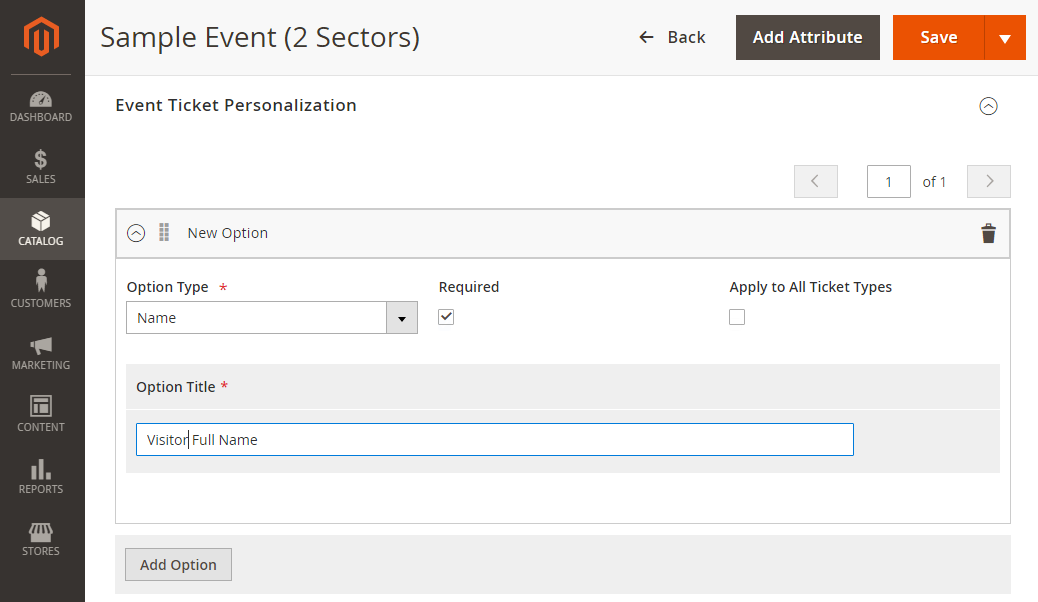
To personalize tickets opt for the Event Ticket Personalization section on the Event Product page. This is where you can add any number of custom options and option fields to the event. These fields will appear on the storefront on selection of a ticket type, and setting its quantity to a number different to the default '0'. To add a personalization option, click on the Add Option button at the bottom of the Event Ticket personalization section. An option block will emerge prompting you to suggest the following details: - Name;
- Email;
- Phone Number;
- Text Field;
- Dropdown;
- Date.
- Required - tick the check box to set the options as mandatory;
- Apply to all ticket types - tick the check box to share the option among all the ticket types assigned to the event;
- Option Title - the name of the option to be displayed both on the frontend and backend.
To delete an option, click on the bucket icon to the right of the option name, | Tip |
|---|
The extension allows ordering personalization options. To change the order of the options, make use of the drag-and-drop icon on the left of the option name. Push on the icon, drag and drop the option block to rearrange the order. The order of the personalization options is reproduced on the frontend. |
To save the event product, click on one of the available options next to the Save button in the top right of the Event Product page. Recurring Events Recurring Events GridAs the name suggests, recurring events take place on a scheduled basis. To view all available recurring events, go to Catalog > Event Tickets by Aheadworks > Recurring Events. The page features a grid of the following columns: - ID - the identification number of the occurrence of the event;
- Name - the name of the event (active link to the New/Edit Event Product page);
- Event Date - the date of the occurrence of the event;
- Time Slot - the time of the occurrence of the event;
- Schedule Type - the type of recurrence of the event;
- Total tickets qty - the overall number of available tickets for the occurrence of the event;
- Used tickets qty - the number of the checked-in tickets for the occurrence of the event;
- Available tickets qty - the difference between the number of all available and used tickets;
- Action - the active link to the detailed ticket page of the occurrence of the event.
The Recurring Events grid aggregates all past, running, and upcoming recurring events. 
| Tip |
|---|
The Event Date, Time Slot and Schedule Type lines are displayed if there is at least one ticket bought. If you want to add a new ticket to the event which is not displayed, create an order with the ticket. |
Tickets GridTo see tickets that were generated for an occasion of a recurring event use the View Tickets link in the corresponding Action cell of the Recurring Events and Tickets grid. For recurring events the Tickets to [Event Name] page looks exactly the same as for one-time events. Creating a New Recurring EventGo to Catalog > Event Tickets by Aheadworks > Recurring Events and click on the Add Event button to create a new recurring event. Events are much similar to native Magento products except for the two specific configuration sections: Event Ticket Options and Event Ticket Personalization. Event Ticket Options The options herein can be distinguished into two categories: General Ticket Options and Event Ticket Space Configuration. General Ticket Options come as the following list: - Require Shipping - overrides the Tickets Require Shipping value in the Configuration of the extension. The option is used for either virtual (shipping is not required) or digital (shipping required) tickets.
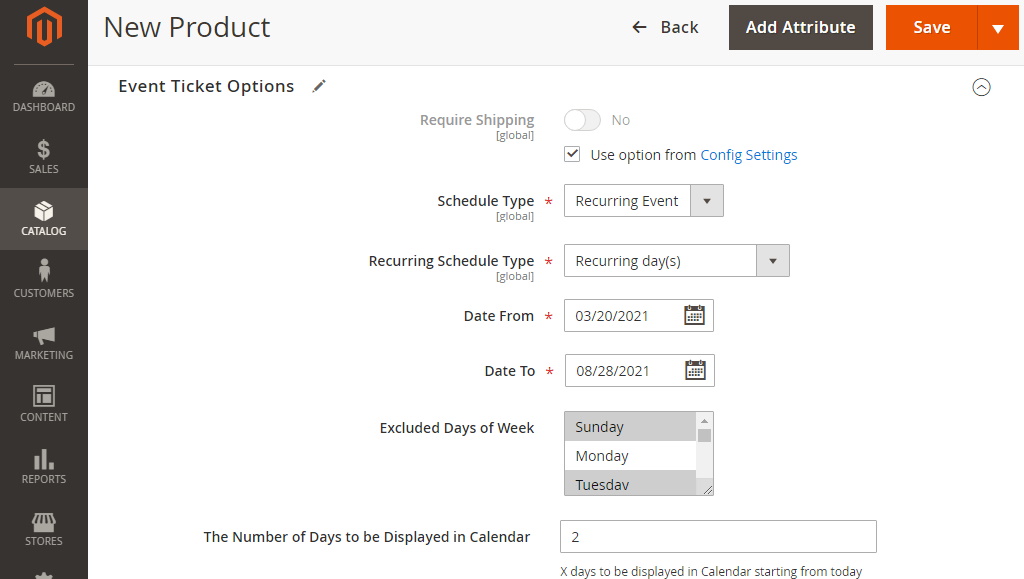
- Schedule Type - the dropbox to select the type of the event: One-Time or Recurring (our choice here);
- Recurring Schedule Type - the type of recurrence: Recurring days, Recurring days of week, Recurring days of month;
- Recurring day(s)
- Date From - the date and time of the start of the event (its first occurrence);
- Date To - the date and time of the end of the event (its final occurrence);
- Excluded Days of Week - selector of days of week when the event is NOT to occur (multiple days can be selected).
- Recurring day(s) of week
- Days of Week - the selector of days of week when the event is to occur (multiple days can be selected);
- Repeat Every [whole numeric] week(s) starting from [date] - the rule for the recurrence of the event, considering the date of the start of the event and the index of recurrence (in weeks).
- Recurring day(s) of month
- Days of month - the text-field to receive whole numeric values which correspond the ordinal number of the days of a month when the event is to take place (the numbers are to be separated with a comma).
- The Number of Days to be Displayed in Calendar* - the number of days with time-slots that will be displayed in Calendar (the option is available only if Recurring Schedule Type is Recurring Days). If left empty or set to zero - no limit.
 - Time Slots - the start and end times of an occurrence of the event (multiple time slots can be added with the help of the Add button at the bottom of the Time Slots block);
- Enable Filter by Available Ticket Quantity* - by setting the option to YES, the filter “Ticket Qty” is displayed above Calendar. The default filter qnt = 1. Max qty is no more than available qnt of tickets for this event;
- Time-slots Multiselection* - by setting the option to YES, a customer/admin will be able to select multiple time-slots in Calendar within one purchase.
- Tickets Selling Deadline - event tickets selling deadline date and time: Event Start Date, In Advance (When In Advance is selected, three additional fields emerge where the Admin is asked to indicate the whole numbers to tell the in-advance period in days, hours and minutes).
* Work both for frontend and backend order placing process. 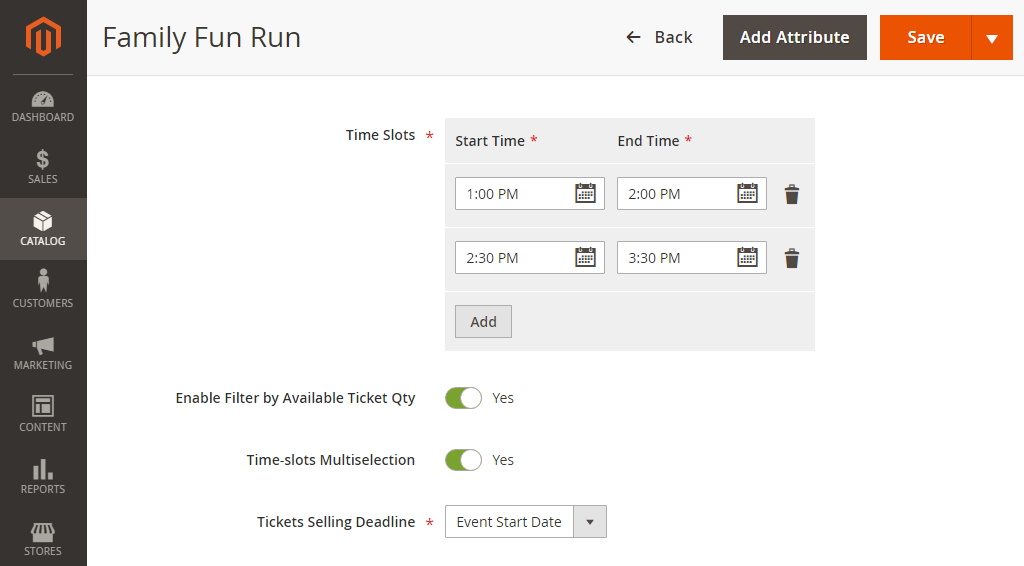
| Note |
|---|
What happens when the Admin tries to edit the event which has some tickets sold? When the Admin clicks on the Bucket icon to delete a time slot, a js-prompt is displayed with the following warning: Warning: There may be tickets purchased on this time slot! If you proceed, make sure to contact the customers to rearrange the bookings. Do you want to delete the time slot? Yes/No |
Event Ticket Space Configuration To assign a venue and space to the event, click on the Select Space Configuration button. The functionality here is the same as described above in the One-Time Events chapter. Event Ticket Personalization To personalize tickets opt for the Event Ticket Personalization section on the Event Product page. This is where you can add any number of custom options and option fields to the event. These fields will appear on the storefront on selection of a ticket type, and setting its quantity to a number different to the default '0'. The functionality here is the same as described above in the One-Time Events chapter. To save the event product, click on one of the available options next to the Save button in the top right of the Event Product page. How to Make a Product Available with Tickets Only?- Go to Catalog > Products.
- Choose a product and click Edit in the corresponding Action cell.
- Scroll down to the Event Ticket Related Options section, and click on the Can be Purchased Only With a Ticket toggle to set it to 'Yes'.
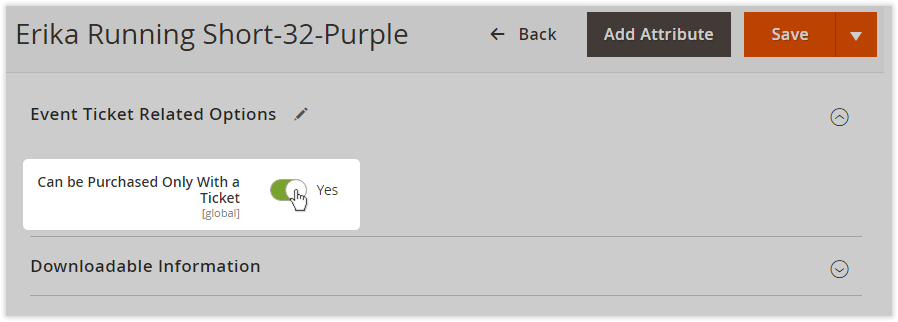
Once you save the changes, customers will see an alert on the given product page. The alert message will also contain a link to the event pa. 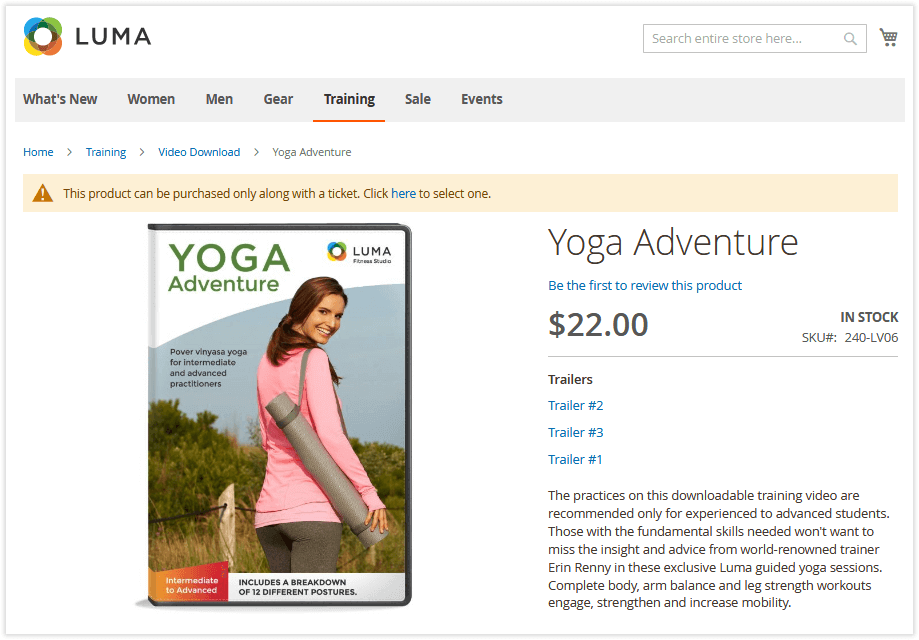
| Note |
|---|
For configurable products, the logic is the following: - If a configurable product has the 'Can be Purchased Only With a Ticket' option enabled, all child products will inherit the behavior of the parent product.
- If the configurable product has the 'Can be Purchased Only With a Ticket' option disabled, every child product will follow its own behavior.
|
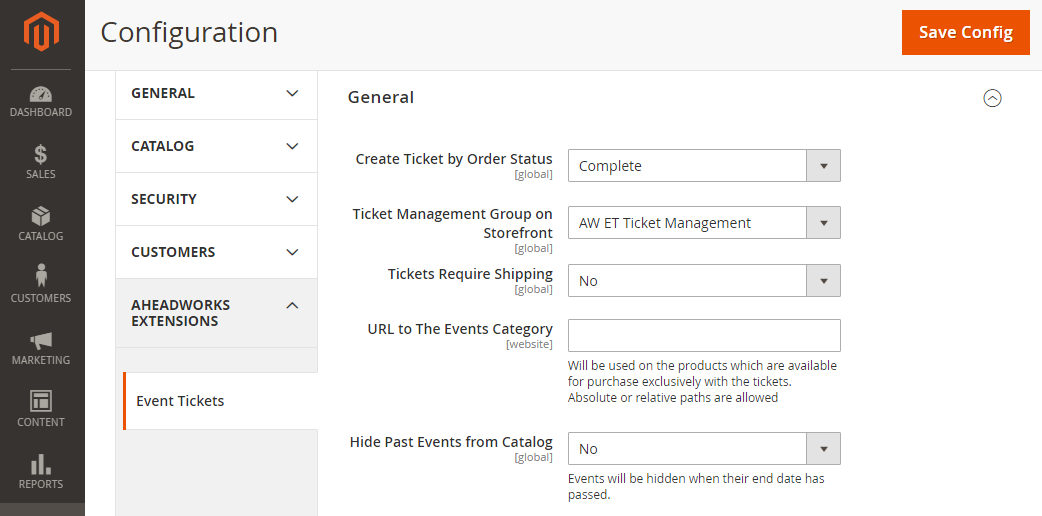
Extension ConfigurationThe extension configuration section is available at Stores > Configuration > AHEADWORKS EXTENSIONS > Event Tickets. The configuration page contains three sections: General, Email Settings, Ticket Number Pattern. General Settings- Create Ticket by Order Status - lists all the available order statuses. Here you can select the one that will trigger ticket creation. If you, for example, sell tickets in installments ("attend now, pay later"), you need to select some other order statuses apart from 'Completed';
- Ticket Management Group on Storefront - defines a user group eligible to verify purchased tickets through QR and/or barcode scanning;
- Tickets Require Shipping - makes it possible to determine whether you are going to sell only digital tickets (with 'No') or physical ones as well (with 'Yes');
- URL to The Events Category - the link that will be provided on the pages of the products available exclusively with tickets;
- Hide Past Events from Catalog - defines if the events will be hidden from the catalog on surpassing the end date.
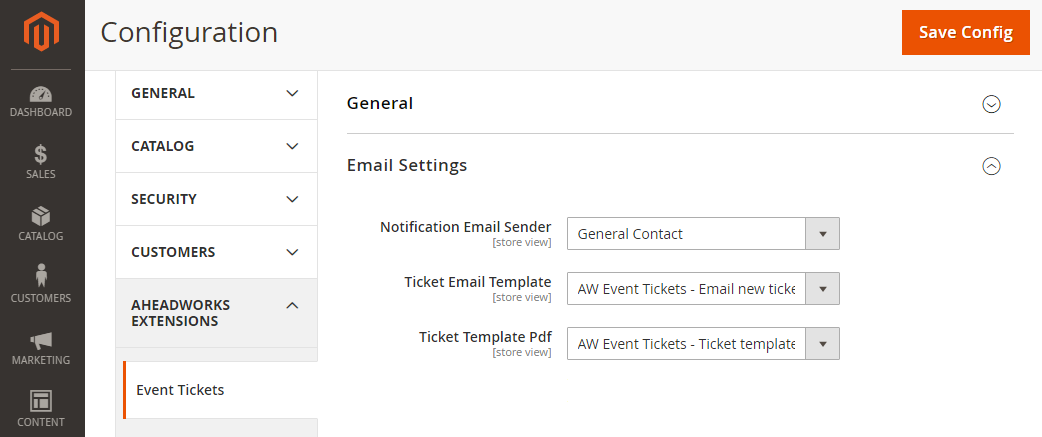
Email Settings- Notification Email Sender -specifies the email address to be used for sending tickets to customers;
- Ticket Email Template - the email template to be used to send tickets to customers;
- Ticket Template PDF - the PDF template to be used as a ticket.
| Info |
|---|
Email Template Variables - $ticket.getCustomerName - fetches the name of the customer;
- $ticket.getCustomerEmail - fetches the email of the customer;
- $ticket.getAttendeeName - fetches the name of the ticket recipient (actual attendee);
- $ticket.getAttendeeEmail - fetches the email of the ticket recipient (actual attendee);
- $ticket.getEventTitle - fetches the event product title;
- $ticket.getEventDescription - fetches the content of the 'Full description' field on the event product configuration page;
- $ticket.getEventAddress - fetches the address of the venue;
- $eventStartDateFormatted - fetches the start date of the event;
- $eventEndDateFormatted - fetches the end date of the event;
- $eventImageUrl - fetches the image of the event.
|
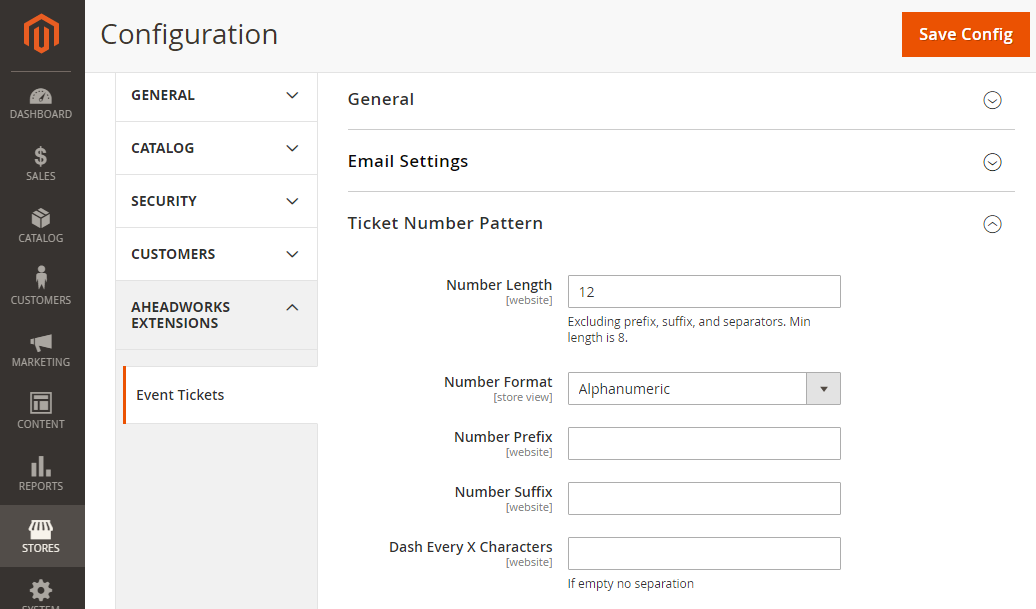
Ticket Number PatternsIn addition to QR and barcodes, each ticket has its own unique ID, and Magento admins are able to define the pattern of each ID: - Number Length - defines the length of ticket IDs;
- Number Format - defines the format of the ID. Can be numeric, alphabetic, or alphanumeric;
- Number Prefix - the prefix to be added to the ID;
- Number Suffix - the suffix to be added to the ID;
- Dash Every X Characters - separates the ID for better readibility.
| 
.png?version=1&modificationDate=1613405017398&cacheVersion=1&api=v2&width=450)