| Section | |||||||||||||
|---|---|---|---|---|---|---|---|---|---|---|---|---|---|
|

Thank you for choosing Aheadworks!
...
| Command Line Installation | Composer Installation | |||||||||||||||||||||||||||||||||||||||||||||||||||||||||||||||||||||||||||||||||||||||||||||||||||||||||||||||||||||||||||||||||||||||||||||||||||||||||||||||||||||||||||||||||||||||||||||||||||
|---|---|---|---|---|---|---|---|---|---|---|---|---|---|---|---|---|---|---|---|---|---|---|---|---|---|---|---|---|---|---|---|---|---|---|---|---|---|---|---|---|---|---|---|---|---|---|---|---|---|---|---|---|---|---|---|---|---|---|---|---|---|---|---|---|---|---|---|---|---|---|---|---|---|---|---|---|---|---|---|---|---|---|---|---|---|---|---|---|---|---|---|---|---|---|---|---|---|---|---|---|---|---|---|---|---|---|---|---|---|---|---|---|---|---|---|---|---|---|---|---|---|---|---|---|---|---|---|---|---|---|---|---|---|---|---|---|---|---|---|---|---|---|---|---|---|---|---|---|---|---|---|---|---|---|---|---|---|---|---|---|---|---|---|---|---|---|---|---|---|---|---|---|---|---|---|---|---|---|---|---|---|---|---|---|---|---|---|---|---|---|---|---|---|---|---|---|
|
|
.png?version=1&modificationDate=1613401999884&cacheVersion=1&api=v2&width=450)
Introducing M2 Smart One Step Checkout
...
| Section | ||||||
|---|---|---|---|---|---|---|
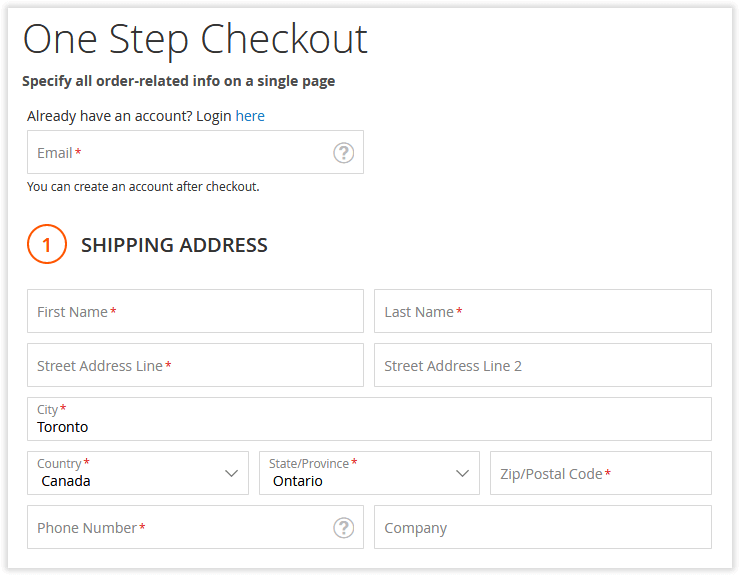
The one-step checkout page introduced by the extension provides all the necessary functionality in one place.
The extension is designed in a way to minimize the number of customers leaving the checkout page. Let's take a closer look at it. Login and Shipping Address
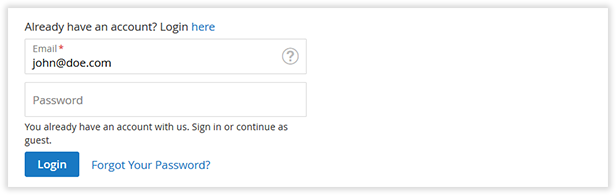
The first checkout block offers customers to log in and fill in the information about their shipping address. Customers are suggested to enter an email address. If there is already an account at the store with such email, the system will recognize it and provide the appropriate suggestions.
Additionally, customers can click the 'Login here' active link to log in manually. Whenever the link is clicked, customers will see a pop-up window suggesting them to enter their login data. Shipping AddressBelow the login and registration fields, you can see the 'Shipping Address' block. With every field, all the entered information is cached within the session. This way, if unexpected page reloads take place, all the already submitted info will be saved. Shipping MethodNext, customers are presented with the 'Shipping Method' block.
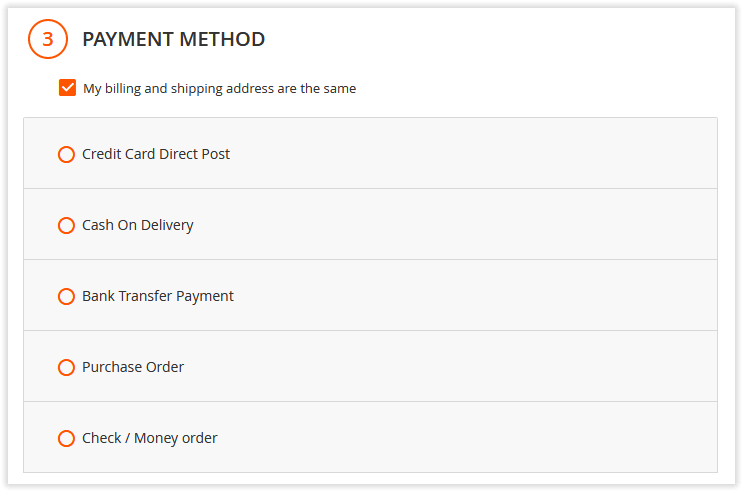
Here customers can choose the preferred shipping method and define a delivery date and time (if allowed by the extension settings). The 'Delivery Date' and 'Delivery Time' options are flexible and set in the admin area. Any dates and time intervals can be specified depending on the delivery options available. Preferred delivery date and time are displayed on the order details page. Payment MethodNext comes the 'Payment Method' block.
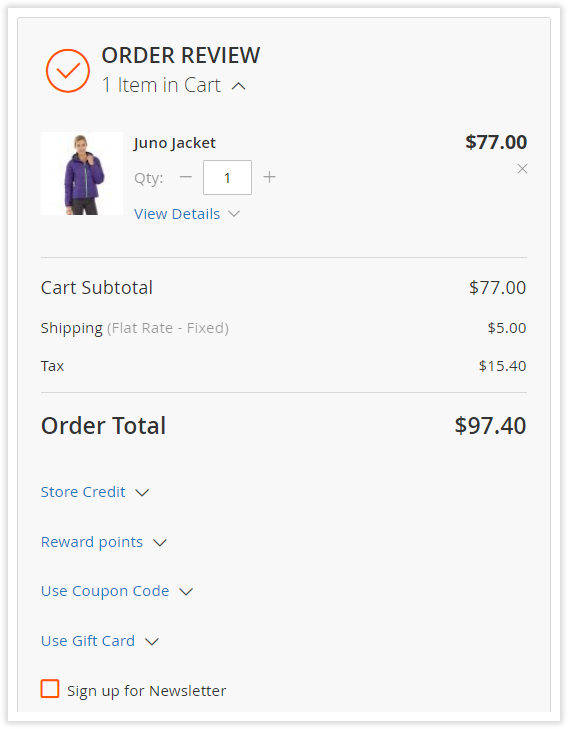
Here customers are suggested to specify the preferred payment method and billing address if it doesn't correspond to the shipping address. Depending on the selected payment method, customers will be either suggested to fill in the required fields or redirected to the payment method side. This solely depends on the configuration and peculiarities of the chosen payment method. Order ReviewOn the right side of the checkout page, customers are presented with the 'Order Review' block. The block provides an overview of all the products added to the cart. Here, customers can remove products, change product quantity, and apply discount codes. Whenever the product quantity is adjusted or the product is removed from cart, the order total is adjusted automatically without page reloading.
Supported Payment OptionsSmart One Step Checkout is integrated with several Aheadworks extensions, including Payment Restrictions, Shipping Restrictions, Store Credit and Refund, Gift Card, and Reward Points. Further to the above, the extension supports a few payment methods and payment gateways: B2B Company Credit, NET.30, Authorize.net, Bambora APAC, NMI, PayPal via Braintree, PayPal Payflow, Amazon Pay, Affirm and Klarna. Authorize.net The extension is compatible with new Authorize.Net payment method that has been added to M2.3.1 instead of Authorize.Net Direct Post (Deprecated).
Amazon Pay We added integration with Amazon Pay, meaning that you can easily register and login to your Magento website and complete checkout using the information and payment methods stored in your Amazon accounts. Bambora APAC Bambora payment support is possible with a standalone module Bambora APAC, available for purchase on the Aheadworks store. NMI NMI payment support is possible with a standalone module NMI Payment available on the Aheadworks store. On Credit Payment The On-Credit payment support is possible with a standalone module B2B Company Credit available on the Aheadworks store. NET 30 Deferred Payment Deferred payment (NET 30) support is possible with a standalone module NET 30 available on the Aheadworks store. PayPal Should you be planning to enable Paypal via Braintree, make sure you install the official Braintree module developed by Gene Commerce.
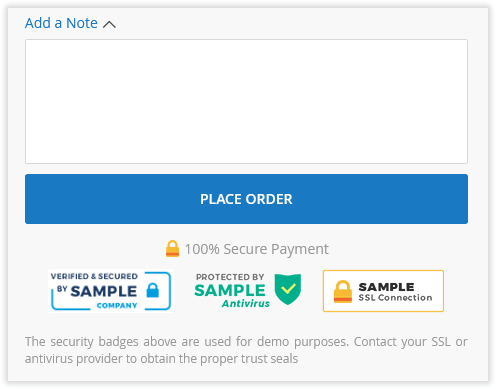
Klarna We added integration with Klarna payment method, which means that you can register and login to your customers can make payments in your Magento website and complete checkout using Klarna. To configure payment methods to be available at checkout, please refer to Stores > Settings > Configuration > Sales > Payment Methods. The official Magento 2 guide will be of help here. To extend the native Magento 2 functionality and specify payment methods to be available at checkout to selected groups of customers install the Payment Restrictions module (extra fee may apply). Adding Notes and Placing an OrderThe last block of the one-step checkout page is the field for notes.
Here customers can leave any note to the admin that will be available on the order details page. Additionally, the admin can upload trust seals of the payment methods available and specify a secure payment label. In the above image, you can see the uploaded official PayPal trust seal and the '100% Secure Payment' secure payment label specified. |


...