Extension SettingsStart configuring the extension by going to Stores > Configuration > AHEADWORKS EXTENSIONS > Affiliate. The configuration page is divided into five sections. We will explore each separately. 
SignupThe 'Signup Settings' section is presented by two parameters: - Select Terms & Conditions CMS Page - defines the page on your web store with affiliate program terms & conditions.
| Note |
|---|
After the installation, the module adds a separate CMS Terms & Conditions page with sample content. |
- Admin Approval Needed - defines whether you need to manually approve affiliate program signup requests. If left to No, all requests will be approved automatically.
Commission ConfigurationThe 'Commission Configuration' section has the following options: - Add Commission When The Order Item Obtains Status - defines the referred customer's order status upon which the affiliate will get a commission (pending until the commission holding period expires): Ordered, Invoiced, or Shipped;
| Note |
|---|
Commissions are accrued upon reaching a particular order item status, not order status. This is particularly useful for the orders that include the items that require commission accrual and those that don't. In case an invoice and shipping are created at the same time (therefore, the order item instantly receives the hardcoded 'Shipped' status bypassing the 'Invoiced' status), the commission is accrued upon reaching the predefined status or the 'Shipped' status. |
- Deduct Commission When The Order Item Obtains Status - the option sets automatic commission deduction (before the commission holding period expires) upon the selected order status: Canceled, Refunded, or Returned.
Payout ConfigurationThe 'Payout Configuration' section contains the following parameters: 
Admin Email ConfigurationThe 'Admin Email Configuration' section comes with the following parameters: - Admin Email - the email address for admin alerts. If left empty, admin alerts will be disabled;
- Sender - the name of the default email sender;
- New Signup Request Template - the email template for new affiliate program signup requests;
- New Payout Template - the email template for new affiliate program payouts;
- Payout Reminder Template - the email template for payout issue reminders;
| Note |
|---|
For store views with separate payout reminders related to the same template, the same reminder will be sent to each email address specified. |
Affiliate Email ConfigurationThe 'Affiliate Email Configuration' section comes with the following parameters: - Payout Complete Template - the email template for payout completion reminders;
- Payout Cancellation Template - the email template for payout cancellation alerts;
- Affiliate Rejection Template - the email template for affiliate program signup request rejections;
- Affiliate Confirmation Template - the email template for affiliate program signup request confirmation.
Affiliate CampaignsTo work with affiliate campaigns, proceed to Marketing > Affiliate by AheadWorks > Campaigns. Managing Affiliate CampaignsThe Campaigns grid is designed for affiliate campaign management and monitoring. The data in the grid is split into the following columns: - ID - the ID of the campaign;
- Name- the name of the campaign;
- Allow Link Generation - shows whether promotion via links is allowed within the campaign;
- Coupon - shows whether promotion via coupon codes is allowed within the campaign;
- Commission - the commission amount provided by the campaign. Can be fixed (displayed in the website's base currency) or percent (as shown in the above picture);
- Status - the status of the campaign;
- Website - the website the campaign is assigned to;
- Action - provides the 'Select' box with the following per-campaign options: Edit, Delete, Disable.
From the 'Action' box above the grid, you can delete, enable, or disable campaigns one by one or massively. 
Creating/Editing Affiliate CampaignsTo create a new campaign, click on the New Campaign button at the top right of the page. To edit a campaign, click on the corresponding Select selector in the Action column. 
The Create/Edit Campaign pages is split into several sections: General Information, Conditions, Link Configuration, Coupon Configuration, Commission Configuration and Recommended Products. In the 'General Information' section, you can specify campaign credentials and assign affiliate groups (individual groups or all groups) to the campaign. In the 'Conditions' section, you can set campaign-specific conditions based on Cart and product attributes. | Note |
|---|
| title | Notes on conditioning campaigns |
|---|
| - Commission rate and/or coupon code will be applied only to the cart items that fall under the specified conditions.
- To assign no conditions to the campaign and make it accessible for all products, leave the Conditions area blank.
|
 Image Modified Image Modified
Refer to the 'Link Configuration' section to enable link generation for the campaign. This is where you can define a link tracking gap - the period [of the lifetime of the cookie] during which the Affiliate will be able to get commissions from campaign-related purchases. | Info |
|---|
If set to 0, the cookie lifetime will be equal to the session time. |
Refer to the 'Coupon Configuration' section to enable and set up the coupon-based promotion type of campaigns. To enable the coupon, select Specific coupon in the 'Coupon' box. You will then be able to define the coupon code, the number of coupon uses per affiliate, discount type (percent or fixed), and discount amount. | Note |
|---|
When the '0' value is set for the 'Uses per Affiliate' option, the number of coupon usages is unlimited. Once any of the affiliates have generated a coupon code for the first time within the campaign, a mirror rule is created automatically in the 'Cart Price' rules. Without this rule, the coupon code can't be applied. In this mirror rule, the 'Uses per Affiliate' option is automatically set to unlimited for all customer groups. |
| Warning |
|---|
It's not recommended changing the mirror rule's settings since the campaign-related coupons won't work the way they are configured in the affiliate marketing campaign. |
| Info |
|---|
If you delete the Affiliate module, all the previously created rules will not be erased. This means that all the related coupons will keep working. To avoid this, you need to delete rules manually. If you delete a website, all the assigned affiliate campaigns will be deleted. However, the previously configured mirror shopping cart rules will remain, meaning that you will have to delete them manually. |
Proceed to the 'Commission Configuration' section to define the type of the commission (% or fixed) and indicate the amount of thereof. Refer the 'Recommended Products' section to (optionally) pick products to be displayed as recommendations for the promotion. The recommendation list can be further edited whenever required. | Note |
|---|
To share campaigns with the same conditions between multiple websites, use the 'Save & Duplicate' option in the 'Save' box at the top right of the page. |
Signup Requests All signup requests can be monitored and managed via Marketing > Affiliate by AheadWorks > Signup Requests.  Image Modified Image Modified
The data in the 'Signup Requests' grid is broken down by the following columns: - ID - the ID of the request;
- Customer Name- the name of the Customer;
- Customer Email - the email address from which the Customer sent a signup request;
- Website - the website to which the Customer sent the request;
- Signup Date - the date of the signup;
- Referral Website - the primary traffic source from where the Affiliate will promote the products within the campaign;
- Status - the status of the signup request status: Pending, Approved, or Declined;
- Action - the 'Select' selector to allow one of the following: View, Delete, Approve, and Decline.
You can also perform the latter three operations massively from the 'Actions' box above the grid. | Info |
|---|
When the Affiliate account is created on the Backend, some relevant fields above will contain data as they are stored in the Customer profile. |
In case of signup request decline, you can optionally specify the reason in the Decline Reason text-box on the 'Signup Request' 'page. 
Affiliate AccountsTo work with affiliate accounts proceed to Marketing > Affiliate by AheadWorks > Accounts. Managing Affiliate AccountsThe 'Accounts' grid lists the information about affiliate accounts split by the following columns: - Affiliate Name - the name of the Affiliate;
- Affiliate Email - the email address of the Affiliate;
- Website - the website where the Affiliate implements the campaign;
- Affiliate Group - the group the Affiliate belongs to;
- Signup Approval Date - the date when the Affiliate's signup request was approved;
- Available Commissions - the total sum of the available commissions (the ones with the holding period already expired) plus admin transactions per affiliate;
- Paid Commissions - the total amount of paid commissions. The amount is calculated based on the sum of completed payouts;
- Status - the current status of the affiliate's account;
- Action - the 'Select' selector with the following options: Edit and View Signup Request.
| Note |
|---|
An affiliate account is valid on a specified website only. If the Affiliate wants to have an account on several websites, he/she will need to create separate credentials for each site. This will enable separate affiliate accounts with separate balances on each website. The websites might have their individual base currencies. |
From the 'Actions' box above the grid, you can activate/deactivate the selected account(s). 
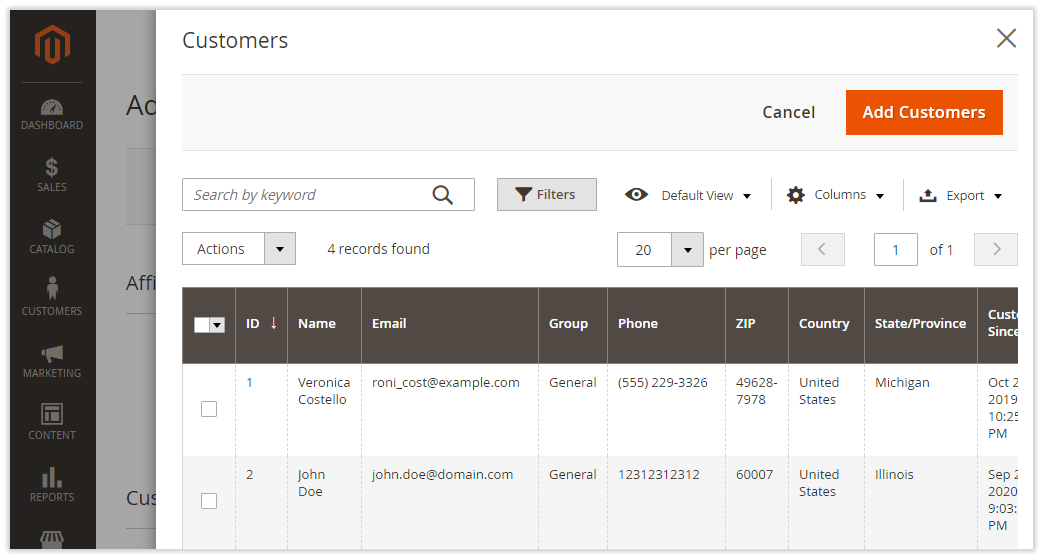
Adding Affiliate AccountsTo add a new Affiliate account, click on the Add New Affiliate button in the top right of the page. This will redirect you to the Add New Affiliate page. The page allows selecting a web-site and a group for the Affiliate. Do that with the help of the two drop-boxes: - Website (Main Website by default, if not set otherwise)
- Affiliate Group (Default group by default)
The page enables assigning a customer for the Affiliate account. 
To assign a customer to the account, click on the Add Customers button at the bottom of the Add New Affiliate page. A popover will emerge prompting to select a customer from the grid. Click Add Customers in the top right of the popover when done. You will be returned to the Add New Affiliate page. The Customers grid at the bottom of the page will feature the following details of the chosen customer: - Customer ID
- Name
- Email
- Group
- Website
- Actions
To remove the customer, click on the Remove active link in the corresponding Actions cell. | Info |
|---|
It is a particular feature of the extension (as of version 1.1.0) that multiple affiliate accounts can be created on the Backend within one operation. To create multiple affiliate accounts, select multiple customers on the customer selection step above. The Customer grid on the Add New Affiliate page will then feature multiple entries. Remember, that when creating affiliate accounts in bulk, you create them with the same values of Website and Affiliate Group. |
To finalize the configuration of the account(s), click on the Set As Affiliate in the top right of the Add New Affiliate page. | Note |
|---|
| title | Affiliate account will not be created if: |
|---|
| An affiliate account will not be created if: - there is a pending signup request from the selected herein customer, and this signup was made from the store view similar to the selected herein website
- there is already an existing affiliate account for the selected customer and website
|
Editing Affiliate AccountsTo edit an affiliate account, click on the corresponding Select selector in the Actions column on the Accounts page. You will be redirected to the Edit Affiliate Account page. This is where you can view the details of the affiliate account. Use the Status and Affiliate Group drop-boxes to update the status and group of the Affiliate. To view the signup request of the Affiliate click on the View active link next to the Signup Request option. You will then be redirected to a page featuring the details of the sign-up. 
Affiliate GroupsTo view the affiliate groups presented in the store, follow to Marketing > Affiliate by AheadWorks > Affiliate Groups. Managing Affiliate GroupsThe 'Affiliate Groups' grid shows data on affiliate groups broken into the following columns: - ID - the id of the affiliate group;
- Group Name - the name of the group;
- Commission Type - the type of commission provided for the group (fixed or percent);
- Commission Premium - the amount of the commission premium (if provided) for the group;
- Commission Holding Period, day(s) - the duration of the commission holding period (in days) per group;
- Action - the column contains the 'Select' box from where you can edit/delete the corresponding group.
With the 'Actions' box above the grid, you can delete selected affiliate group(s) in bulk. 
Creating/Editing Affiliate GroupsTo create a new affiliate group, click the New Affiliate Group button above the grid. To edit an affiliate group click on the Select selector in the relevant Action cell and choose Edit. In each case you will be redirected to the Create/Edit Affiliate Group page. The page will prompt you to indicate the following details: - Group Name
- Commission Type
- Commission Premium
- Holding Period
By setting individual commission amounts and commission holding periods per group, you can reward best performing affiliate groups with higher commissions and shorter holding periods. This is how you can encourage their active participation in your campaign. At the same time such fine-tuning helps prompt the under-performing groups to collaborate with you more actively. 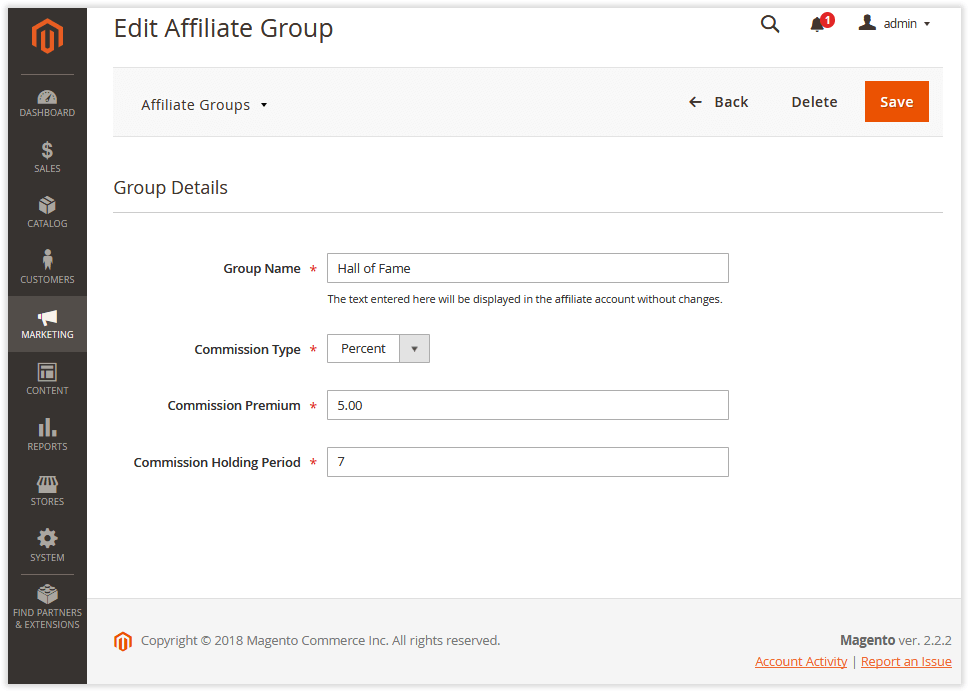
Transactions To work with affiliate program transactions, go to Marketing > Affiliate by AheadWorks > Transactions. Monitoring TransactionsThe data in the 'Transactions' grid is presented within the following columns: - ID - the ID of the transaction;
- Affiliate Name - the name of the Affiliate;
- Affiliate Email- the email address of the Affiliate;
- Type - the type of the transaction:
- Commission - transactions per purchase made during the campaign
- Payout - transactions to affiliate balances (Completed payouts can be exported into XML/CSV)
- Admin changes - in-coming/out-coming transactions which you create on the Backend
| Info |
|---|
All admin manual transactions relate to the 'Admin Changes' transaction type. |
| Note |
|---|
Commissions are created when an item in the order meets the conditions of the campaign and receives the status defined in Add Commission When The Order Item Obtains Status Extension Configuration. |
- Website - the website from where the transactions are performed;
- Status - the status of the transaction: Complete, Pending, or Canceled;
The table below shows the relation of an affiliate account balance with the status of the transaction. 
- Amount - the amount of the transaction;
- Creation Date - the date of transaction creation;
- Holding Period Expiration Date - the date when a) the transaction changes the status from Pending to Complete; b) pending commissions in the affiliate account get decreased by the transaction amount, while the commissions available get increased by it, respectively;
- Comment - the comment the Admin may leave to the transaction. For transactions of the 'Commission' type, the comment will include the title of the items which invoked the commission;
- Action - the Go to Affiliate active link leading to the 'Edit Affiliate Account' page.

Creating/Editing TransactionsTo create a new transaction, click the Create Transaction button in the top right corner of the Transactions page. You will be redirected to the Create Transaction page. The page prompts to do the following to create a transaction: - Select the required affiliate - make use of the Select Affiliate button and the subsequent Select Affiliate popover.
- Specify the transaction amount (positive or negative) - indicate the amount in the Amount field. Do that in the website base currency. Use negative values to subtract money from the affiliate's balance.
- Add a comment - type the comment into the Comment field.

Understanding Transaction Flow Transaction flow is illustrated in the chart below. 
| Note |
|---|
| title | How bundled items receive their commission? |
|---|
| For orders containing both parent and child items the logic of commissioning is as follows: An item receives its status if either a parent item or all child items have this status; To indicate which item type - parent or child - determines the end status of the item, consider the following bundle product options: Dynamic Price (Yes/No) and Ship Bundle Items (Together/Separately); According to the native Magento 2 logic, a configurable product is equal to a bundle product with the 'Dynamic Price' option set to No and the 'Ship Bundle Items' parameter set to Together. To clarify, it is suggested that the Configurable type is a particular case of bundle products; For products with Dynamic Price = No and Ship Bundle Items = Together, all statuses are determined by the parent item; For products with Dynamic Price = Yes and Ship Bundle Items = Separately, all statuses are determined by child items; For products with Dynamic Price = No and Ship Bundle Items = Separately, by child items, only the 'Shipped' status is determined; For products with Dynamic Price = Yes and Ship Bundle Items = Together, all statuses are determined by child items, and the 'Shipped' status is determined by the parent item |
PayoutsTo monitor money outflow in the context of affiliate payouts, go to Marketing > Affiliate by AheadWorks > Payouts. The 'Payouts' grid contains the payout data presented within the following columns: - ID - the ID of the payout;
- Affiliate Name - the name of the Affiliate;
- Affiliate Email - the email address of the Affiliate;
- Type- the type of the payout (manual or automatic);
- Payment Type - the type of payment (PayPal or other);
- Payment Info - the additional payment info. If the affiliate uses PayPal as the payment type, this field will indicate their PayPal email address. In the case of another payment type, the field will contain the corresponding info about the appropriate payment destination;
- Payout Amount - the amount of the payout;
- Currency - the base currency of the store;
- Status - the status of the payout: Pending, Processing, Canceled, or Complete;
- Created At - the date of payout creation;
- Updated At - the date of the last update of the payout;
- Action - the column contains the 'Select' box from where you can go to the affiliate details page, process, complete, or cancel the corresponding payout.
With the 'Actions' box above the grid, you can change the status of the selected payouts in bulk. The options available here are Processing, Compete, or Canceled. 
| Info |
|---|
Export payout data into CSV/XML with the help of the Export button below the Payouts grid. Do that to issue mass payouts to affiliates, for example. The workflow herein goes as follows: - Payouts are exported to CSV/XML;
- The admin manually edits the exported payouts in accordance with the required payment processor's standards;
- The edited payouts are imported into the required payment processors;
- The admin issues payouts in bulk.
|
Sales by Affiliate Link ReportTo access the performance statistics of the link-based promotions, go to Reports > Affiliate by AheadWorks > Sales by Affiliate Link. The 'Sales by Affiliate Link' gridcontains the reporting data split by columns: - Affiliate Email - the email address of the affiliate;
- Campaign - the related affiliate campaign;
- Hits - the number of clicks on the link;
- Orders - the number of orders within the campaign;
- Buyers - the number of visitors who came via the affiliate link and made at least one purchase;
- Commissions - the available commission amount;
- Conversion - the number of visitors who has come via the affiliate link and made at least one purchase to hits ratio.

| Note |
|---|
The report employs information only about the available commissions and only for the last three months. |
Sales by Coupon ReportTo view the performance of the coupon-based promotions, go to Reports > Affiliate by AheadWorks > Sales by Coupon. The 'Sales by Coupon' gridcontains the reporting data split by columns: - Affiliate Email - the email address of the Affiliate;
- Campaign - the related affiliate campaign;
- Coupon Code - the coupon code of the Affiliate;
- Total № of Uses - shows how many times the coupon was used;
- Commissions - the available commission amount.

| Note |
|---|
The report employs data only about the commissions available and only for the last three months. |
| Info |
|---|
The 'aw_aff_link_statistics' database table stores complete statistics on the performance of all the campaigns within the life-cycle of the extension. Should need be, you can upload the data from the table and analyze it outside Magento. |
| 
.png?version=1&modificationDate=1613403059752&cacheVersion=1&api=v2&width=450)


.png?version=1&modificationDate=1564159750040&cacheVersion=1&api=v2)