...
| width | 50% |
|---|
| Table of Contents |
|---|
| Warning |
|---|
Firefox user notice: Please use another web browser to view this document. Sorry for the inconvenience. |
...
| width | 30% |
|---|
...

Magento 2 Shop by Brand adds a designated page that lists all brands presented in a store. From there, users can navigate to particular brand pages with related products. More to it, the module allows displaying a widget with all and featured brands across different site pages and in various page positions and promote brand-related cross-sells via the 'More from this brand' block.
Compatibility: Magento Open Source 2.3.X - 2.4.X, Magento Commerce 2.3.X - 2.4.X
...
Thank you for choosing Aheadworks!
Installing Shop by Brand
| Note |
|---|
Before installing the M2 Shop by Brand, enable Elasticsearch in your store. Please refer to the official Magento 2 guide to learn how to enable Elasticsearch. No further configuration of Elasticsearch is needed, just enable it for successful installation of the extension. |
...
| Panel | ||||
|---|---|---|---|---|
| ||||
1. Backup your web directory and store database |
| Panel | ||||
|---|---|---|---|---|
| ||||
2. Download the Shop by Brand installation package |
| Panel | ||||
|---|---|---|---|---|
| ||||
3. Upload contents of the Shop by Brand installation package to your store root directory |
...
| borderWidth | 2px |
|---|---|
| borderStyle | solid |
4. In SSH console of your server navigate to your store root folder:
| No Format |
|---|
cd path_to_the_store_root_folder |
run the following command: :
| No Format |
|---|
php -f bin/magento module:enable Aheadworks_ShopByBrand |
then:
| No Format |
|---|
php -f bin/magento setup:upgrade |
after:
| No Format |
|---|
php -f bin/magento setup:static-content:deploy |
| Panel | ||||
|---|---|---|---|---|
| ||||
5. Flush store cache; log out from the backend and log in again |
| Note |
|---|
Make sure the installation is done from the FTP administrator account. Otherwise, set 775 permissions to the store root directory after the extension is deployed. |
...
| width | 50% |
|---|
...
| borderWidth | 2px |
|---|---|
| borderStyle | solid |
If you are installing an extension from Aheadworks for the first time, you need to add our composer repository to your Magento store:
| Panel | ||||||||||||||
|---|---|---|---|---|---|---|---|---|---|---|---|---|---|---|
| ||||||||||||||
1. Login to your ssh console and navigate to your store folder:
Run the following command:
After the command was executed successfully, you can use the composer to install the products. |
...
| borderWidth | 2px |
|---|---|
| borderStyle | solid |
To install the extension:
2. Login to your ssh console and navigate to your store folder:
| Panel | ||||
|---|---|---|---|---|
| ||||
| cd path_to_the_store_root_folder |
...
| borderWidth | 2px |
|---|---|
| borderStyle | solid |
3. Run the following command to install the latest version of the extension:
| Panel | ||||
|---|---|---|---|---|
| ||||
composer require aheadworks/module-shop-by-brand |
if you need to install a specific version, run this command:
| Panel | ||||
|---|---|---|---|---|
| ||||
composer require aheadworks/module-shop-by-brand:<version> |
| Tip |
|---|
Specify the version of the extension in <version> |
| Panel | ||||
|---|---|---|---|---|
| ||||
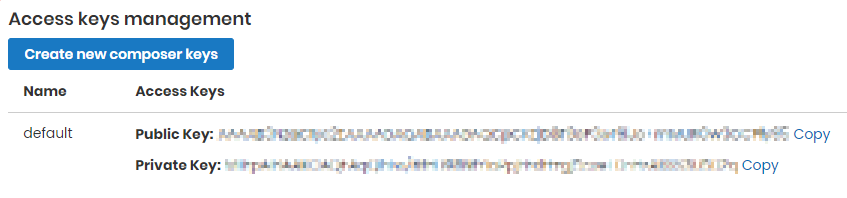
When prompted, enter Public Key (Username) and Private Key (Password): |

| Note |
|---|
Both Public Key (Username) and Private Key (Password) can be found in My Projects and Licenses in your personal account on our site:
|
...
| borderWidth | 2px |
|---|---|
| borderStyle | solid |
4. Enable the extension:
| Panel | ||||
|---|---|---|---|---|
| ||||
php -f bin/magento module:enable <Module_Name> |
| Tip |
|---|
Add the product name in <Module_Name> |
Next, register the extension:
| Panel | ||||
|---|---|---|---|---|
| ||||
bin/magento setup:upgrade |
Recompile your Magento store if you are in the Production mode:
| Panel | ||||
|---|---|---|---|---|
| ||||
bin/magento setup:di:compile |
To verify that the extension is enabled, run this command:
| Panel | ||||
|---|---|---|---|---|
| ||||
bin/magento module:status |
Clean store cache, by running the following command:
| Panel | ||||
|---|---|---|---|---|
| ||||
bin/magento cache:clean |
Log out and Log in the backend again.
...
| borderWidth | 2px |
|---|---|
| borderStyle | solid |
To upgrade the extension:
5. To update or upgrade an extension:
Download the updated extension file. Take note of the module-name and version. Export the contents to your Magento root.
If a composer package exists for the extension, run one of the following.
| Code Block | ||
|---|---|---|
| ||
composer update aheadworks/module-shop-by-brand |
| Code Block | ||
|---|---|---|
| ||
composer require aheadworks/module-shop-by-brand:<version> |
Run the following commands to upgrade, deploy, and clean the cache.
| Panel | ||||
|---|---|---|---|---|
| ||||
php bin/magento setup:upgrade --keep-generated
php bin/magento setup:static-content:deploy
php bin/magento cache:clean |
Migrating Shop by Brand from Magento 1 to Magento 2
...
...
Below the 'General Information' settings, you can define the brand's description per store view using the 'What You See Is What You Get (WYSIWYG)' editor. The 'Content' section of the page also includes the 'Meta Title' and 'Meta Description' sections useful for SEO and the 'Store View' selector if you run multiple stores and need to adjust your brand page separately for each store view.
| Warning |
|---|
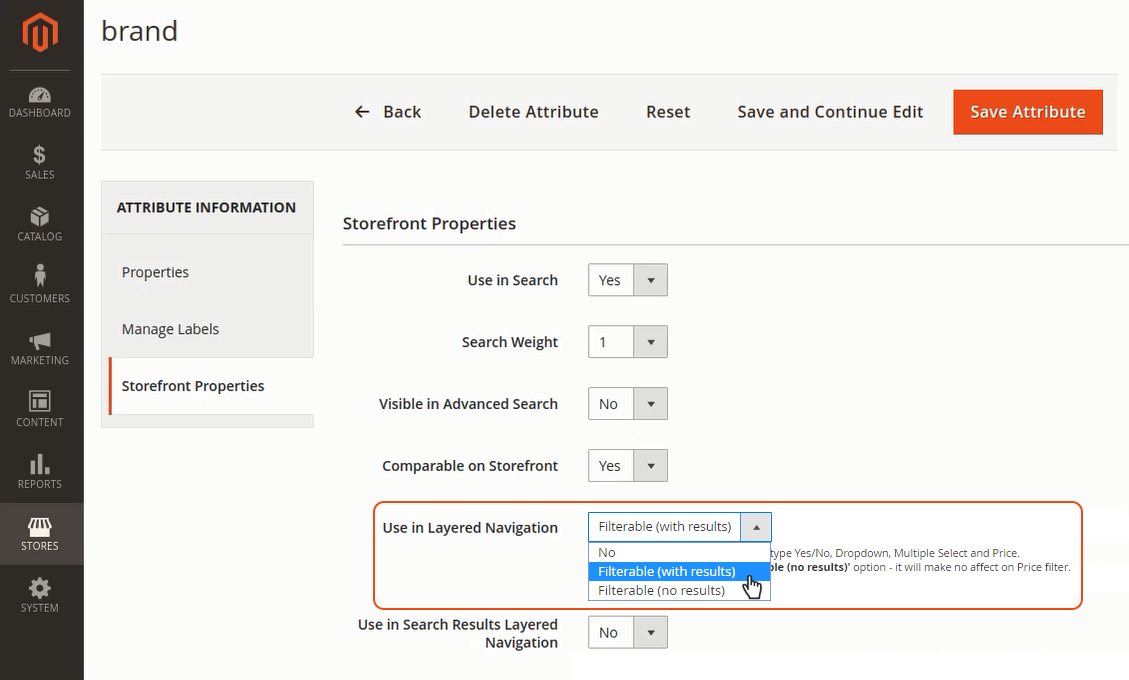
Have "Use in Layered Navigation" parameter set to "Filterable (with results)" (Stores → Attribute → Product → Brand → Storefront Properties) if brand attributes are not displayed on Stores → Configuration → Aheadworks Extensions → Shop by Brand → General → Brand Product Attribute, or if options of the "Brand" dropbox are not displayed on Catalog → Shop by Brand by Aheadworks → Brand Pages → Click Add New.
|
Managing Brand Products
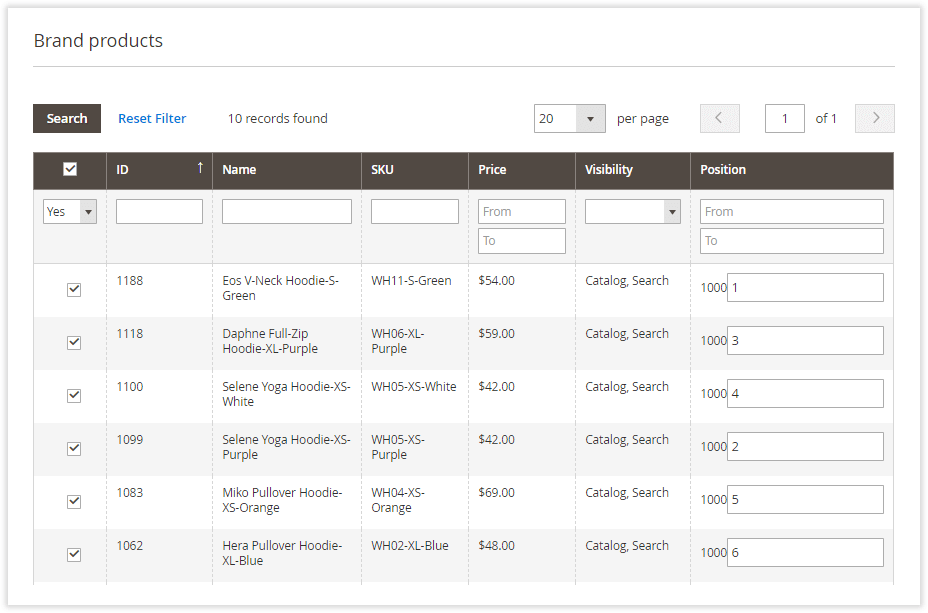
You can add any number of products from the catalog to brand pages. Once you've created a new brand page, the dedicated 'Brand products' grid becomes available. It allows selecting the required items either one by one or massively.
In order to find a particular product, you can search it by ID, Name, SKU, Price, and Visibility. Moreover, you can change the display order of brand-related products on the page by manually specifying the appropriate values in the 'Position' column. Respectively, the item with the '1' value will go first in the list.
When done setting up a new brand page, click ![]() .
.
Brands on the Storefront
...
Shop by Brand Category
If required, you can create a dedicated brand category.
To do this:
1) Create a new category and configure it as you need;
2) Navigate to Content > Widgets and add the new widget of the 'Brands' type;
3) Set the layout updates for the widget to make sure it is displayed in the required category.
After all the required parameters are configured, you will get something like this:

Brand Page
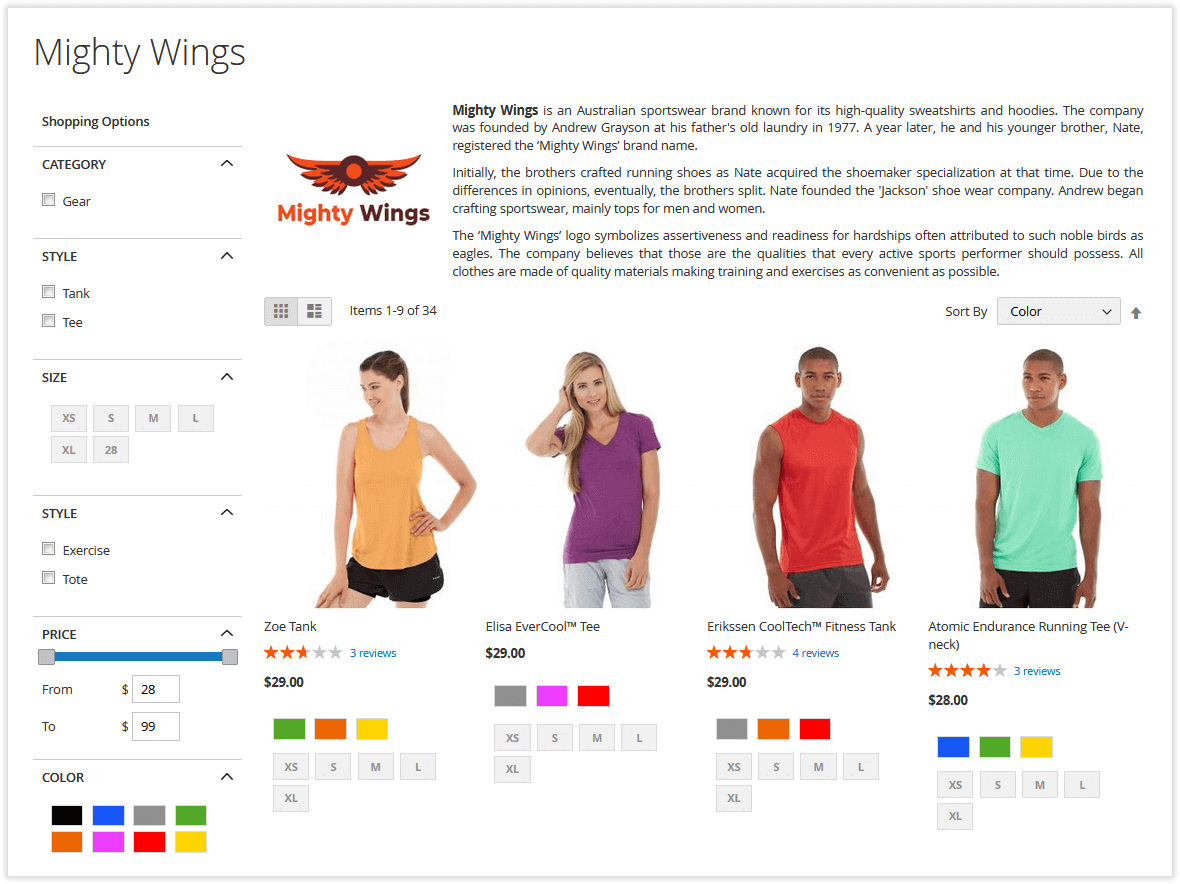
Each brand page features brand descriptions and logos you previously set. Below the brand's description, customers can find products related to the corresponding brand.
Product Pages
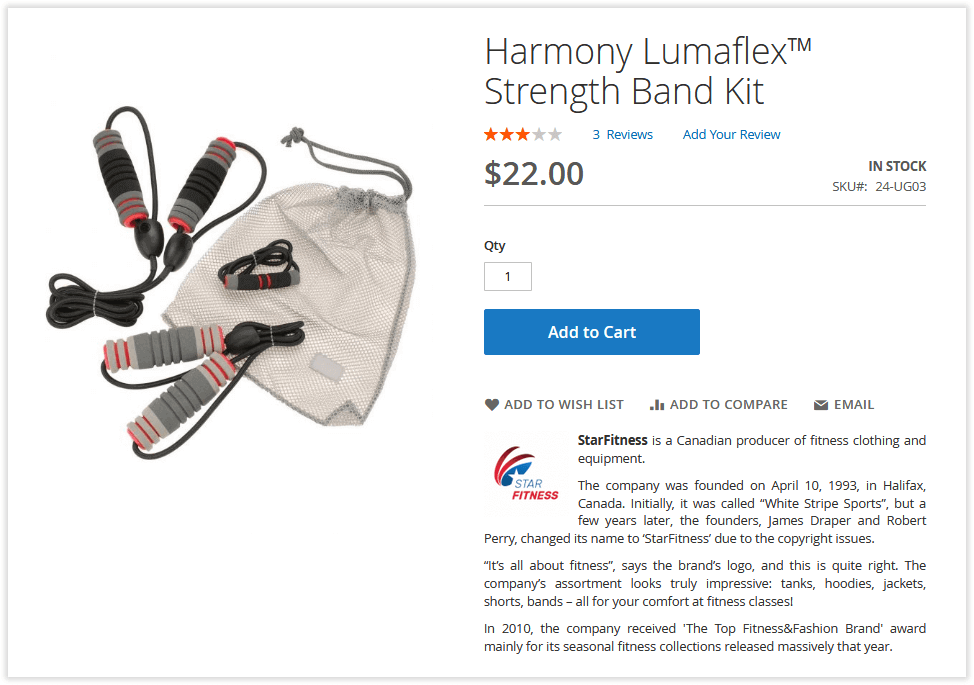
Products belonging to a particular brand can have this brand featured on their pages. You can either display a brand logo or a brand logo plus brand description.
Brand Widget
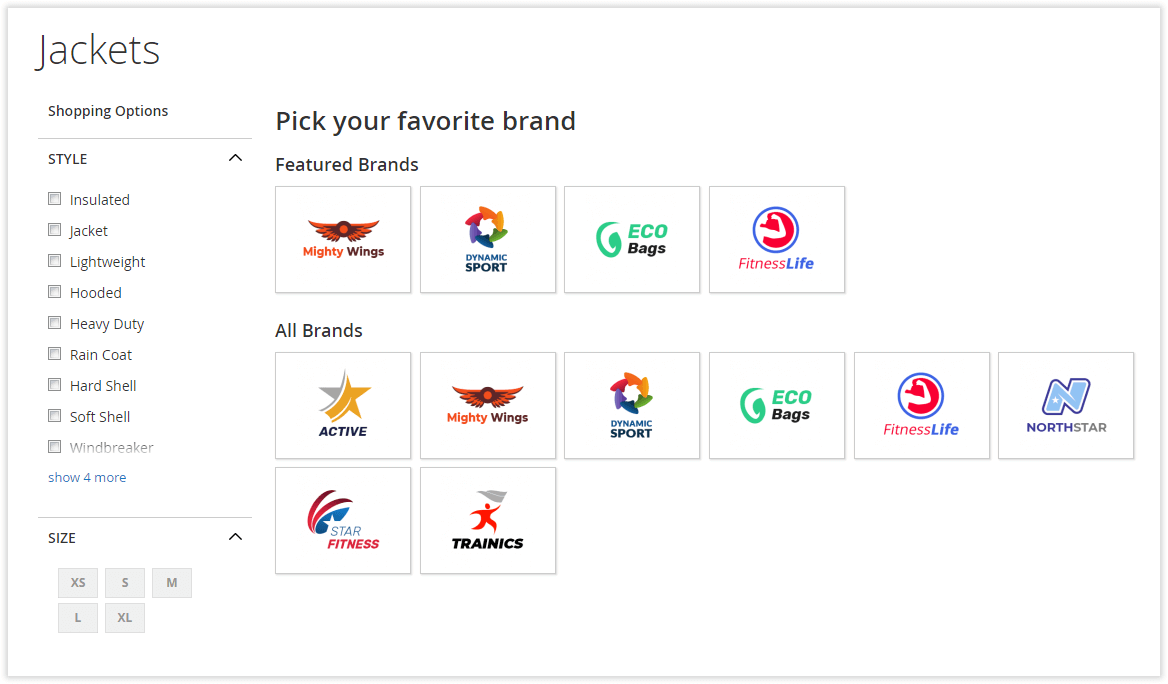
A widget featuring all brands presented in the store can be placed in any required page position as well as across different store pages. To add the widget, go to Content > Widgets and find it in the list of all Magento 2 widgets.
Uninstalling Shop by Brand
...
| width | 50% |
|---|
Manual Removal
...
| borderWidth | 2px |
|---|---|
| borderStyle | solid |
1. Disable the module by executing the following commands:
| No Format |
|---|
php bin/magento module:disable Aheadworks_ShopByBrand
php bin/magento setup:upgrade |
...
| borderWidth | 2px |
|---|---|
| borderStyle | solid |
2. Remove the extension files from the following folder:
| No Format |
|---|
app/code/Aheadworks/ShopByBrand |
...
| width | 50% |
|---|
Automatic Removal (via Composer)
...
| borderWidth | 2px |
|---|---|
| borderStyle | solid |
1. Disable the module by executing the following commands:
| No Format |
|---|
php bin/magento module:uninstall Aheadworks_ShopByBrand |
...
| ||||
| Warning | ||||
|---|---|---|---|---|
Consider the following information as a top priority, otherwise, the migration might result in an accidental data loss. | ||||
More information on manual migration can be found in the Magento instructions on manual migration.Video GuideA similar migration process is described in the educational Video Guide on the Aheadworks Youtube channel. Don't forget to enable subtitles for the video to follow the data migration process. Migration ProcessBelow you can see the migration guide with a more detailed, step-by-step description. Panel | | |||
| ||||
| Expand | ||||
|
| No Format |
|---|
cd /var/www/my_magento2_store/ |
2. Install the Magento Data Migration Tool.
| Expand | ||
|---|---|---|
| ||
The installation instructions for the Magento Data Migration Tool along with the basic information can be found here: http://devdocs.magento.com/guides/v2.0/migration/migration-tool-install.html Magento provides the two ways of installing the Data Migration Tool: To make sure that the Migration Tool was installed successfully, navigate to vendor/magento/. |
3. Download the Shop by Brand migration distributive and unpack it to the required location.
| Expand | ||
|---|---|---|
| ||
The Shop by Brand migration distributive can be found in the extension package (since the 1.2.0 version): https://ecommerce.aheadworks.com/awlicensing/index/links/ Unpack the contents of the distributive and find the /etc and /scr folders inside. |
4. Copy the contents of the Shop by Brand migration distributive to the Magento Data Migration Tool's main folder.
| Expand | ||
|---|---|---|
| ||
Copy the /etc and /scr folders included in the RMA migration package to vendor/magento/data-migration-tool/. Rewrite on prompt. |
5. Edit the config.xml file in the Magento Data Migration Tool
| title | Click to view details |
|---|
| Note |
|---|
Pay close attention to the following tags: <aw_sbb_brand_product_attribute_code> - an attribute code which is used as a brand attribute (manufacturer is by default). <aw_sbb_create_attribute_if_not_exist> - defines whether the attribute (above) should be created (in case it has not been manually created yet) or not (false is set by default). <aw_sbb_create_attribute_option_if_not_exist> - defines whether an attribute option should be created or not (false is set by default). |
6. Run the migration script in the console
| title | Click to view details |
|---|
To start the migration process, run the following command considering the path to config.xml :
| No Format |
|---|
bin/magento migrate:data [-r|--reset] {<path to config.xml>} |
You can also use the following command considering the path to config.xml:
| No Format |
|---|
bin/magento migrate:data -r vendor/magento/data-migration-tool/etc/aw_rma/config.xml |
| Panel |
|---|
7. Data migration is complete. Make sure to manually migrate the attached files and images.
|
Describing the Migration Process
There is a difference between building a brand in the M1 module and the same process in the M2 module.
In M1 Shop By Brand you can create any number of brands with any products assigned to them.
In M2 Shop By Brand before creating a brand, first, you need to select a product attribute in the extension settings. After that each option of that attribute becomes a brand.
In order to migrate data successfully from M1 to M2, the following has to be done:
| Panel |
|---|
1. You can create product attribute manually or let it be created automatically. Make sure the following options are enabled when creating attribute: Catalog input type for Store Owner is dropdown. Use in Layered Navigation: Filterable with results. Now this attribute can be used for migration. |
| Panel |
|---|
2. Insert the code of the created attribute into the config tag <aw_sbb_brand_product_attribute_code> in config.xml.
If you decided to allow the attribute to be created on the fly, then put any code to <aw_sbb_brand_product_attribute_code> and type true for the <aw_sbb_create_attribute_if_not_exist> config. |
3. For each M1 brand migrated to M2, there will be an option (a value for the attribute) created with the name of brand’s title.
To create the option automatically, you need to type true for the <aw_sbb_create_attribute_option_if_not_exist> config.
| Info |
|---|
The best config is: <aw_sbb_brand_product_attribute_code>any_code</aw_sbb_brand_product_attribute_code> <aw_sbb_create_attribute_if_not_exist>true</aw_sbb_create_attribute_if_not_exist> <aw_sbb_create_attribute_option_if_not_exist>true</aw_sbb_create_attribute_option_if_not_exist> |
After the migration is completed, the attribute will be automatically selected as a brand attribute in the extension settings.
Flush the cache to see the result.
Note that each attempt to migrate the data will remove all the previously created brands.
Introducing Shop by Brand
| Section |
|---|
The Shop by Brand extension has the following key features:
Extension LogicThe module allows you to organize purchases by brands. The brands represent dedicated pages that feature brand logos and descriptions and list all related products. This helps customers easily find the items of a particular brand. The predefined brand logos and (optionally) descriptions are automatically added to the relevant product pages, this way, promoting the brand. In addition, a brand widget featuring all and featured brands can be placed anywhere in the store (in terms of particular brand pages and page positions). The 'More from this brand' block with brand-related products can be added to all product pages of the corresponding brand. What's New?Shop By Brand, as of version 1.2.2, supports elasticsearch for Magento 2.3.2+. |
Extension Settings
| Section | ||||
|---|---|---|---|---|
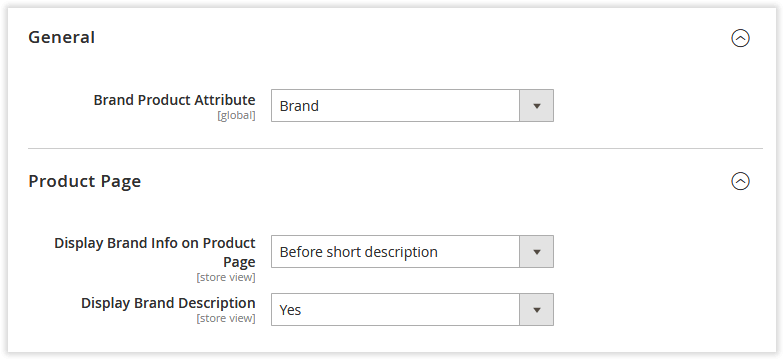
Before using the extension, you need to proceed to the extension settings page that can be found in Stores > Configuration > Aheadworks Extensions > Shop by Brand. General and Product Page SettingsThe 'Brand Product Attribute' option under General defines the attribute to be used throughout the brand creation process.
The 'Product Page' settings define how brand-related product pages will look like.
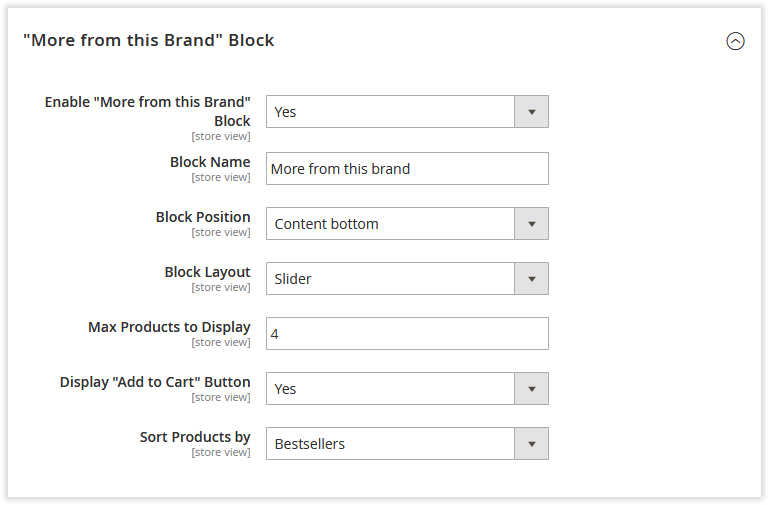
'More from this Brand' Block
This section controls the properties of the 'More from this Brand' related product block available within the extension. The block can only be displayed on product pages related to a particular brand. If enabled, it is placed automatically on all product pages.
SEO
The 'SEO' configuration section defines if the 'noindex' attribute should be added to pagination to prevent SEO penalties. Once done with the settings, click |
.png?version=1&modificationDate=1555766425137&cacheVersion=1&api=v2)

Creating Brands
...
Converting Attributes into Brands
The Shop by Brand extension allows you to convert the existing attributes into brands. As we said earlier, only attributes of the drop-down type can be converted.
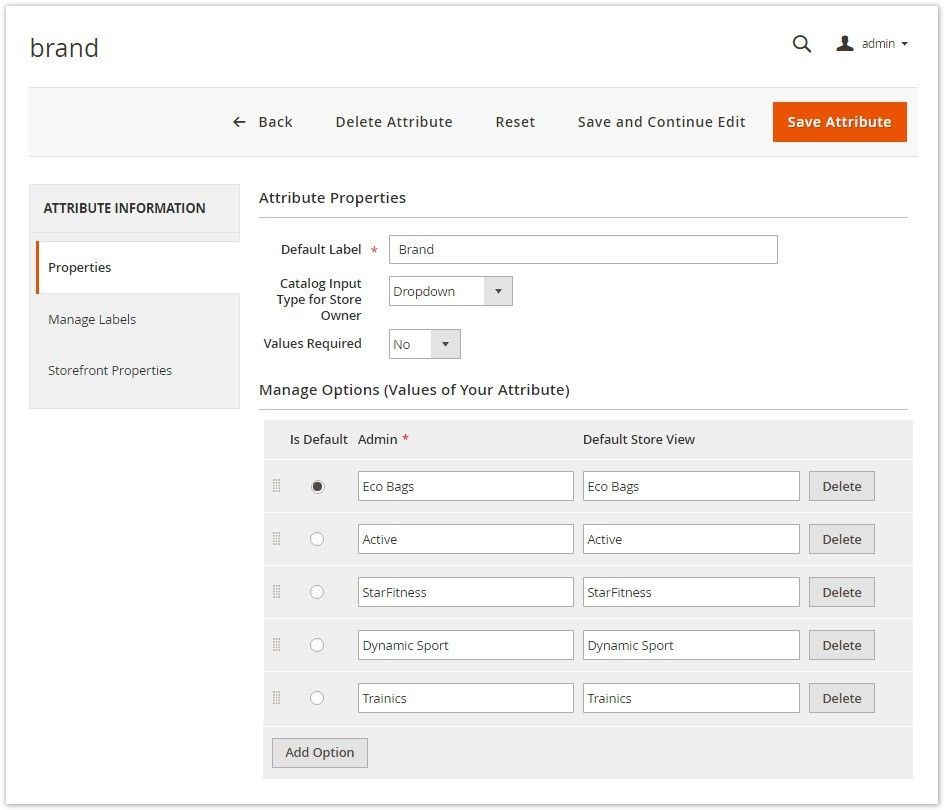
Here you can create attribute values that can later be set as your brands while adding new brand pages.
Brand Pages Grid
To create a new brand, navigate to the 'Brands' grid in Catalog > Shop by Brand by Aheadworks > Brand Pages.
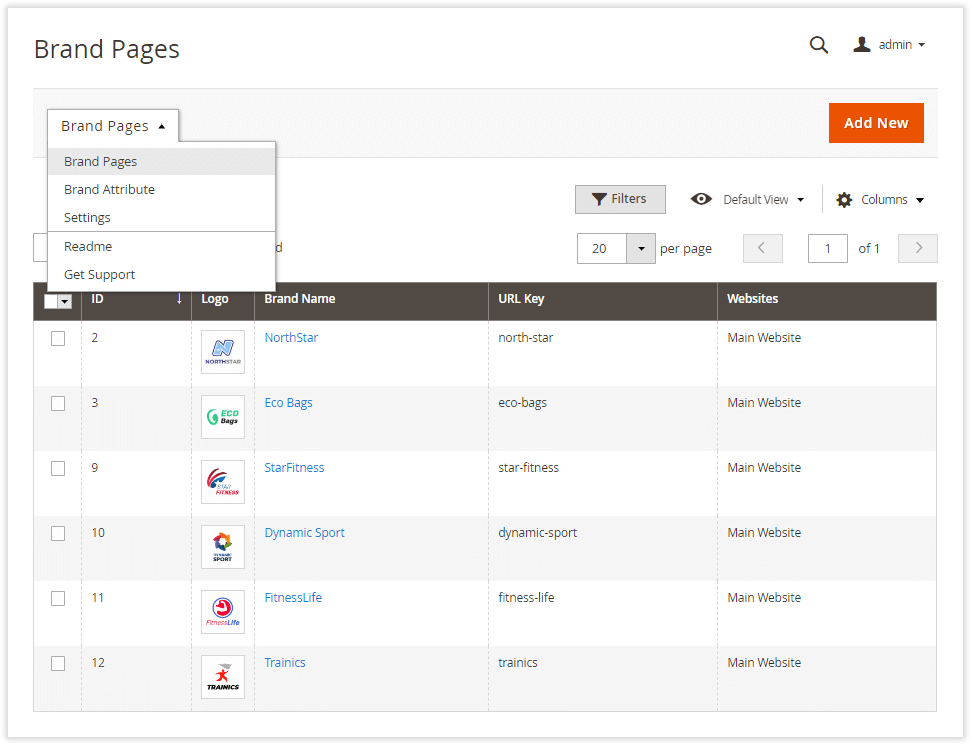
The 'Brand Pages' grid contains the following columns:
...
To add a new brand page, click  .
.
Adding a Brand Page
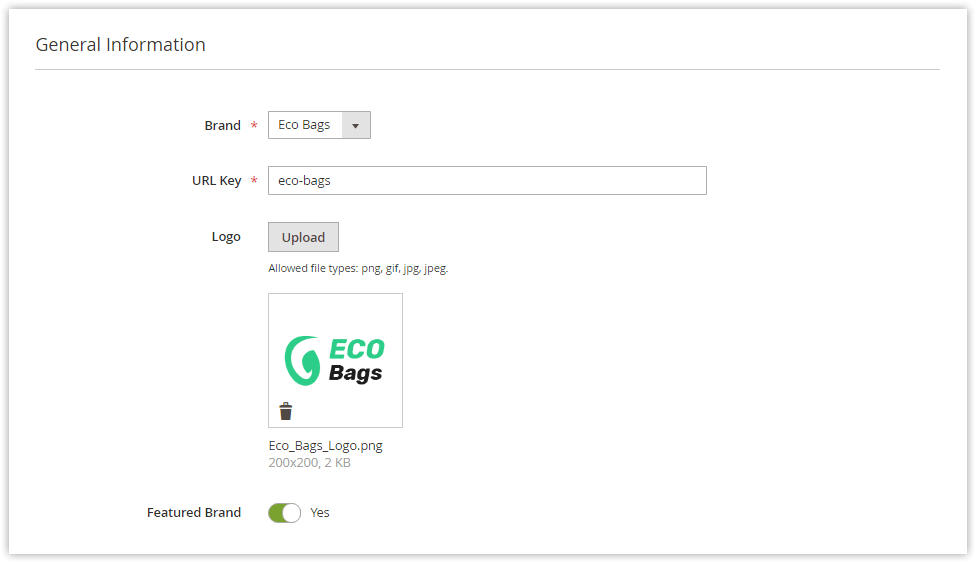
The 'New Brand' page comes with the following settings:
...
more information follow the product user manual on our website |
Thank you for choosing Aheadworks!
Need Customization?
.png?version=1&modificationDate=1564162604296&cacheVersion=1&api=v2)
You can always find the latest version of the software, full documentation, demos, screenshots, and reviews on http://aheadworks.com
License agreement: https://aheadworks.com/end-user-license-agreement
Contact Us: https://aheadworks.com/contact
Copyright © 2021 Aheadworks Co. http://www.aheadworks.com