...
| width | 50% |
|---|
| Table of Contents |
|---|
| Warning |
|---|
Firefox user notice: Please use a different web browser to view this document. Sorry for the inconvenience. |
...
| width | 35% |
|---|

Magento 2 Custom Stock Status is a tool for alerting customers on low stock alerts within your store and conducting customer behavior by pushing them to purchase.
Compatibility: Magento Open Source 2.3.X - 2.4.X, Magento Commerce 2.3.X. - 2.4.X
Thank you for choosing Aheadworks!
Installing Custom Stock Status for Magento 2
...
| width | 50% |
|---|
Command Line Installation
| Panel | ||||
|---|---|---|---|---|
| ||||
1. Backup your web directory and store database |
| Panel | ||||
|---|---|---|---|---|
| ||||
2. Download the Custom Stock Status installation package |
| Panel | ||||
|---|---|---|---|---|
| ||||
3. Upload the contents of the Custom Stock Status installation package to your store root directory |
...
| borderWidth | 2px |
|---|---|
| borderStyle | solid |
4. In the SSH console of your server, navigate to your store root folder:
| No Format |
|---|
cd path_to_the_store_root_folder |
run the following command:
| No Format |
|---|
php -f bin/magento module:enable Aheadworks_CustomStockStatus |
then:
| No Format |
|---|
php -f bin/magento setup:upgrade |
after:
| No Format |
|---|
php -f bin/magento setup:static-content:deploy |
| Panel | ||||
|---|---|---|---|---|
| ||||
5. Flush the store cache; log out from the backend and log in again |
| Note |
|---|
Make sure the installation is done from the FTP administrator account. Otherwise, set 775 permissions to the store root directory after the extension is deployed. |
...
| width | 50% |
|---|
Composer Installation
...
| borderWidth | 2px |
|---|---|
| borderStyle | solid |
If you are installing an extension from Aheadworks for the first time, you need to add our composer repository to your Magento store:
| Panel | ||||||||||||||
|---|---|---|---|---|---|---|---|---|---|---|---|---|---|---|
| ||||||||||||||
1. Login to your ssh console and navigate to your store folder:
Run the following command:
On successful execution of the command you will be able to use the composer to install the extensions. |
...
| borderWidth | 2px |
|---|---|
| borderStyle | solid |
To install the extension:
2. Login to your ssh console and navigate to your store folder:
| Panel | ||||
|---|---|---|---|---|
| ||||
| cd path_to_the_store_root_folder |
...
| borderWidth | 2px |
|---|---|
| borderStyle | solid |
3. Run the following command to install the latest version of the extension:
| Panel | ||||
|---|---|---|---|---|
| ||||
composer require aheadworks/module-customstockstatus |
if you need to install a specific version, run this command:
| Panel | ||||
|---|---|---|---|---|
| ||||
composer require aheadworks/module-customstockstatus:<version> |
| Tip |
|---|
Specify the version of the extension in <version> |
| Panel | ||||
|---|---|---|---|---|
| ||||
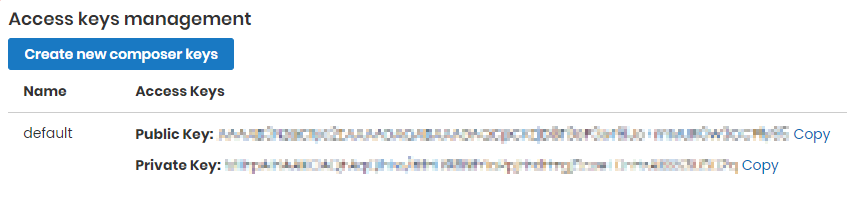
When prompted, enter Public Key (Username) and Private Key (Password): |
.png?version=1&modificationDate=1613404799942&cacheVersion=1&api=v2&width=450)
| Note |
|---|
Both Public Key (Username) and Private Key (Password) can be found in My Projects and Licenses in your personal account on our site:
|
...
| borderWidth | 2px |
|---|---|
| borderStyle | solid |
4. Enable the extension:
| Panel | ||||
|---|---|---|---|---|
| ||||
php -f bin/magento module:enable <Module_Name> |
| Tip |
|---|
Add the product name in <Module_Name> |
Next, register the extension:
| Panel | ||||
|---|---|---|---|---|
| ||||
bin/magento setup:upgrade |
Recompile your Magento store if you are in the Production mode:
| Panel | ||||
|---|---|---|---|---|
| ||||
bin/magento setup:di:compile |
To verify that the extension is enabled, run this command:
| Panel | ||||
|---|---|---|---|---|
| ||||
bin/magento module:status |
Clean store cache, by running the following command:
| Panel | ||||
|---|---|---|---|---|
| ||||
bin/magento cache:clean |
Log out and Log in the backend again.
...
| borderWidth | 2px |
|---|---|
| borderStyle | solid |
To upgrade the extension:
5. To update or upgrade an extension:
Download the updated extension file. Take note of the module-name and version. Export the contents to your Magento root.
If a composer package exists for the extension, run one of the following.
| Code Block | ||
|---|---|---|
| ||
composer update aheadworks/module-customstockstatus |
| Code Block | ||
|---|---|---|
| ||
composer require aheadworks/module-customstockstatus:<version> |
Run the following commands to upgrade, deploy, and clean the cache.
| Panel | ||||
|---|---|---|---|---|
| ||||
php bin/magento setup:upgrade --keep-generated
php bin/magento setup:static-content:deploy
php bin/magento cache:clean |
Set up cron
The Get Product Status extension uses cron for automatic stock staus updates.
...
| width | 50% |
|---|
If you have already configured cron jobs for your Magento installation, then you can skip this step. Read the following instructions on setting cron job for your Magento store: Magento user guide.
Generally, it will be enough to run in the SSH console of your server the following command:
| Code Block | ||
|---|---|---|
| ||
crontab -e |
And insert the following line:
| Code Block |
|---|
*/3 * * * * php -c <ini-file-path> <your Magento install dir>/bin/magento cron:run
*/3 * * * * php -c <ini-file-path> <your Magento install dir>/update/cron.php
*/3 * * * * php -c <ini-file-path> <your Magento install dir>/bin/magento setup:cron:run |
Don't forget to confirm saving request when exit.
Introducing Custom Stock Status for Magento 2
| Section |
|---|
The Get Product Status extension for Magento 2 presents a customizable block for a stock status display based on specific conditions. With the extension you
|
Supported product types
| Section |
|---|
|
Extension configuration
...
To start working with Magento 2 Custom Stock Status configure the basics of the extension. Follow Stores > Configuration > Aheadworks extensions > Custom Stock Status.
Stock Status Block Settings
First of all, decide whether the Custom Stock Status will be displayed along with the default Stock Status. Enable the option if you need both the stock statuses to cover for each other in case of some issues occurred
The 'Display mode' field defines the options for stock status block customization while creating a rule.
- 'Text and Icon' allows using icons next to the block.
- 'Text and image' adds a field for image inserting.
Display settings help to select where to show custom stock status besides a product page. The 'Category Page' and 'Shopping Cart' options are available for adding.
.png?version=1&modificationDate=1558429975229&cacheVersion=1&api=v2&width=1100)
Notification Settings
The 'Notification Settings' section contains low stock alert & back-in-stock notification configuration.
The notification sender email is specified in a corresponding field.
If the back-in-stock subscription is enabled customers will see a related button next to an out-of-stock product. The notification request pop-up appears upon clicking the button. If you want to display your store Private Policy link in the pop-up choose the relevant option. Also, it is p[ossible to specify the destination of the link in the 'Privacy Policy CMS Page' field.
Low Stock Alert Quantity is the number of products left in stock that triggers low stock alert sending.
Templates for both back-in-stock and low stock alert emails can be selected here in the section.

Rule Management
Rule Grid
All the rules related to custom stock statuses application can be found on the following path: Catalog > Custom Stock Statuses.
You can perform individual actions, such as enabling, disabling, or deleting, to the rules or manage them massively in a single grid.
From this page you can move to a particular rule page or create a new one by clicking 'Add New Rule' button.
.png?version=1&modificationDate=1558429948186&cacheVersion=1&api=v2&width=1200)
General Settings
General Settings for custom stock status rules are pretty much standard.
- Start with naming the rule for your comfortable use.
- Decide whether the rule is enabled or not for the moment..
- Specify rule priority to apply the rule accordingly in relation to other similar rules.
- Select a store view where the rule will be active.

Product Conditions
Product conditions specify the products to which the rule will be bound to.

Display Options
Stock status display options are based on a specified product quantity.
| Note |
|---|
It's possible to set up a few options to the same product if there's a difference in item quantity. |
- Product quantity field allows setting up the display mode based on several parameters:
- less than - the current display mode will be applied if the product quantity is less than a particular number;
- greater than - the current display mode will be applied if the product quantity is greater than a particular number;
- equals or less than - the current display mode will be applied if the stock item quantity matches the number inserted in the field or is less than the number;
- equals or greater than - the current display mode will be applied if the stock item quantity matches the number inserted in the field or is less than the number;
- range - the current display mode will be applied if the stock item quantity is within a particular number range you specify in the fields 'from' & 'to'.
- 'Custom Stock Status Text' is a field for adding a text message on stock status.
- 'Upload image/icon' are boxes for visualizing stock status. They can be added via the drag-and-drop functionality or the standard upload window.
| Note |
|---|
Icon and image display is closely related to the 'Display Mode' setting in the extension configuration section. If you choose 'text & icon' mode no image will be shown. If you settle on the 'text & image' option the icon display will become unavailable. |
.png?version=1&modificationDate=1558433831865&cacheVersion=1&api=v2&width=1500)
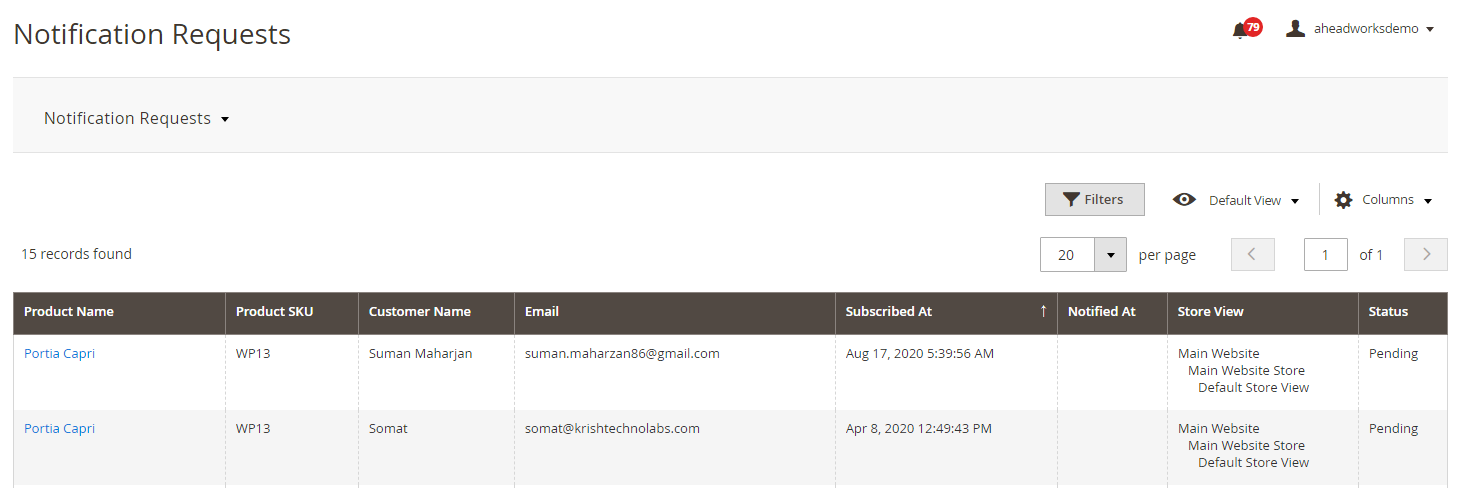
Notification Requests
The extension allows customers to submit requests for notifications when products of their interest return to stock. Magento 2 Custom Stock Status automates the process of sending back-in-stock alerts you just need to specify the sender and the template for such emails.
All the notification request you can view in Catalog > Notification Requests with the info on a relevant product, customer name and email address, and status of the request to know what actions can be done to satisfy all the customers' needs.
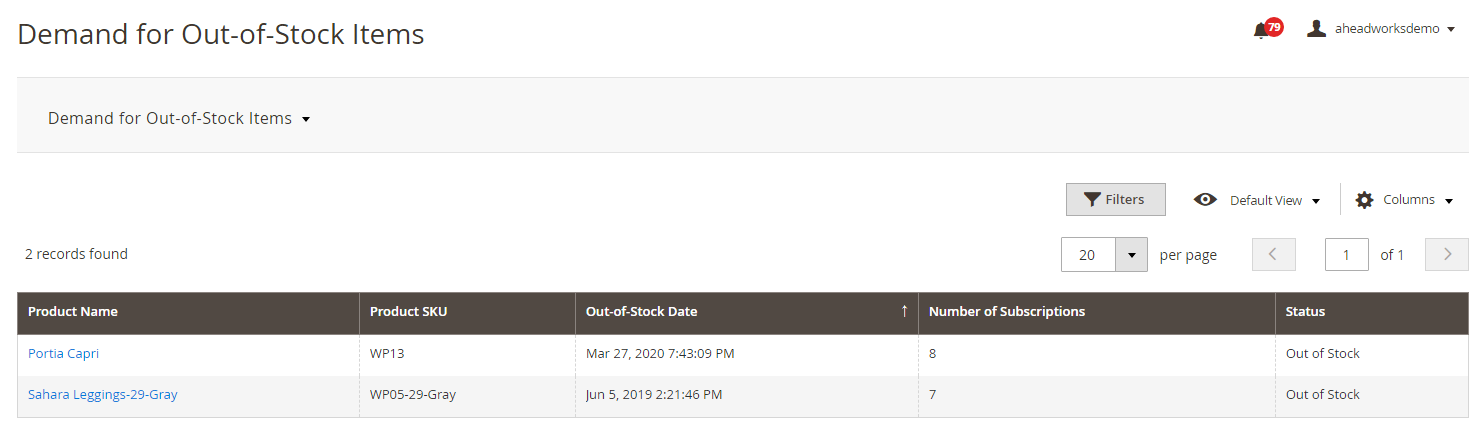
Demand for Out of Stock Items
The grid with customer subscriptions to out of stock products can be found on the following path: Catalog > Demand for Out of Stock Items. The info presented here helps to analyze customer demand by highlighting the number of subscriptions and plan re-supplying according to the data when the product went out of stock.
Frontend View
Custom Stock Status can be displayed on both category and product pages, and in the shopping cart. If specified in the backend settings the notification button is shown along with the particular status.
Category Page Display
.png?version=1&modificationDate=1558434372674&cacheVersion=1&api=v2&width=1000)
Product Page Display

Shopping Cart Display

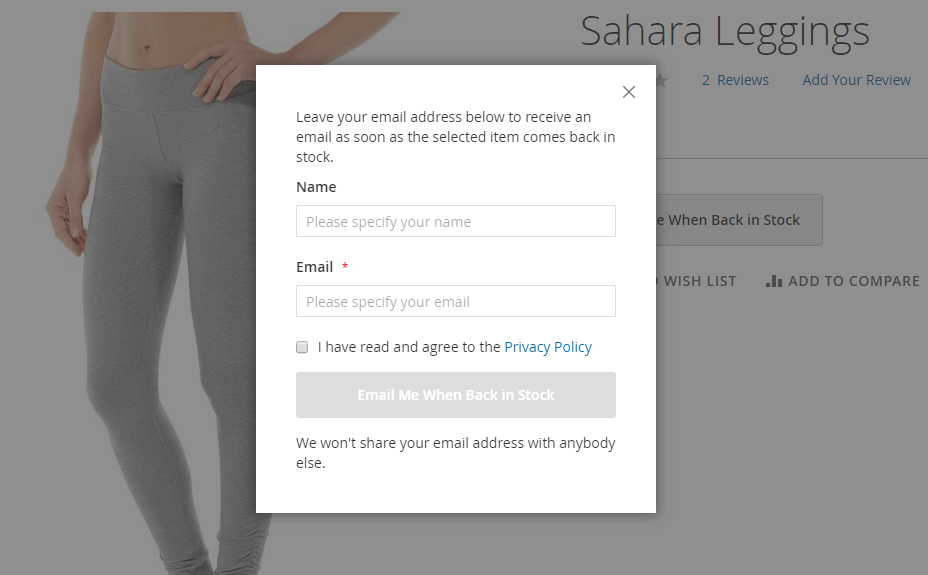
Notification Request Box
The notification request box appears upon clicking the 'Email Me When Back In Stock' button.
The compounds are the name and email fields and the Privacy Policy checkbox. Only the email entry is required to be filled to send a notification request successfully.
...
| Warning |
|---|
For more information follow the product user manual on our website |
Thank you for choosing Aheadworks!
.png?version=1&modificationDate=1564162115283&cacheVersion=1&api=v2)