...
| width | 50% |
|---|
| Table of Contents |
|---|
| Warning |
|---|
Firefox user notice: Please use another web browser to view this document. Sorry for the inconvenience. |
...
| width | 30% |
|---|
...

Magento 2 Customer Group Catalog Permissions is equipped with rich functionality in the backend and easy to implement functionality in the frontend. The backend includes both individual and mass settings. The individual ones allow an admin to set the permissions for each category, product and CMS page separately. Mass settings provide the opportunity to configure and delete permissions for the unlimited number of store catalog elements at once.
Both individual and mass settings are aimed at visibility management of the element itself, its price and add to cart button. More to that, it’s possible to assign text messages equipped with CSS-styles and configure the redirection instead of hidden elements.
Compatibility: Magento Open Source 2.3.X - 2.4.X, Magento Commerce 2.3.X - 2.4.X
Thank you for choosing Aheadworks!
Installing Customer Group Catalog Permissions
To install the extension follow the instructions below:
...
| Panel | ||||
|---|---|---|---|---|
| ||||
1. Backup your web directory and store database |
| Panel | ||||
|---|---|---|---|---|
| ||||
2. Download the Customer Group Catalog Permissions installation package |
| Panel | ||||
|---|---|---|---|---|
| ||||
3. Upload contents of the Customer Group Catalog Permissions installation package to your store root directory |
...
| borderWidth | 2px |
|---|---|
| borderStyle | solid |
4. In SSH console of your server navigate to your store root folder:
| No Format |
|---|
cd path_to_the_store_root_folder |
run the following command: :
| No Format |
|---|
php -f bin/magento module:enable Aheadworks_CustGroupCatPermissions |
then:
| No Format |
|---|
php -f bin/magento setup:upgrade |
after:
| No Format |
|---|
php -f bin/magento setup:static-content:deploy |
| Panel | ||||
|---|---|---|---|---|
| ||||
5. Flush store cache; log out from the backend and log in again |
| Note |
|---|
Make sure the installation is done from the FTP administrator account. Otherwise, set 775 permissions to the store root directory after the extension is deployed. |
...
| width | 50% |
|---|
...
| borderWidth | 2px |
|---|---|
| borderStyle | solid |
If you are installing an extension from Aheadworks for the first time, you need to add our composer repository to your Magento store:
| Panel | ||||||||||||||
|---|---|---|---|---|---|---|---|---|---|---|---|---|---|---|
| ||||||||||||||
1. Login to your ssh console and navigate to your store folder:
Run the following commands:
On successful execution of the commands you will be able to use the composer to install the extensions. |
...
| borderWidth | 2px |
|---|---|
| borderStyle | solid |
To install the extension:
2. Login to your ssh console and navigate to your store folder:
| Panel | ||||
|---|---|---|---|---|
| ||||
| cd path_to_the_store_root_folder |
...
| borderWidth | 2px |
|---|---|
| borderStyle | solid |
3. Run the following command to install the latest version of the extension:
| Panel | ||||
|---|---|---|---|---|
| ||||
composer require aheadworks/module-customer-group-catalog-permissions |
if you need to install a specific version, run this command:
| Panel | ||||
|---|---|---|---|---|
| ||||
composer require aheadworks/module-customer-group-catalog-permissions:<version> |
| Tip |
|---|
Specify the version of the extension in <version> |
| Panel | ||||
|---|---|---|---|---|
| ||||
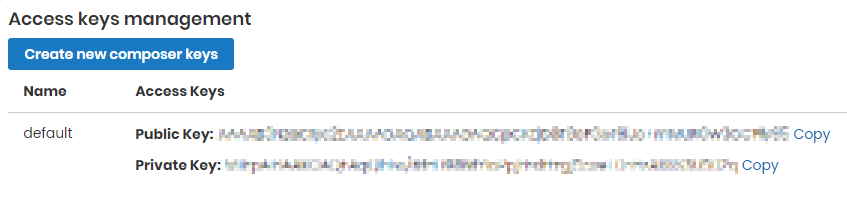
When prompted, enter Public Key (Username) and Private Key (Password): |
.png?version=1&modificationDate=1613404622153&cacheVersion=1&api=v2&width=450)
| Note |
|---|
Both Public Key (Username) and Private Key (Password) can be found in My Projects and Licenses in your personal account on our site:
|
...
| borderWidth | 2px |
|---|---|
| borderStyle | solid |
4. Enable the extension:
| Panel | ||||
|---|---|---|---|---|
| ||||
php -f bin/magento module:enable <Module_Name> |
| Tip |
|---|
Add the product name in <Module_Name> |
Next, register the extension:
| Panel | ||||
|---|---|---|---|---|
| ||||
bin/magento setup:upgrade |
Recompile your Magento store if you are in the Production mode:
| Panel | ||||
|---|---|---|---|---|
| ||||
bin/magento setup:di:compile |
To verify that the extension is enabled, run this command:
| Panel | ||||
|---|---|---|---|---|
| ||||
bin/magento module:status |
Clean store cache, by running the following command:
| Panel | ||||
|---|---|---|---|---|
| ||||
bin/magento cache:clean |
Log out and Log in the backend again.
...
| borderWidth | 2px |
|---|---|
| borderStyle | solid |
To upgrade the extension:
5. To update or upgrade an extension:
Download the updated extension file. Take note of the module-name and version. Export the contents to your Magento root.
If a composer package exists for the extension, run one of the following.
| Code Block | ||
|---|---|---|
| ||
composer update aheadworks/module-customer-group-catalog-permissions |
| Code Block | ||
|---|---|---|
| ||
composer require aheadworks/module-customer-group-catalog-permissions:<version> |
Run the following commands to upgrade, deploy, and clean the cache.
| Panel | ||||
|---|---|---|---|---|
| ||||
php bin/magento setup:upgrade --keep-generated
php bin/magento setup:static-content:deploy
php bin/magento cache:clean |
Backend Configuration
...
| Info |
|---|
Note that firstly, you need to disable native permissions to launch the Customer Group Catalog Permissions by Aheadworks. |
1. General Configuration
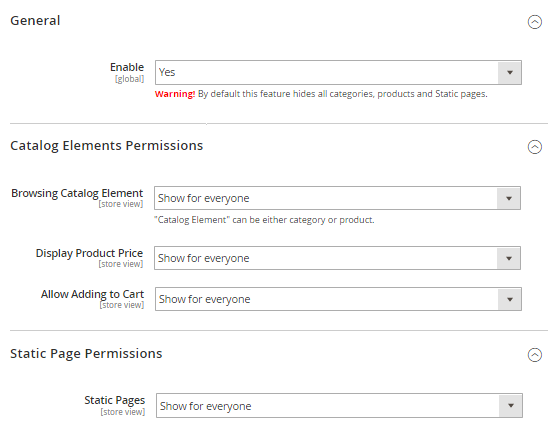
The Configuration page of the extension (Stores > Configuration > Aheadworks Extensions > Сustomer Group Catalog Permissions) includes three sections: General, Catalog Elements Permissions, and CMS Page Permissions.
The General section of the General configuration page allows you to enable the extension via choosing the option ‘Yes’.
Catalog Elements Permissions - section of the Configuration page contains the following configuration options:
Browsing Catalog Elements - the field to be used for the needed mode for the element visibility to be chosen: Show for everyone, Hide from specified customer groups or Hide from everyone;
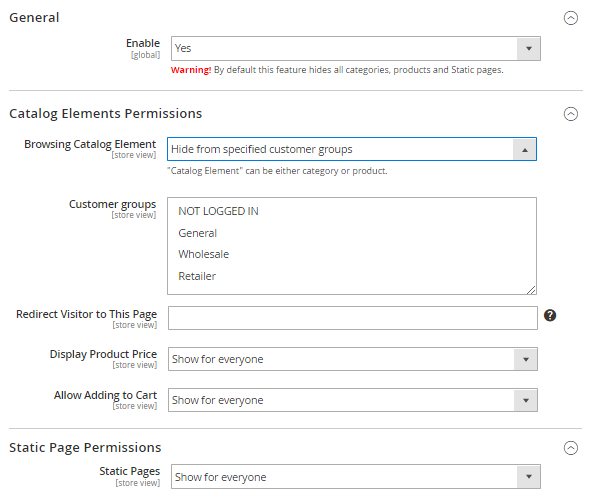
Note that if you choose mode ‘Hide from specified customer groups’, the following fields appear:
Customer Groups - the field to be used for you to choose the definite customer groups;
Redirect Visitor to This Page - the field to be used for you to insert the URL page for redirection those customers who reach the hidden browsing catalog element;
Display Product Price - the field to be used for the needed mode for the price visibility to be chosen: Show for everyone, Hide from specified customer groups or Hide from everyone.
Allow Adding to Cart - the field to be used for the needed mode for the add to cart button visibility to be chosen: Show for everyone, Hide from specified customer groups or Hide from everyone.
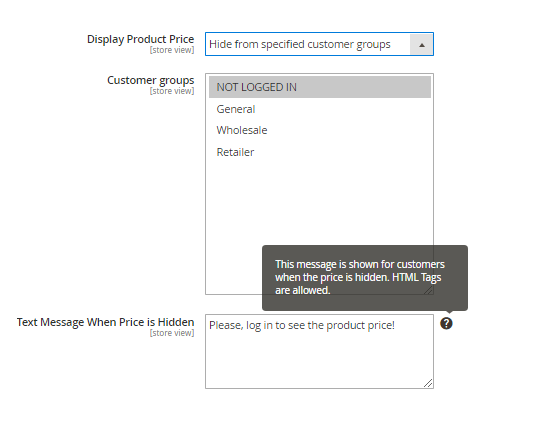
Note that if you choose mode ‘Hide from specified customer groups’ for these two fields (Display Product Price and/or Allow Adding to Cart), the following fields appear:
Customer Groups - the field to be used for you to choose the definite customer groups;
Text Message When Price Is Hidden - the field to be used for you to insert a customized text message using a ready-made HTML-code.
Text Message When Button Add to Cart Is Hidden - the field to be used for you to insert a customized text message using a ready-made HTML-code.
| Info | ||||||
|---|---|---|---|---|---|---|
To display the Hidden Add To Cart Message in the places where the Add To Cart button is displayed, you need to add the following code to the corresponding template:
where $ _product is the product object in the template.
For the Category Page:
This code is added wherever it is necessary to display the message and the product object ($ _product) is defined. |
...
To hide the unwanted text 'Out of stock' when the product permissions are applied, you should:
1) open the template with the output of this text
2) find this text and wrap its output with a conditional construction.
| No Format |
|---|
<?php if (!$_product->getHidePrice() && !$_product->getHideAddToCart()):?>

... the output of the text "Out of stock"

<?php endif; ?> |
As an example, changes in the vendor / magento / module-catalog / view / frontend / templates / product / list.phtml template:
before:
| No Format |
|---|
<?php if ($_product->isAvailable()):?>

    <div class="stock available"> <span> <?= /* @escapeNotVerified */ __('In stock')?> </span> </div>

<?php else:?>

    <div class="stock unavailable"> <span> <?= /* @escapeNotVerified */ __('Out of stock')?> </span> </div>

<?php endif; ?> |
after:
| No Format |
|---|
<?php if ($_product->isAvailable()):?>

    <div class="stock available"> <span> <?= /* @escapeNotVerified */ __('In stock')?> </span> </div>

<?php else:?>

    <?php if (!$_product->getHidePrice() && !$_product->getHideAddToCart()):?>

        <div class="stock unavailable"> <span> <?= /* @escapeNotVerified */ __('Out of stock')?> </span> </div>

    <? php endif; ?>

<? php endif; ?> |
Static Pages - the field to be used for the needed mode for the CMS page visibility to be chosen: Show for everyone, Hide from specified customer groups or Hide from everyone.
Note that if you choose mode ‘Hide from specified customer groups’, the following fields appear:
Customer Groups - the field to be used for you to choose the definite customer groups;
Redirect Visitor to This Page - the field to be used for you to insert the URL page for redirection those customers who reach the hidden CMS page.Finally, note that these settings are applied to the whole store catalog without dividing it into separate categories, products or CMS pages. More to that, the settings configured are applied as default unless other individual ones are specified.
That's it. The configuration is done.
2. Category Permissions (individual settings)
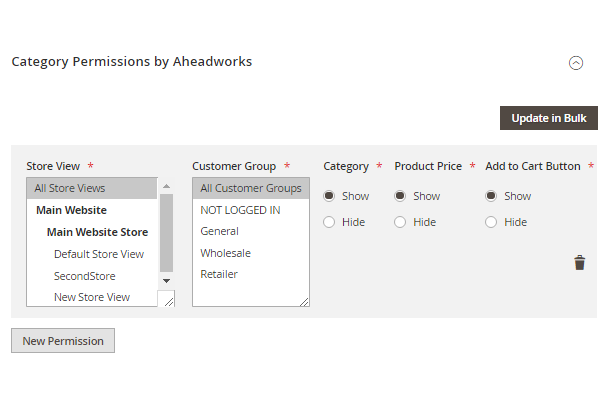
If you want to set the permissions for the individual category, you need to reach the New Permission fieldset. The fieldset is available through the following path: Сatalog > Categories > Needed Category chosen from the Category tree > Category Permissions by Aheadworks > New Permission and includes the following columns:
Store View - the website which will be the application scope for the permissions specified;
Customer Group - the particular customer group for which you want to apply the permissions specified;
Category - contains the ‘Show’ or ‘Hide’ modes for you to choose;
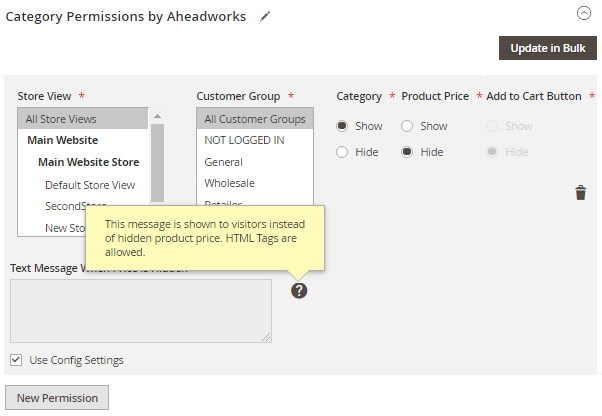
Product Price - contains the ‘Show’ or ‘Hide’ modes for you to choose;
| Info |
|---|
Please note: if you decide to hide the product price, the Add to Cart button is hidden automatically. Instead, you can create a customized text message in the field ‘Text Message When Price is Hidden’ using a ready-made HTML-code. |
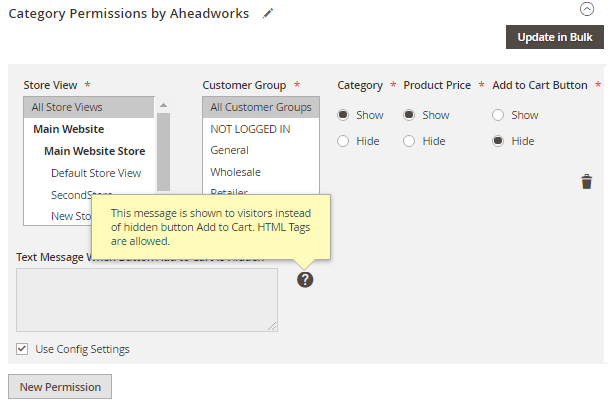
Add to Cart Button - contains the ‘Show’ or ‘Hide’ modes for you to choose.
| Info |
|---|
Please note: if you decide to hide the Add to Cart button you can create a customized text message in the field ‘Text Message When Button Add to Cart Is Hidden’ using a ready-made HTML-code. |
3. Product Permissions (individual settings)
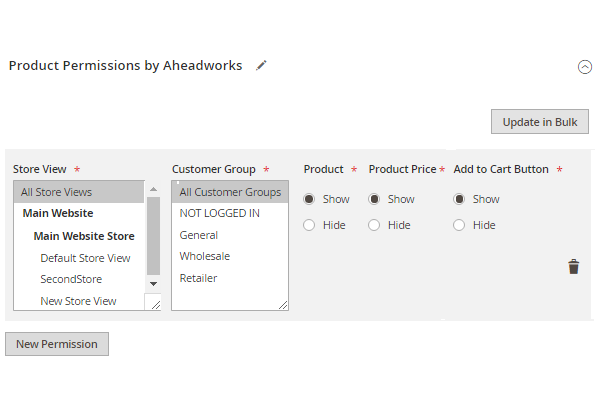
If you want to set the permissions for the individual product, you need to reach the New Permission grid. The fieldset is available through the following path: Products > Categories > Needed Product chosen from the Product grid > Edit > Product Permissions by Aheadworks > New Permission and includes the following columns:
Store View - the website which will be the application scope for the permissions specified;
Customer Group - the particular customer group for which you want to apply the permissions specified;
Product - contains the ‘Show’ or ‘Hide’ modes for you to choose;
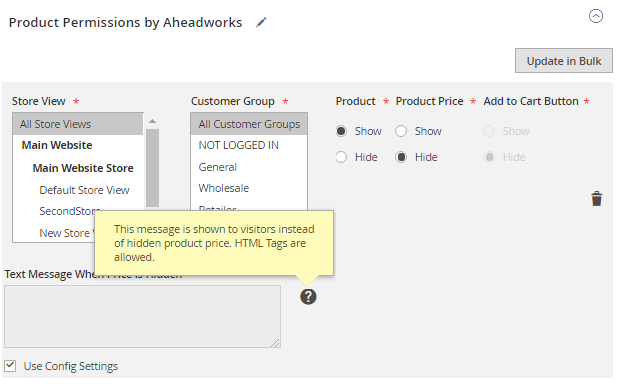
Product Price - contains the ‘Show’ or ‘Hide’ modes for you to choose;
| Info |
|---|
Please note: if you decide to hide the product price, the Add to cart button is hidden automatically. Instead you can create a customized text message in the field ‘Text Message When Price is Hidden’ using a ready-made HTML-code. |
.png?version=1&modificationDate=1555686068645&cacheVersion=1&api=v2&width=597)
Add to Cart Button - contains the ‘Show’ or ‘Hide’ modes for you to choose.
| Info |
|---|
Please note: if you decide to hide the Add to Cart button you can create a customized text message in the field ‘Text Message When Button Add to Cart Is Hidden’ using a ready-made HTML-code. |
4. Static Page Permissions (individual settings)
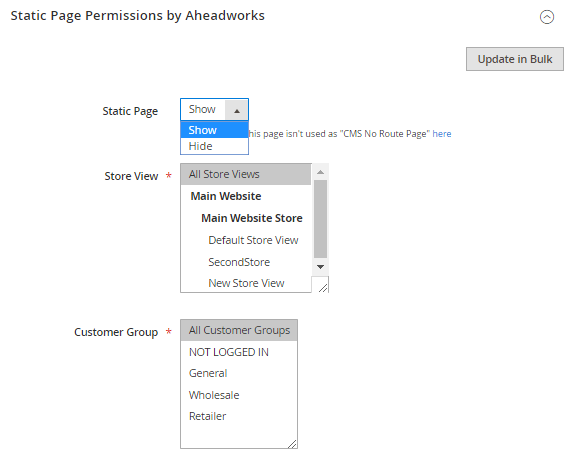
If you want to set the permissions for the individual CMS page, you need to reach the Static Page Permissions by Aheadworks fieldset. The grid is available through the following path: Content > Pages > Needed Page chosen from the Page grid > Select > Edit > Static Page Permissions by Aheadworks > and includes the following columns:
Static Page - contains the ‘Show’ or ‘Hide’ modes for you to choose;
Store View - the website which will be the application scope for the permissions specified;
Customer Group - the particular customer group for which you want to apply the permissions specified.
5. Update Permissions in Bulk

| Info |
|---|
Please note: the final step requires you to deal with the fieldset which is the similar to this one you see while configuring individual permission settings for category, product of CMS page. Finally, to update the permissions in bulk you need to click on the button 'Apply' or the button 'Back' to change the previous steps. |
6. Delete Permissions in Bulk
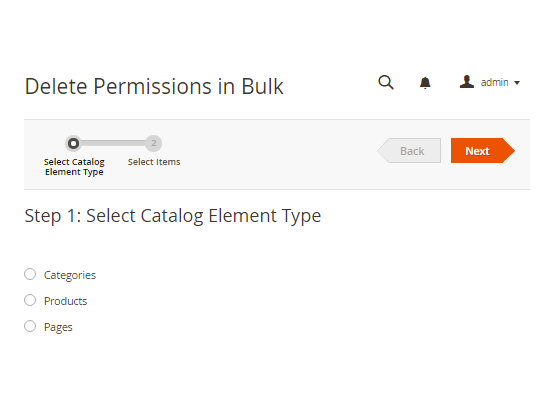
If you need to delete permissions in bulk you need to reach the Delete Permissions in Bulk wizard. The wizard is available through the following path: Catalog > Delete Permissions in Bulk and includes the following steps:
Select Catalog Element Type - the step to be made for you to choose between Categories, Products, and Pages;
Select Items - the step to be made for you to choose the items for which you want to set the permissions.
To delete the permissions you need to click on the button 'Delete' or the button 'Back' to change the previous steps.
| Info |
|---|
Note that this functionality is available not only from the main menu, but also on the page of the individual permission settings for categories - the Category Permissions by Aheadworks page, products - the Product Permissions by Aheadworks page, and CMS page - the CMS Page Permissions by Aheadworks page. |
...
Uninstall Script
Please note: uninstall script works correctly only if the module was installed via Composer
| Column |
|---|
In the backend, the permission settings are divided into:
The command to run the uninstall script: |
| Info |
|---|
Note for a developer: To use the uninstall script in the standard workflow, see Magento\Setup\Console\Command\ModuleUninstallCommand::validate(). The function should return an empty array for correct further processing. You can simply comment out lines 319-338. |
Frontend Visualisation
| Section |
|---|
The extension, in fact, starts working right after the installation. You just need to configure it in accordance with your preferences. When the configuration stage is passed, you can start managing the store catalog visibility. Note, that the extension frontend is the result of the extension configuration in the backend. |
...
| Warning |
|---|
For more information follow the product user manual on our website |
Thank you for choosing Aheadworks!
Need Customization?
.png?version=1&modificationDate=1564160605192&cacheVersion=1&api=v2&width=760)
You can always find the latest version of the software, full documentation, demos, screenshots, and reviews on http://aheadworks.com
License agreement: https://aheadworks.com/end-user-license-agreement
Contact Us: https://aheadworks.com/contact
Copyright © 2021 Aheadworks Co. http://www.aheadworks.com