...
| width | 50% |
|---|
| Table of Contents |
|---|
| Warning |
|---|
Firefox user notice: Please use another web browser to view this document. Sorry for the inconvenience. |
...
...
...
| width | 30% |
|---|
...

Magento 2 Popup Pro helps online merchants draw buyers’ attention to promo offers by means of highly customizable popups (with view to design, content, animation effects, position, etc.). Popup windows get triggered against the five events as provided by the extension. Admins are, furthermore, able to customize the trigger values that pinpoint the timing of each popup. Popups can be created for distinct store views and customer segments. Finally, they can be displayed on specified product pages.
Compatibility: Magento Open Source 2.3.X - 2.4.X, Magento Commerce 2.3.X - 2.4.X
| Warning |
|---|
For more information follow the product user manual on our website |
Thank you for choosing Aheadworks!
Installing Popup Pro
...
| Panel | ||||
|---|---|---|---|---|
| ||||
1. Backup your web directory and store database |
| Panel | ||||
|---|---|---|---|---|
| ||||
2. Download the Popup Pro installation package |
| Panel | ||||
|---|---|---|---|---|
| ||||
3. Upload contents of the Popup Pro installation package to your store root directory |
...
| borderWidth | 2px |
|---|---|
| borderStyle | solid |
4. In SSH console of your server navigate to your store root folder:
| No Format |
|---|
cd path_to_the_store_root_folder |
run the following command: :
| No Format |
|---|
php -f bin/magento module:enable Aheadworks_Popup |
then:
| No Format |
|---|
php -f bin/magento setup:upgrade |
after:
| No Format |
|---|
php -f bin/magento setup:static-content:deploy |
| Panel | ||||
|---|---|---|---|---|
| ||||
5. Flush store cache; log out from the backend and log in again |
| Note |
|---|
Make sure the installation is done from the FTP administrator account. Otherwise, set 775 permissions to the store root directory after the extension is deployed. |
...
| width | 50% |
|---|
...
| borderWidth | 2px |
|---|---|
| borderStyle | solid |
If you are installing an extension from Aheadworks for the first time, you need to add our composer repository to your Magento store:
| Panel | ||||||||||||||
|---|---|---|---|---|---|---|---|---|---|---|---|---|---|---|
| ||||||||||||||
1. Login to your ssh console and navigate to your store folder:
Run the following command:
After the command was executed successfully, you can use the composer to install the products. |
...
| borderWidth | 2px |
|---|---|
| borderStyle | solid |
To install the extension:
2. Login to your ssh console and navigate to your store folder:
| Panel | ||||
|---|---|---|---|---|
| ||||
| cd path_to_the_store_root_folder |
...
| borderWidth | 2px |
|---|---|
| borderStyle | solid |
3. Run the following command to install the latest version of the extension:
| Panel | ||||
|---|---|---|---|---|
| ||||
composer require aheadworks/module-pop-up |
if you need to install a specific version, run this command:
| Panel | ||||
|---|---|---|---|---|
| ||||
composer require aheadworks/module-pop-up:<version> |
| Tip |
|---|
Specify the version of the extension in <version> |
| Panel | ||||
|---|---|---|---|---|
| ||||
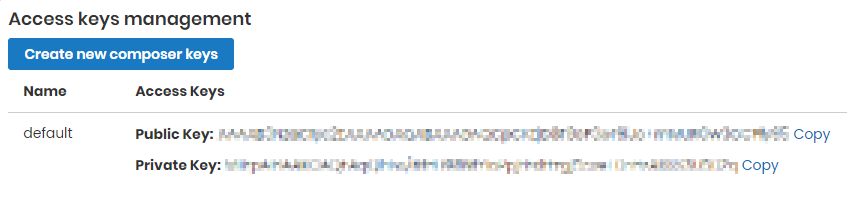
When prompted, enter Public Key (Username) and Private Key (Password): |

| Note |
|---|
Both Public Key (Username) and Private Key (Password) can be found in My Projects and Licenses in your personal account on our site:
|
...
| borderWidth | 2px |
|---|---|
| borderStyle | solid |
4. Enable the extension:
| Panel | ||||
|---|---|---|---|---|
| ||||
php -f bin/magento module:enable <Module_Name> |
| Tip |
|---|
Add the product name in <Module_Name> |
Next, register the extension:
| Panel | ||||
|---|---|---|---|---|
| ||||
bin/magento setup:upgrade |
Recompile your Magento store if you are in the Production mode:
| Panel | ||||
|---|---|---|---|---|
| ||||
bin/magento setup:di:compile |
To verify that the extension is enabled, run this command:
| Panel | ||||
|---|---|---|---|---|
| ||||
bin/magento module:status |
Clean store cache, by running the following command:
| Panel | ||||
|---|---|---|---|---|
| ||||
bin/magento cache:clean |
Log out and Log in the backend again.
...
| borderWidth | 2px |
|---|---|
| borderStyle | solid |
To upgrade the extension:
5. To update or upgrade an extension:
Download the updated extension file. Take note of the module-name and version. Export the contents to your Magento root.
If a composer package exists for the extension, run one of the following.
| Code Block | ||
|---|---|---|
| ||
composer update aheadworks/module-pop-up |
| Code Block | ||
|---|---|---|
| ||
composer require aheadworks/module-pop-up:<version> |
Run the following commands to upgrade, deploy, and clean the cache.
| Panel | ||||
|---|---|---|---|---|
| ||||
php bin/magento setup:upgrade --keep-generated
php bin/magento setup:static-content:deploy
php bin/magento cache:clean |
Introducing Popup Pro
| Section |
|---|
By far, when used properly popups may well help soar your conversion rates and add to customers' engagement with the store. Popup Pro for Magento 2 from Aheadworks helps build sustainable promo strategies and support them with popup notifications. It is for you to decide upon the time, rules of display, audience, format and frequency of the popup, and it is for the extension to offer all the relevant functionality to have them work. Furthermore, the extension allows analyzing each popup against some performance criteria. Business AdvantagesThe Popup Pro extension provides merchants with the following key features:
What's new?The present version (1.2.0) highlights integration with the Customer Segmentation module. |
Getting Around
| Section |
|---|
Once installed the extension introduces its section under Content > Popup Pro by aheadWorks > Manage Popups
The Manage Popups screen is the management center of the extension. The popup grid offers an overview of all the popups created along with the Click Through Rate (CTR) statistics:
The Manage Popups grid can be adjusted according to a particular task:
Once the Manage Popups grid is configured, the store administrator may start managing popups. |


Managing Popups
| Section | ||||
|---|---|---|---|---|
To create a new popup, click General InformationIn this section the store administrator is to suggest a name for the popup, a store view for popup display, as well as some other popup attributes.
The General Information section of the New Popup page comes with the following settings:
Where to displayThis is the second popup configuration section. Here store administrator is suggested to decide on what pages the popup is to be displayed.
The section comes with the following settings:
Popup contentThe next section of the New Popup page is the content section.
Here the store administrator is presented with the WYSIWYG editor, as well as with some content blocks of the popup. The editor allows populating the popup with widgets, media (images, video), hyperlinks etc. Popup designThe final section of the New Popup page. Here store administrator can submit custom CSS design to adjust the look and feel of the popup. If the field is empty the default design is used. |


Uninstalling Popup Pro
...
| width | 50% |
|---|
Manual Removal
...
| borderWidth | 2px |
|---|---|
| borderStyle | solid |
1. Disable the module by executing the following commands:
| No Format |
|---|
php bin/magento module:disable Aheadworks_Popup
php bin/magento setup:upgrade |
...
| borderWidth | 2px |
|---|---|
| borderStyle | solid |
2. Remove the extension files from the following folder:
| No Format |
|---|
app/code/Aheadworks/Popup |
...
| width | 50% |
|---|
Automatic Removal (via Composer)
...
| borderWidth | 2px |
|---|---|
| borderStyle | solid |
1. Disable the module by executing the following commands:
| No Format |
|---|
php bin/magento module:uninstall Aheadworks_Popup |
...
Need Customization?
.png?version=1&modificationDate=1564161372526&cacheVersion=1&api=v2)
You can always find the latest version of the software, full documentation, demos, screenshots, and reviews on http://aheadworks.com
License agreement: https://aheadworks.com/end-user-license-agreement
Contact Us: https://aheadworks.com/contact
Copyright © 2021 Aheadworks Co. http://www.aheadworks.com