...
| width | 50% |
|---|
| Table of Contents |
|---|
| Warning |
|---|
Firefox user notice: Please use another web browser to view this document. Sorry for the inconvenience. |
...
...

Magento 2 Rich Banner Slider is designed for a flawless management of rotating banner sliders. Store admins can create in-page and widescreen banners with configurable images, URL’s, animations, timing, and other parameters. Banners can be put on particular pages and page sections. The performance of each banner can be evaluated by viewing key banner stats in the individual grid.
Compatibility: Magento Open Source 2.3.X - 2.4.X, Magento Commerce 2.3.X - 2.4.X
Thank you for choosing Aheadworks!
Installing Rich Banner Slider
...
| Panel | ||||
|---|---|---|---|---|
| ||||
1. Backup your web directory and store database |
| Panel | ||||
|---|---|---|---|---|
| ||||
2. Download the Rich Banner Slider installation package |
| Panel | ||||
|---|---|---|---|---|
| ||||
3. Upload contents of the Rich Banner Slider installation package to your store root directory |
...
| borderWidth | 2px |
|---|---|
| borderStyle | solid |
4. In SSH console of your server navigate to your store root folder:
| No Format |
|---|
cd path_to_the_store_root_folder |
run the following command: :
| No Format |
|---|
php -f bin/magento module:enable Aheadworks_Rbslider |
then:
| No Format |
|---|
php -f bin/magento setup:upgrade |
after:
| No Format |
|---|
php -f bin/magento setup:static-content:deploy |
| Panel | ||||
|---|---|---|---|---|
| ||||
5. Flush store cache; log out from the backend and log in again |
| Note |
|---|
Make sure the installation is done from the FTP administrator account. Otherwise, set 775 permissions to the store root directory after the extension is deployed. |
...
| width | 50% |
|---|
...
| borderWidth | 2px |
|---|---|
| borderStyle | solid |
If you are installing an extension from Aheadworks for the first time, you need to add our composer repository to your Magento store:
| Panel | ||||||||||||||
|---|---|---|---|---|---|---|---|---|---|---|---|---|---|---|
| ||||||||||||||
1. Login to your ssh console and navigate to your store folder:
Run the following command:
After the command was executed successfully, you can use the composer to install the products. |
...
| borderWidth | 2px |
|---|---|
| borderStyle | solid |
To install the extension:
2. Login to your ssh console and navigate to your store folder:
| Panel | ||||
|---|---|---|---|---|
| ||||
| cd path_to_the_store_root_folder |
...
| borderWidth | 2px |
|---|---|
| borderStyle | solid |
3. Run the following command to install the latest version of the extension:
| Panel | ||||
|---|---|---|---|---|
| ||||
composer require aheadworks/module-rbslider |
if you need to install a specific version, run this command:
| Panel | ||||
|---|---|---|---|---|
| ||||
composer require aheadworks/module-rbslider<version> |
| Tip |
|---|
Specify the version of the extension in <version> |
| Panel | ||||
|---|---|---|---|---|
| ||||
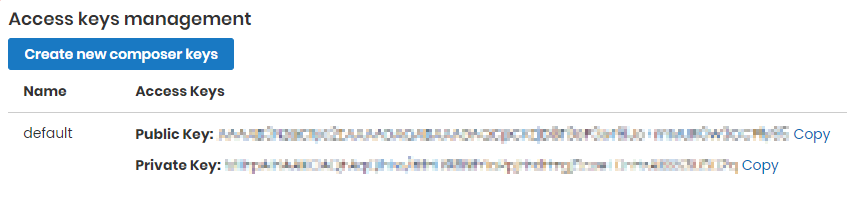
When prompted, enter Public Key (Username) and Private Key (Password): |

| Note |
|---|
Both Public Key (Username) and Private Key (Password) can be found in My Projects and Licenses in your personal account on our site:
|
...
| borderWidth | 2px |
|---|---|
| borderStyle | solid |
4. Enable the extension:
| Panel | ||||
|---|---|---|---|---|
| ||||
php -f bin/magento module:enable <Module_Name> |
| Tip |
|---|
Add the product name in <Module_Name> |
Next, register the extension:
| Panel | ||||
|---|---|---|---|---|
| ||||
bin/magento setup:upgrade |
Recompile your Magento store if you are in the Production mode:
| Panel | ||||
|---|---|---|---|---|
| ||||
bin/magento setup:di:compile |
To verify that the extension is enabled, run this command:
| Panel | ||||
|---|---|---|---|---|
| ||||
bin/magento module:status |
Clean store cache, by running the following command:
| Panel | ||||
|---|---|---|---|---|
| ||||
bin/magento cache:clean |
Log out and Log in the backend again.
...
| borderWidth | 2px |
|---|---|
| borderStyle | solid |
To upgrade the extension:
5. To update or upgrade an extension:
Download the updated extension file. Take note of the module-name and version. Export the contents to your Magento root.
If a composer package exists for the extension, run one of the following.
| Code Block | ||
|---|---|---|
| ||
composer update aheadworks/module-rbslider |
| Code Block | ||
|---|---|---|
| ||
composer require aheadworks/module-rbslider:<version> |
Run the following commands to upgrade, deploy, and clean the cache.
| Panel | ||||
|---|---|---|---|---|
| ||||
php bin/magento setup:upgrade --keep-generated
php bin/magento setup:static-content:deploy
php bin/magento cache:clean |
Introducing Rich Banner Slider
| Section |
|---|
The Rich Banner Slider extension introduces advertising banner rotation to the Magento 2 stores:
Extension LogicThe module allows adding banner slides (or simply banners) to home, product, catalog, blog pages, or display banners via a custom Magento 2 widget. Each banner can contain several slides and target either selected customer groups or customer segments (Customer Segmentation for M2 is required). Explicit configuration options of display of sliders clearly define the place of banners within a store, the content of the slides and, furthermore, allow to prompt action with overlay features. Additionally, the extension provides the click-through rate (CTR) statistics per slider for evaluation of the efficiency of the promotional campaign, put behind the use of the slider. What's NewThe present version of the extension (v. 1.4.0) enables the following new features to have sliders finer and more catchy: different slider images for desktop and mobile store views, text and buttons over the image of the slider. |
Getting Around
| Section |
|---|
Rich Banner Slider introduces its sections under Content > Rich Banner Slider by Aheadworks. The extension comes with three sections:
|
Sliders on Backend
...
Banners consist of slides, base units of a banner slider. It is suggested that you first come up with an idea for a banner, configure it on the backend and then populate the banners with slides. To populate banners with slides, you will have to create them on the backend, and assign to the target banners. Each slide can have a unique background image, overlay content and destination URL.
Banners
Banners are composed of slides and represent a block of images located at a defined position on the storefront.
Banners grid
The Banners page comes as a grid of the following columns:
- ID - identification number of a banner;
- Name - name of a banner (to reflect your promotion/sales strategy);
- Status - status of a banner (enabled / disabled);
- Where to Display - location of a banner (product pages, catalog pages, home page, custom widget);
- Layout position - position of a banner within the place page of display (menu top, content top, menu bottom, page bottom);
- Slides - list of slides assigned to the banner (active link to the configuration page of a slide);
- Priority - priority of display of banners of same location and position of display.
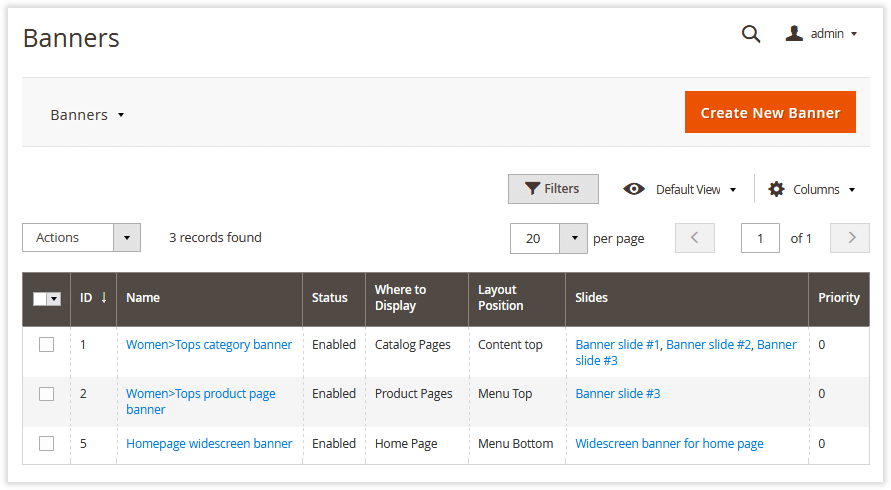
To create a banner, click the Create New Banner button at the top of the page. To edit a banner, click on the name of a banner in the grid.
Create / Edit Banner
The Create/Edit Banner page is represented with four setting blocks: General Information, Position, Behaviour, Slides.
General Information and Position
The General Information block allows tweaking the following settings for a banner:
- Name - a meaningful name of the banner (will be used for internal identification purposes);
- Enable Banner - allows enabling/disabling the banner on frontend;
- Priority - a whole numeric to define the priority of display of the banner in an array of thereof sharing same position and location.
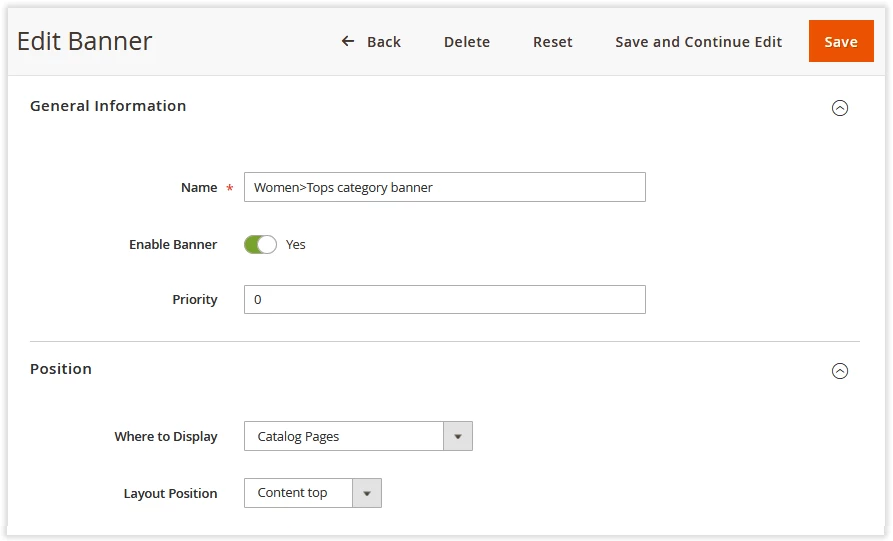
The Position sections presents the following configuration options:
- Where to Display - defines the pages to display the banner.
On choice of the display option, the admin will be asked to specify the product, catalog pages or the widget in accordance with the table below:
...
Home Page
The banner is displayed on the home page of the store.
...
Product Pages
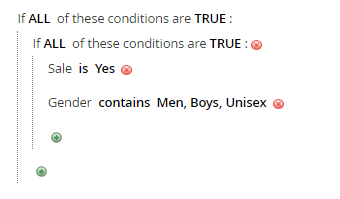
The block of configurable conditions will be shown for the admin to specify the products to display the banner.
Leave blank to display the block on all product pages.
...
...
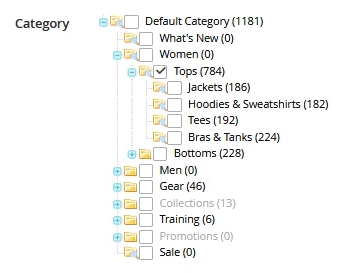
Catalog Pages
The catalog tree will be shown for the admin to specify the catalog pages to display the banner.
Tick the checkbox next to each page you want to display the banner. Click + / - to fold/unfold the category.
...
...
Custom Widget
The banner is displayed via the selected widget.
You will have to create a widget and configure it to display the banner. Follow the official Magento 2 user guide to learn more.
...
- Layout Position - defines the position of the banner on the target page:
- Menu Top;
- Menu Bottom;
- Content top;
- Page bottom.
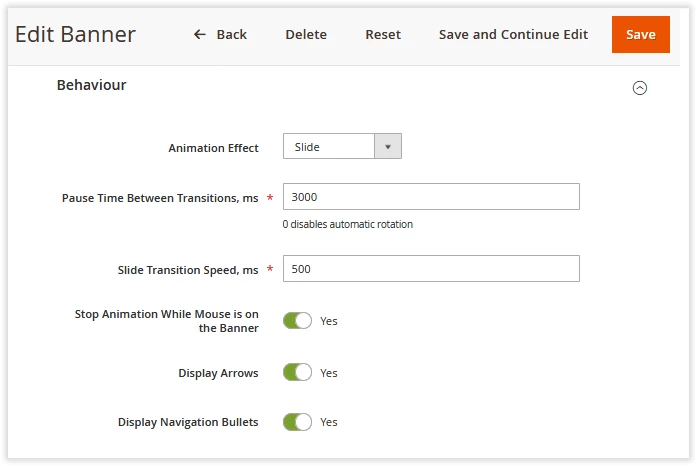
Banner Behavior
The block allows defining the behavior of the banner against the following parameters:
- Animation Effect - slide change animation effect:
- Slide;
- Fade Out/In;
- Pause Time Between Transitions, ms - the interval between switching slides automatically;
- Slide Transition Speed, ms - the speed at which slides are switched;
- Display Arrows - enables/disables navigation arrows at the Banner;
Slides Assigned to Banner
The section comes as a grid to features all available slides. This is where the admin is able to assign the chosen slides to the banner. For convenience reasons the grid is supported with the filter head row, which helps maneuvering over long lists of slides.
To assign a slide to the banner, tick the checkbox next to the chosen slide. The grid in general looks the same as that of the Slides Page, thereby proceed below to learn more on it.

Slides
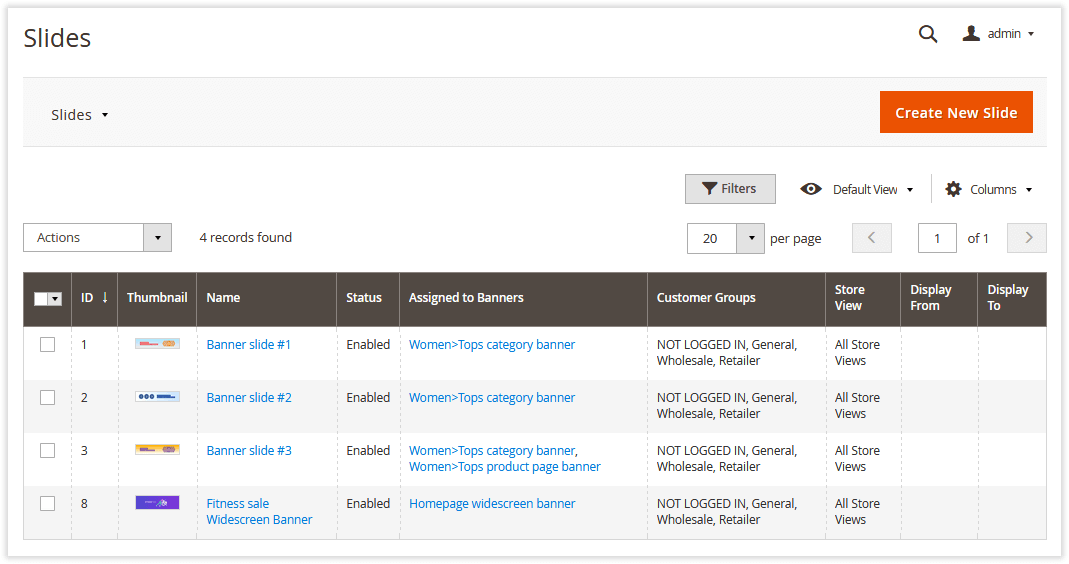
Slides Grid
To create and manage slides proceed to Content > Rich Banner Slider by Aheadworks > Slides. The Slides Page comes as a grid with the following columns:
- ID - the identification number of the slide;
- Thumbnail - the thumbnail image of the slide (for preview within the grid);
- Name - the name of the slide (have it meaningful to reflect the marketing strategy behind);
- Status - the status of the slide (enabled / disabled);
- Assigned to Banners - the list of banners to contain the slide (active links leading to a Create\Edit Banner Page);
- Customer Groups - the list of groups to see the banner;
- Store View - the view of the store to show the banner;
- Display from / to - the dates of display of the banner.
To create a new slide, click on the Create New Slide button in the top right corner of the page. To edit a slide, click on the name of the slide in the grid.
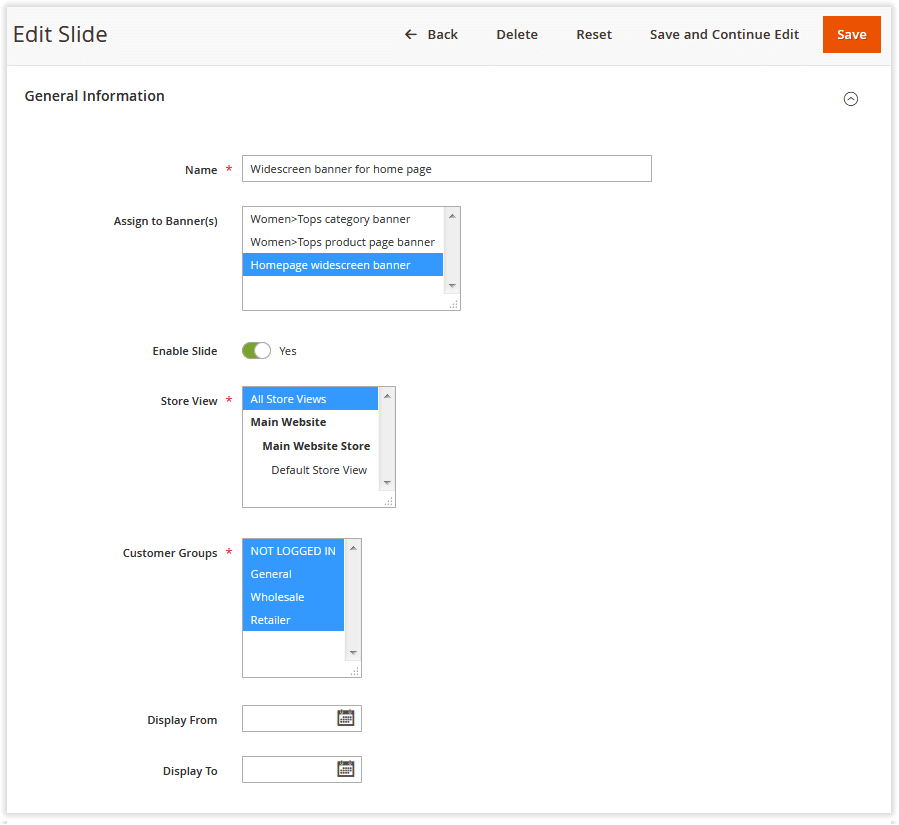
Create / Edit Slides
The Edit Slide page is represented with the four blocks of settings: General Information, Background Image, Overlay Content and URL Options.
General Settings
The General Settings block comes with the following settings:
- Name - the name of the slide (used for internal identification purpose);
- Assign to Banner(s) - the list of banners to assign the slide to;
- Enable Slide - the status of the slide (enabled/disabled);
- Store View - the store view to feature the slide;
- Customer Groups - the customer groups the slide is to be displayed to;
- Customer Segments (available when Customer Segments is installed, v. 1.1.0 or newer) - the customer segments the Slide is to be displayed to;
- Display From/to - the date range the slider is to be displayed on the storefront.
| Note |
|---|
If Customer Segmentation is installed, enable the "Compatibility with frontend extensions" option in Stores → Configuration → Aheadworks → Customer Segmentation for correct integration with the present extension. |
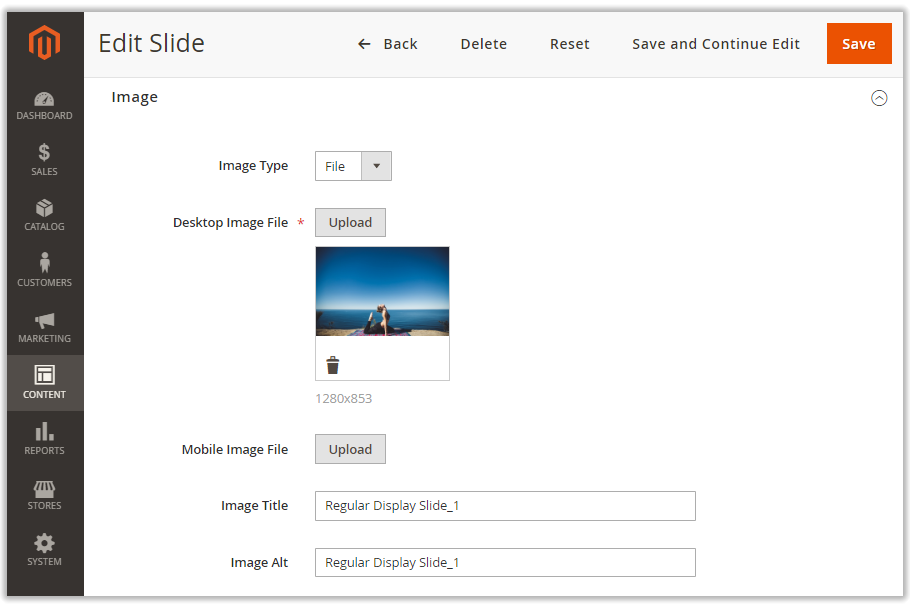
Background Image
The Image section allows uploading an image for the slide, as well as tweaking some related options.
- Image Type - select between an image file type and URL for image upload;
- Image Title - define a title for the image;
- Image Alt - define the text to display upon mouse hover over the image.
To ensure best content representation practice across multiple devices, admins can upload two images of the same kind though of different size - for desktop and mobile devices. Click either on the Upload Desktop Image File or Upload Mobile Image File button to do so. Should no image be uploaded for mobile devices, the desktop image will be used.
| Tip |
|---|
The size of images depends solely on your taste and design needs, though there are some observations that may dictate some limitations. It is widely accepted that the 300x250 px is best for a slide image for mobile devices, both for handset and tablet. At the same time, this could change depending on the ad placement and ad style. |
| Note |
|---|
It is recommended, the size of all images be the same, since the size of the banner is calculated from size of the first image in a slider. |
Overlay Content
The Overlay Content functionality allows placing formatted text and image elements over the slide image. This further enhances the informative capacity of the slide and prompts customers respond to the call to action.
The Overlay Content block contains a WYSIWYG editor. Type in some text in the text-area, upload pictures or tables and apply necessary formatting options. No special designing skills are required to have really rich slides this way.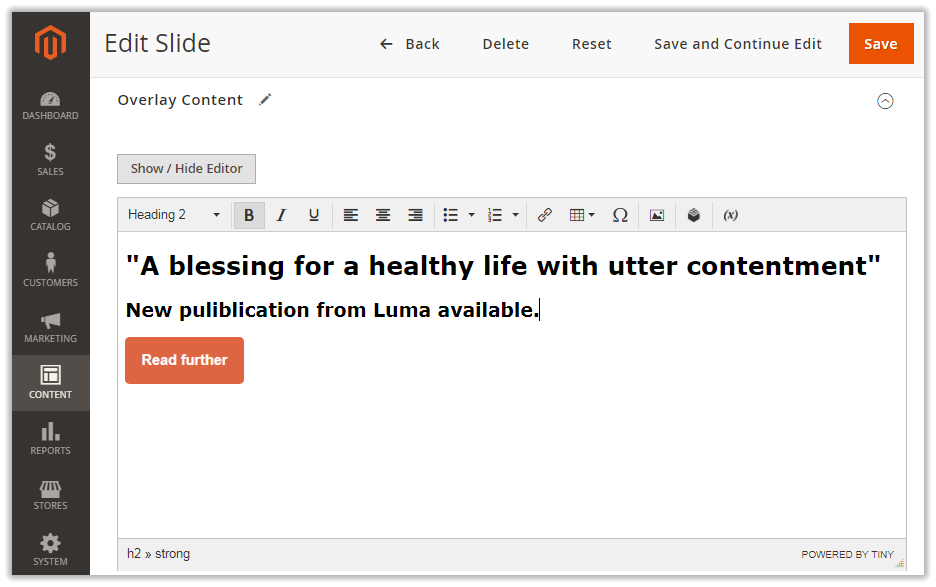
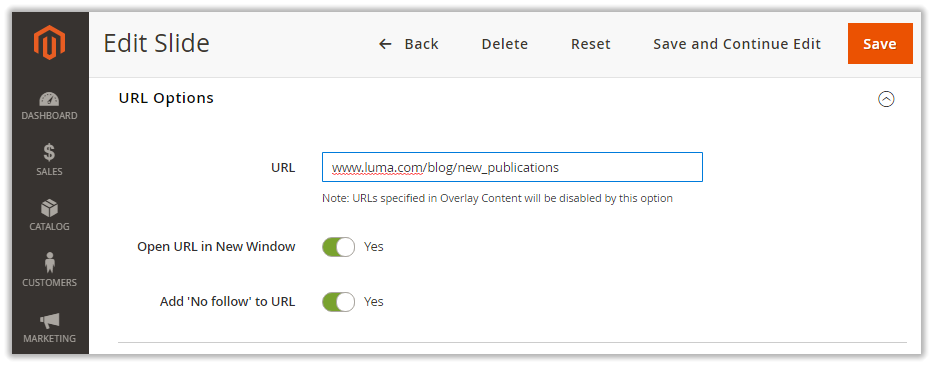
URL Options
This is where you define a destination URL for the image and slide. The block features the following options for configuration:
- URL - the text-field to type-in a URL;
- Open URL in New Window - defines if the destination URL should be opened in a new browser window;
- Add 'No follow' to URL - defines if rel="nofollow" should be added to the destination URL.
On completing the set-up, click the Save button at the top.
Having created a set of slides, proceed to creating a banner.
Slider Performance Statistics
...
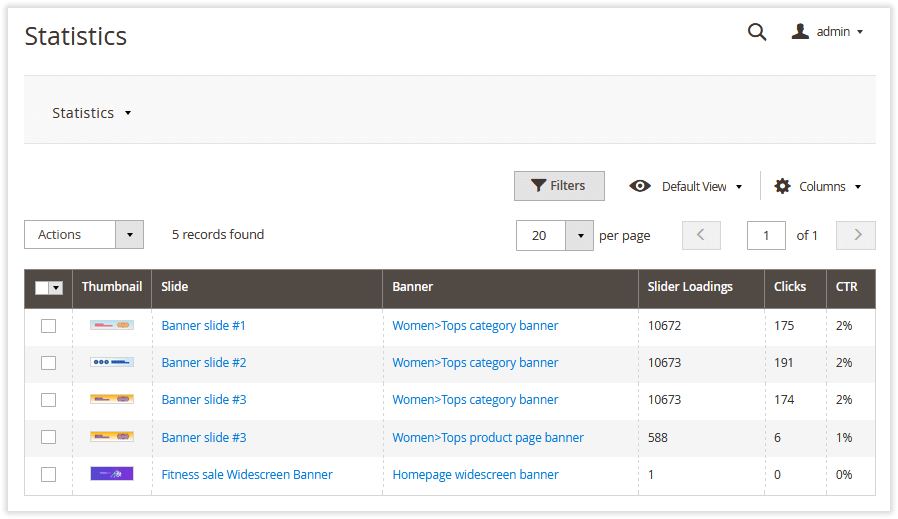
Once the banners are set up, you can estimate the performance of each banner. Proceed to Content > Rich Banner Slider by Aheadworks > Statistics to find performance statistics of every slider. The page comes as a grid of the following columns:
- Thumbnail - the grid preview image of the slide;
- Slide - the name of the slide (active link to the Create/Edit Slide page);
- Banner - the name of the banner to contain the slide (active link to the Create/Edit Banner page);
- Slider Loadings - the number of loadings of the slider;
- Click - the number of clicks per slider over the time of validity;
- CTR - the click-through-rate (ratio between the latter two) in %.
Statistics prompts analysis and allows evaluating the performance of a slide within you marketing campaign.
Sliders on Frontend
...
On the storefront, the pre-configured banner sliders are loaded at the same time as the whole content of the page.
Customers are able to scroll slides in the banner with the help of either the display arrows or navigation bullets (as configured on the backend).
A sample banner of a single slide on a category page will look as follows:
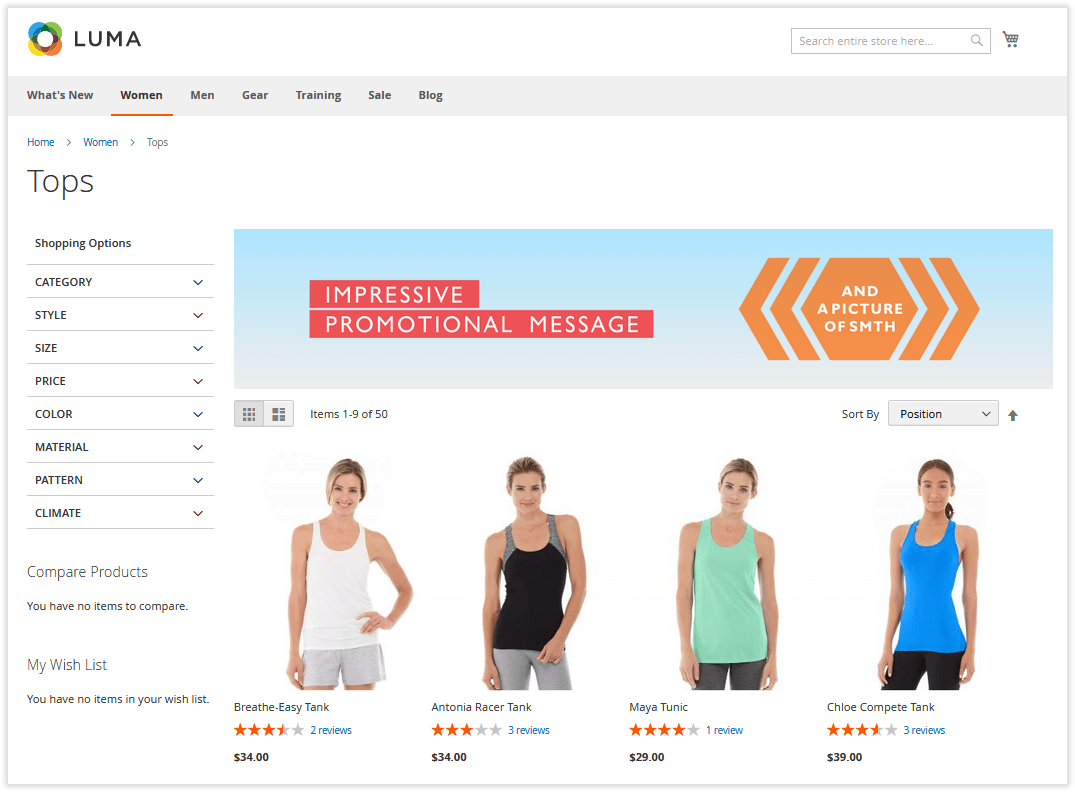
A widescreen banner on Home Page will look like this:

...
| width | 50% |
|---|
Manual Removal
...
1. Disable the module by executing the following commands:
| No Format |
|---|
php bin/magento module:disable Aheadworks_Rbslider
php bin/magento setup:upgrade |
...
2. Remove the extension files from the following folder:
| No Format |
|---|
app/code/Aheadworks/Rbslider |
...
| width | 50% |
|---|
Automatic Removal (via Composer)
...
1. Disable the module by executing the following commands:
| No Format |
|---|
php bin/magento module:uninstall Aheadworks_Rbslider |
...
| Warning |
|---|
For more information follow the product user manual on our website |
Thank you for choosing Aheadworks!
Need Customization?
.png?version=1&modificationDate=1564162777646&cacheVersion=1&api=v2)
You can always find the latest version of the software, full documentation, demos, screenshots, and reviews on http://aheadworks.com
License agreement: https://aheadworks.com/end-user-license-agreement
Contact Us: https://aheadworks.com/contact
Copyright © 2021 Aheadworks Co. http://www.aheadworks.com