...
...
| width | 50% |
|---|
| Table of Contents |
|---|
| Warning |
|---|
Firefox user notice: Please use another web browser to view this document. Sorry for the inconvenience. |

Magento 2 Reward Points helps reward customers for shopping at your store with points that can be used towards purchase of goods and services offered on the store. The Admin can set multiple points earning and spending rates which are dependent on customer groups, customer lifetime sales, and other parameters. Additionally, the Admin can define limitations for points usage, specify occasions to award shoppers with points, add points balance announcements to product pages, enable automatic refunds into points, promote reward programs by email and monitor transactions with reward points.
Compatibility: Magento Open Source 2.3.X - 2.4.X, Magento Commerce 2.3.X - 2.4.X
...
Thank you for choosing Aheadworks!
Installing M2 Reward Points
...
| Panel | ||||
|---|---|---|---|---|
| ||||
1. Backup your web directory and store database |
| Panel | ||||
|---|---|---|---|---|
| ||||
2. Download the Reward Points installation package |
| Panel | ||||
|---|---|---|---|---|
| ||||
3. Upload contents of the Reward Points installation package to your store root directory |
...
| borderWidth | 2px |
|---|---|
| borderStyle | solid |
4. In SSH console of your server navigate to your store root folder:
| No Format |
|---|
cd path_to_the_store_root_folder |
run the following command: :
| No Format |
|---|
php -f bin/magento module:enable Aheadworks_RewardPoints |
then:
| No Format |
|---|
php -f bin/magento setup:upgrade |
after:
| No Format |
|---|
php -f bin/magento setup:static-content:deploy |
| Panel | ||||
|---|---|---|---|---|
| ||||
5. Flush store cache; log out from the backend and log in again |
| Note |
|---|
Make sure the installation is done from the FTP administrator account. Otherwise, set 775 permissions to the store root directory after the extension is deployed. |
...
| width | 50% |
|---|
...
| borderWidth | 2px |
|---|---|
| borderStyle | solid |
If you are installing an extension from Aheadworks for the first time, you need to add our composer repository to your Magento store:
| Panel | ||||||||||||||
|---|---|---|---|---|---|---|---|---|---|---|---|---|---|---|
| ||||||||||||||
1. Login to your ssh console and navigate to your store folder:
Run the following commands:
After the command was executed successfully, you can use the composer to install the products. |
...
| borderWidth | 2px |
|---|---|
| borderStyle | solid |
To install the extension:
2. Login to your ssh console and navigate to your store folder:
| Panel | ||||
|---|---|---|---|---|
| ||||
| cd path_to_the_store_root_folder |
...
| borderWidth | 2px |
|---|---|
| borderStyle | solid |
3. Run the following command to install the latest version of the extension:
| Panel | ||||
|---|---|---|---|---|
| ||||
composer require aheadworks/module-reward-points |
if you need to install a specific version, run this command:
| Panel | ||||
|---|---|---|---|---|
| ||||
composer require aheadworks/module-reward-points:<version> |
| Tip |
|---|
Specify the desirable extension version in <version>. |
| Panel | ||||
|---|---|---|---|---|
| ||||
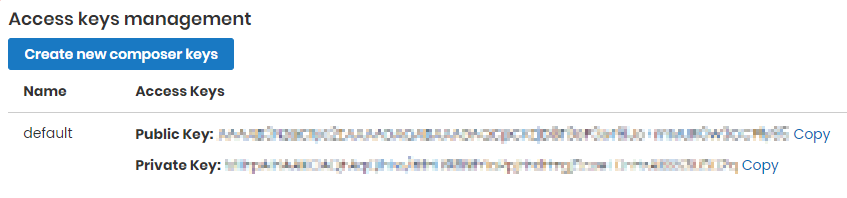
When prompted, enter Public Key (Username) and Private Key (Password): |

| Note |
|---|
Both Public Key (Username) and Private Key (Password) can be found in My Projects and Licenses in your personal account on our site:
|
...
| borderWidth | 2px |
|---|---|
| borderStyle | solid |
4. Enable the extension:
| Panel | ||||
|---|---|---|---|---|
| ||||
php -f bin/magento module:enable <Module_Name> |
| Tip |
|---|
Add the product name in <Module_Name> |
Next, register the extension:
| Panel | ||||
|---|---|---|---|---|
| ||||
bin/magento setup:upgrade |
Recompile your Magento store if you are in the Production mode:
| Panel | ||||
|---|---|---|---|---|
| ||||
bin/magento setup:di:compile |
To verify that the extension is enabled, run this command:
| Panel | ||||
|---|---|---|---|---|
| ||||
bin/magento module:status |
Clean store cache, by running the following command:
| Panel | ||||
|---|---|---|---|---|
| ||||
bin/magento cache:clean |
Log out and Log in the backend again.
...
| borderWidth | 2px |
|---|---|
| borderStyle | solid |
To upgrade the extension:
5. To update or upgrade an extension:
Download the updated extension file. Take note of the module-name and version. Export the contents to your Magento root.
If a composer package exists for the extension, run one of the following.
| Code Block | ||
|---|---|---|
| ||
composer update aheadworks/module-reward-points |
| Code Block | ||
|---|---|---|
| ||
composer require aheadworks/module-reward-points:<version> |
Run the following commands to upgrade, deploy, and clean the cache.
| Panel | ||||
|---|---|---|---|---|
| ||||
php bin/magento setup:upgrade --keep-generated
php bin/magento setup:static-content:deploy
php bin/magento cache:clean |
Set up cron
...
| width | 50% |
|---|
If you have already configured cron jobs for your Magento installation then you can skip this step. Read the following instructions on setting cron job for your Magento store: Magento user guide.
Generally it would be enough to run in SSH console of your server:
| Code Block | ||
|---|---|---|
| ||
crontab -e |
And insert the following line:
| Code Block |
|---|
*/3 * * * * php -c <ini-file-path> <your Magento install dir>/bin/magento cron:run
*/3 * * * * php -c <ini-file-path> <your Magento install dir>/update/cron.php
*/3 * * * * php -c <ini-file-path> <your Magento install dir>/bin/magento setup:cron:run |
Don't forget to confirm saving request when exit.
Updating from 1.0.0 to 1.1.0 version
...
| width | 50% |
|---|
1.1.0 version of the extension introduces many features and changes in the extension's workflow. Before updating 1.0.0 version to 1.1.0 make sure to read the following information and suggestions to avoid any issues.
...
1. Make sure that all transactions that were to expire on the day of the update are expired.Otherwise, the points on the customer's account will be preserved.
| Warning | ||
|---|---|---|
| ||
Status column is added in the Transactions table. It reflects the state of the points transaction. Before the update, make sure that the transactions that were to expire on the day you update are EXPIRED. The installation script of the extension will set 'Expired' value to all transactions in this column with expiration_date <= current date (UTC). |
...
2. All customers that have/had points will be automatically subscribed to the point balance updates.
| Warning | ||
|---|---|---|
| ||
After updating to 1.1.0 version make sure to unsubscribe customers from the point balance updates in cases you do not want the emails to be sent. |
| Panel |
|---|
3. After the update the status of all transactions in columns Balance Update Notified and Expiration Notified will be set to 'NO'. |
| Panel |
|---|
4. After the update all expired transactions inherited from version 1.0.0 will have id=0 in the comment column. |
| Panel |
|---|
5. Value of the Balance column of the transactions inherited from version 1.0.0 will be set to '0'. |
...
6. After the update the Status of all transactions inherited from version 1.0.0 will be set to 'Used'. For every inherited transaction a new transaction (with the point balance on the day of the update) will be created automatically. The expiration date of the new transactions will be equal to the one set in the extension settings.
| Warning |
|---|
...
| title | What to do |
|---|
...
After the update you may want to check up on the expiration balance and manage transaction balance manually.
Introducing M2 Reward Points
...
Extension Overview
The Reward Points extension for Magento 2 helps reward customers for shopping at your Magento 2 store with points that can be used towards purchase of products and services at the store. The key-features of the extension are as follows:
- Selection of occasions to grant points: birthday, purchase, review, sharing, etc
- Configurable points earning and spending rates
- Customer lifetime sales values to define points earning and spending rates
- Conditioning the purchase of products with points
- Option to apply points to order totals before or after tax
- Option to show prices discounted by the amount of points available to the Customer
- Import/export of the reward points balance
- Integration with M2 One Step Checkout
- Integration with M2 B2B Company Accounts :
- Reward Points 1.8.0 or newer is compatible ONLY with Company Accounts 1.4.1 or newer
- Reward Points 1.7.2 or older is compatible ONLY with Company Accounts 1.4.0 or older
Recent Updates
As of version 1.8.1 the present extension enables the following:
- An option to let customers enter points amount they'd like to spend during checkout
- "Reward Points" tab at backend customer page
Configuring M2 Reward Points
| Section |
|---|
| Info |
|---|
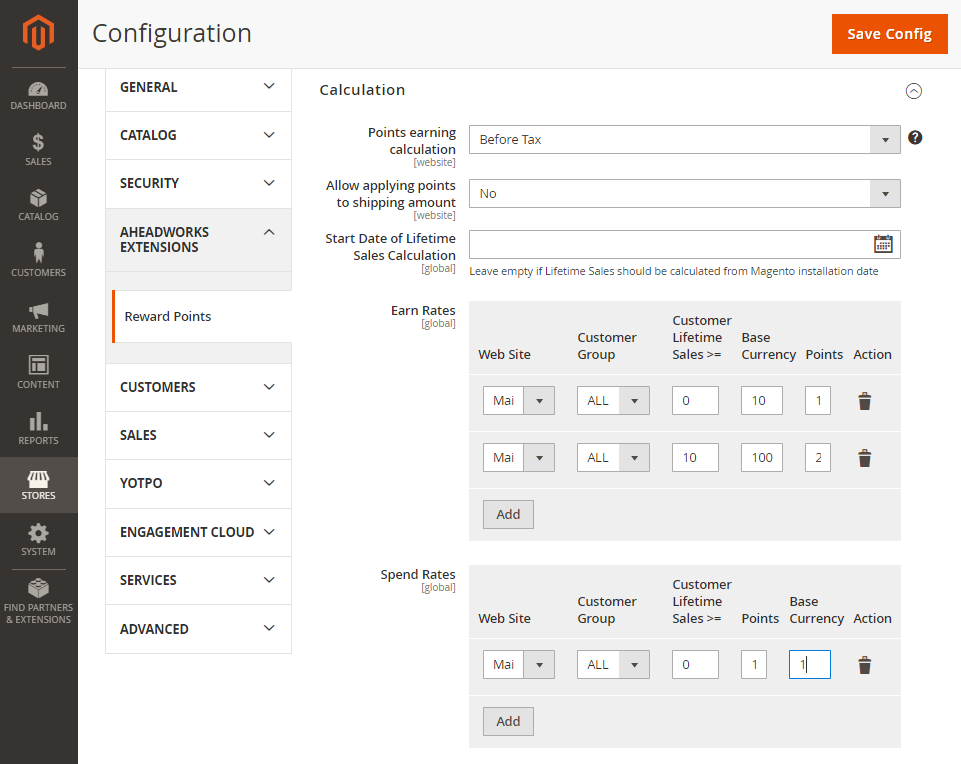
To set the date of Magento 2 store installation as the start of count of lifetime sales, leave Start Date of Lifetime Sales Calculation empty. |
- Earn Rates - the block to set the ratio of earned points to an amount in base currency
- Spend Rates - the block to set the ratio of spent points to an amount in base currency
| Note |
|---|
Multiple rates of earning and spending of points can be created. Rates are adjusted against a range of customer lifetime sales. |
The Earn Rates and Spend Rates blocks look and behave similarly.
To add an earn/spend rate, the Admin clicks on the "Add Earn Rate" or "Add Spend Rate" button correspondingly. The following parameters will then require configuration in the newly added row:
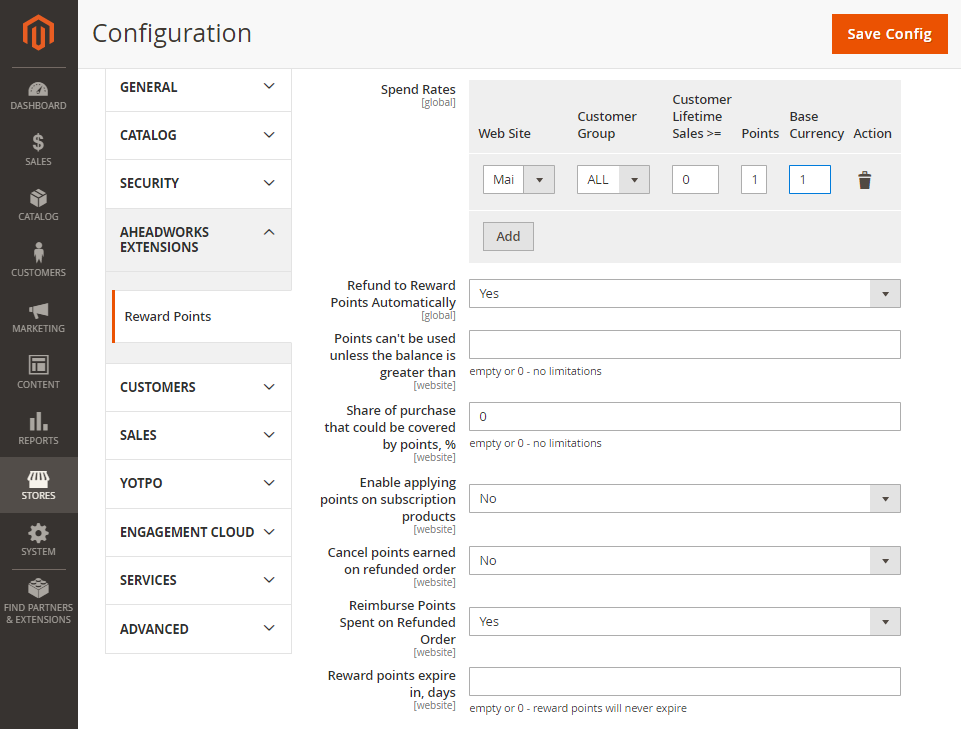
- Refund to Reward Points Automatically - the Yes/No selector to define if refunds are to be done into points. When set to Yes the '
- Points can't be used unless the balance is greater than - the whole numeric to indicate the lowest minimum amount of points available to the Customer, which allows him/her to use points towards purchase
- Share of purchase that could be covered by points, % - the % of an order total that can be covered with points (Helps avoiding zero checkouts)
- Enable applying points on subscription products - the Yes/No selector to allow customers to use points when purchasing subscriptions (this configuration appears only if you have Advanced Subscription Products module installed)
- Cancel points earned on refunded order - the Yes/No selector to define if points are to be deducted from the points balance of the Customer when his/her order is refunded
- Reimburse Points Spent on Refunded Order - the Yes/No selector to define if points which the Customer had spent on an order are to be automatically added to the balance when the order is refunded
- Reward points expire in, days - the whole numeric to define the time (in days), during which earned points are available to the Customer (Urges customers to place more orders).
| Info |
|---|
To allow the Customer to use points towards purchase without limits, make sure the following parameters are empty or have 0:
|
| Note |
|---|
When the Admin creates an order on the Backend and applies points to it, the following has to be taken into account:
|
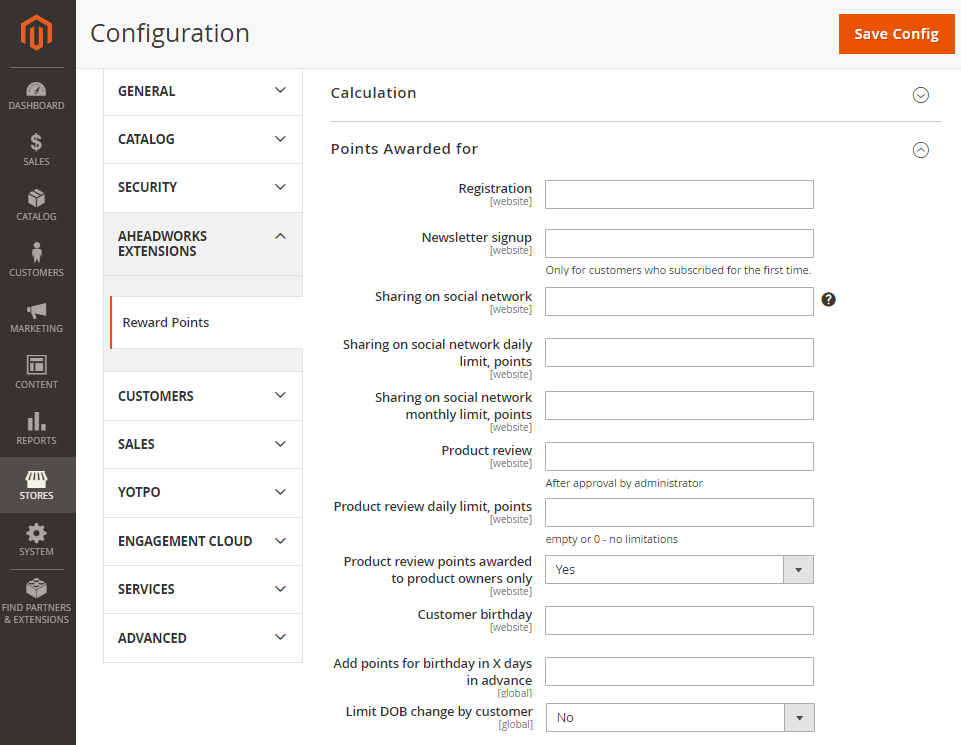
Points Awarded for
The Points AwardedFor
section defines the occasions when points are to be added to the Customer's balance:Registration - the number of points to be awarded to the Customer on registering at the store (This may prove useful if you want to avoid guest checkouts and get more information on your customers);
Newsletter signup - the number of points to be awarded to the Customer on subscribing to Newsletter (or when subscribed to by the Admin);
Sharing on social network - the number of points to be awarded to the Customer on sharing a store page to a social network;
Sharing on social network daily limit, points - the maximum number of points that can be awarded to the Customer on sharing store pages to social networks per day;
Sharing on social network monthly limit, points - the maximum number of points that can be awarded to the Customer on sharing store pages to social networks per month;
| Info | ||
|---|---|---|
| ||
Once installed Reward Points extension adds Facebook, Twitter and Google+ icons to the product pages.
By clicking on a button the Customer can share the product page to the social network and earn some points. |

Product review - the number of points to be awarded to the Customer on leaving a review to a product (Points are awarded only after the review is approved);
Product review daily limit, points - the maximum number of points that can be awarded to the Customer on leaving a review to a product per day;
Product review points awarded to product owners only - the Yes/No selector to allow limiting point awards only to the customers who have purchased the product;
- Customer birthday - the number of points to be awarded to the Customer on his/her birthday;
- Add points for birthday in X days in advance - the number of days for the birthday points to be awarded to the Customer in advance of his/her birthday;
- Limit DOB change by customer - the No/Once A Year selector to enable the limit on Customer's changing his/her date of birth.
| Note |
|---|
If Once a Year is selected for Limit DOB change by customer, the Admin can make the DOB field inactive in Account Information, on the Frontend. Alternatively, the Admin opt for a message “Date of Birth can be modified only once a year” to be displayed every time when the Customer tries to change DOB earlier than in a year's time. DOB can be specified either by the Customer on the Frontend (“Show DOB” must be enabled) or by the Admin on the Backend via the native Magento 2 functionality |
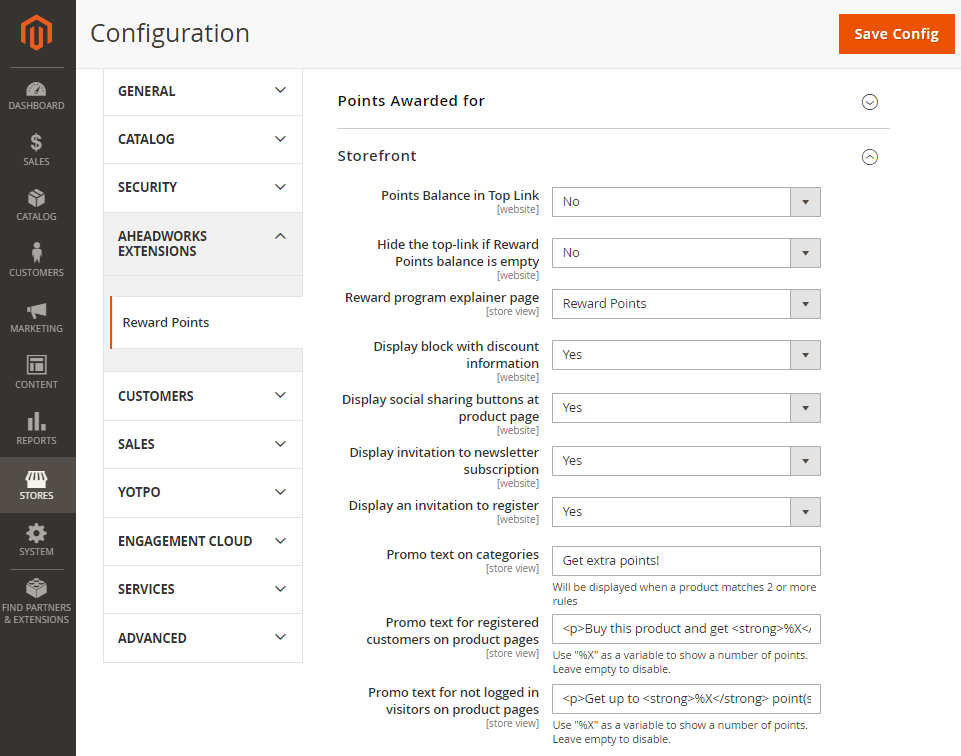
Storefront
The Storefront section guides customers on the Frontend on earning and spending of points. The sections shows the following parameters for configuration:
- Points Balance in Top Link - the Yes/No selector to define if the points available to the Customer are to be displayed below the product title at the product page
- Hide the top-link if Reward points balance is empty - the Yes/No selector to define if the points balance is to be displayed in the top link if the Customer has an empty points balance
- Reward program explainer page - the page selector to define the CMS page, a user guide to points collection and usage
- Display prices discounted by available points - the Yes/No selector to define if product prices are to be displayed discounted by the available to the Customer points
- Display social sharing buttons at product page - the Yes/No selector to define if the social sharing buttons should be displayed at the product pages
- Display invitation to newsletter subscription - the Yes/No selector to display invitation to Newsletter subscription
- Display an invitation to register - the Yes/No selector to display invitation to start an account within the store
- Promo text on categories - the text of the promo message to motivate customers to buy more
- Promo text for registered customers on product pages - the html-friendly text of the promo message to motivate registered customers to buy more
- Promo text for not logged in visitors on product pages - the html-friendly text of the promo message to motivate guest customers to buy more
| Info |
|---|
The promo text on categories is displayed when the product matches 2 or more rules. |
| Note |
|---|
Writing the Promo text for registered customers on product pages use "%X" as a variable to show the number of points. To disable the promo text leave the field empty. (Same note is true for Promo text for not logged in visitors on product pages) Examples
|
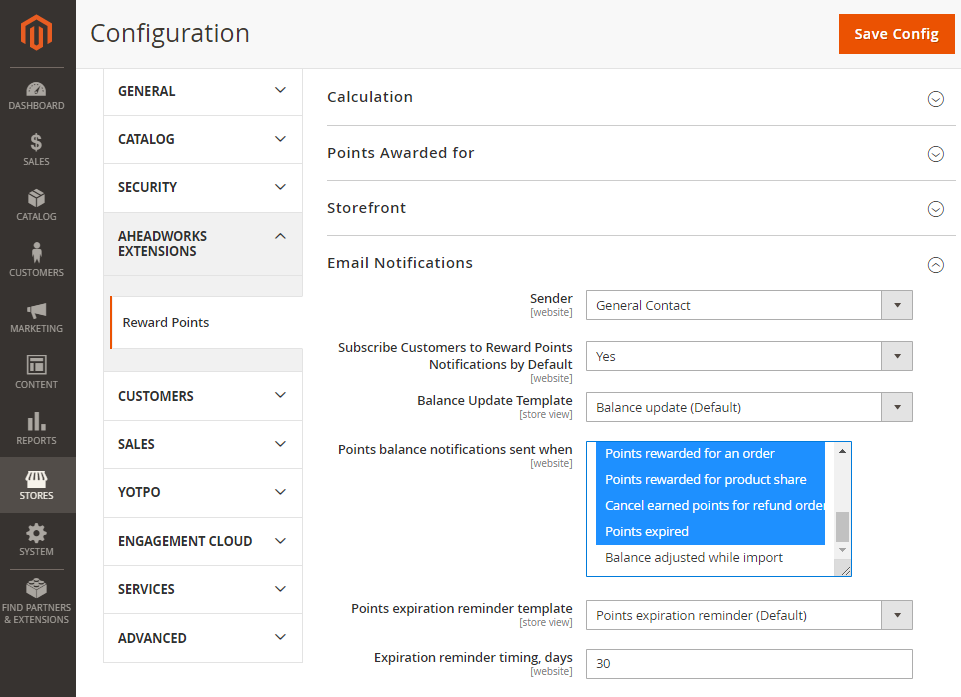
Email Notifications
The Email Notifications section controls email notifications to be sent to customers on updates to their points balances. The sections considers the following parameters for configuration:
- Sender - the selector to define the role and the email address, linked to it, from which notification emails are to be sent
- Subscribe Customers to Reward Points Notifications by Default - the Yes/No selector to define if the Customer is to be subscribed to the notifications by default or is to do that him/herself from My Account
- Balance Update Template - the selector of the email template to notify customers on updates to their points balances
- Points balance notifications sent when - the selector of occasions for notifications to be sent to customers (multiple selection is possible)
- Points expiration reminder template - the selector of the email template regarding points expiration
- Expiration reminder timing, days - the whole number to indicate the period in days when the notification on points expiration is to be sent in advance
Getting Around
...
Once installed and properly configured Reward Points extension allows customers to participate in the reward campaign by purchasing products and participating in such social activities as: reviewing products, sharing product pages on social networks, subscribing to the newsletter and registering at the store.
First of all, the Magento 2 Reward Points extension adds its section to the customer's account.
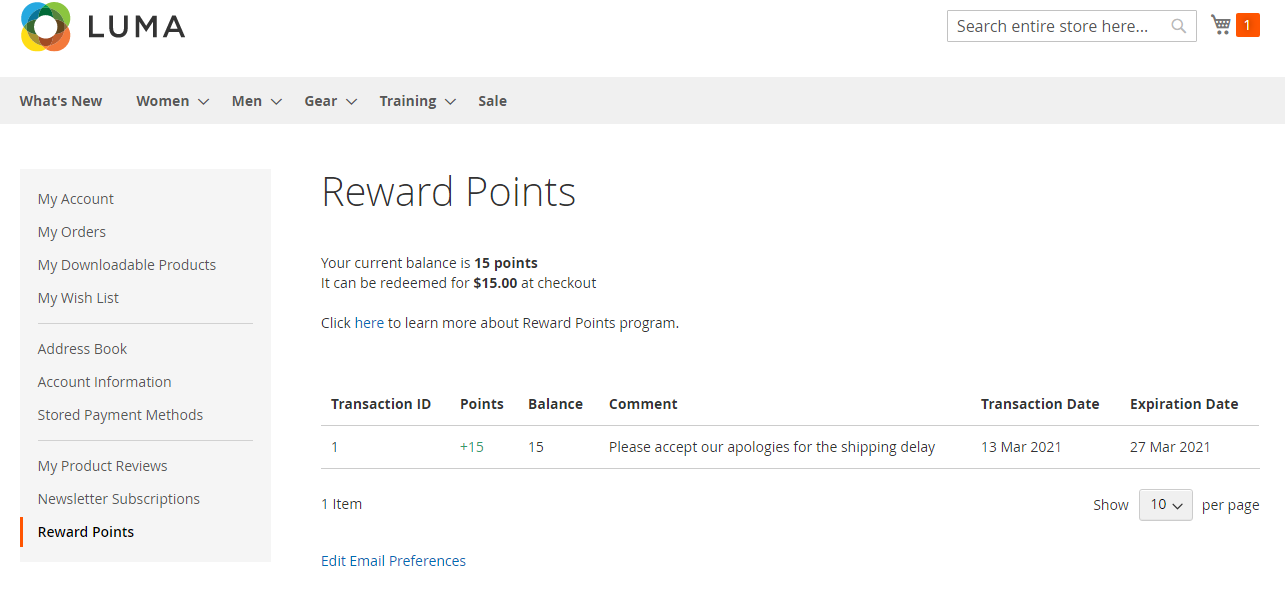
Here customers can see current points balance, read about the points and rewards policies and look through the transaction history. If the store administrator has set up a point award for registration, the first transaction should already be available to customers who created a new account.
Moving forward to browsing the product catalog, customers can find the point information block right below the product name at the product pages:

The points information block displays the available point balance and the discount customer can get if the points are applied at the checkout.
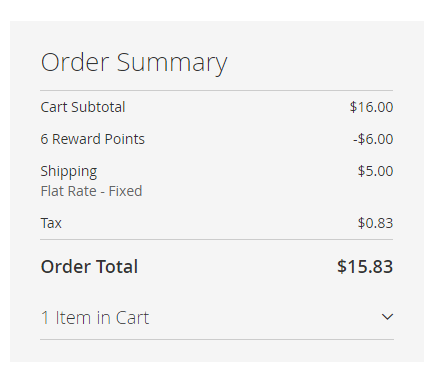
At the checkout, points can be applied to the order at the Review & Payments step at the Reward Points tab.
Here the current conversion rate is displayed. Below it there is an input “Use X points” where the customer enters the desired amount of points to be applied to the order.
Also, there is a hint of how many points can be applied to this order.
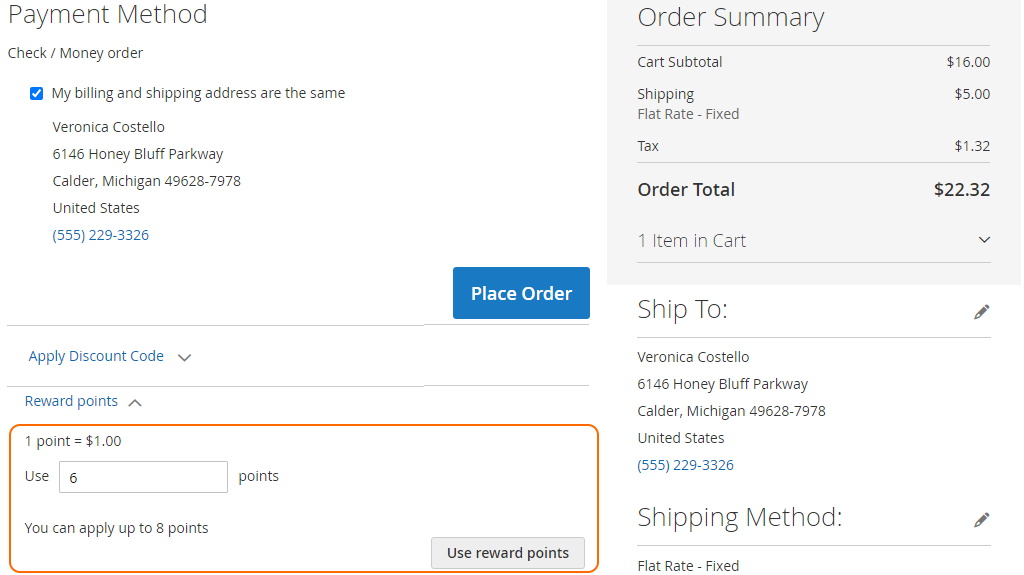
By clicking  button customers can apply chosen amount of points to the order. This action will be accordingly reflected on the order total and in the order invoice:
Every time a customer spends points an appropriate transaction is added to the Reward Points section of the customer's account.
Managing Points
| Section |
|---|
In addition to the extension settings, the Reward Points extension introduces its section to Marketing > Reward Points by Aheadworks. Transactions
To add a new transaction, click
The New Transaction page offers a set of options for updating points balance of customers:
The Customers section of the New Transaction page allows specifying store customers that will be eligible to receive a points balance update. The section offers the same navigation options in terms of filters and grid customization as the Transactions section.
Now click Customers
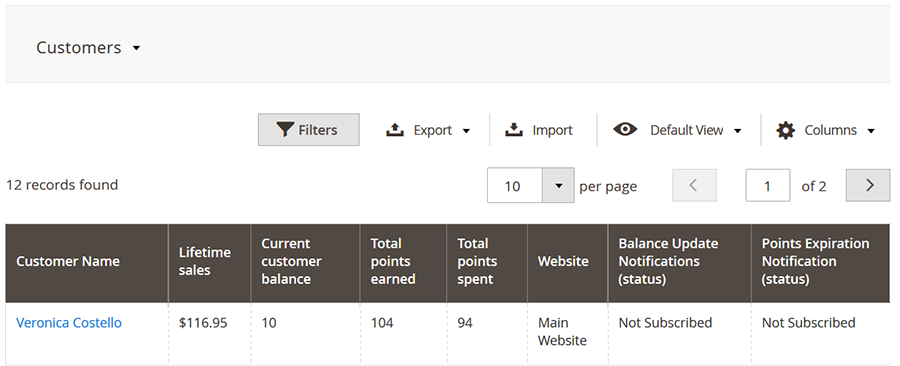
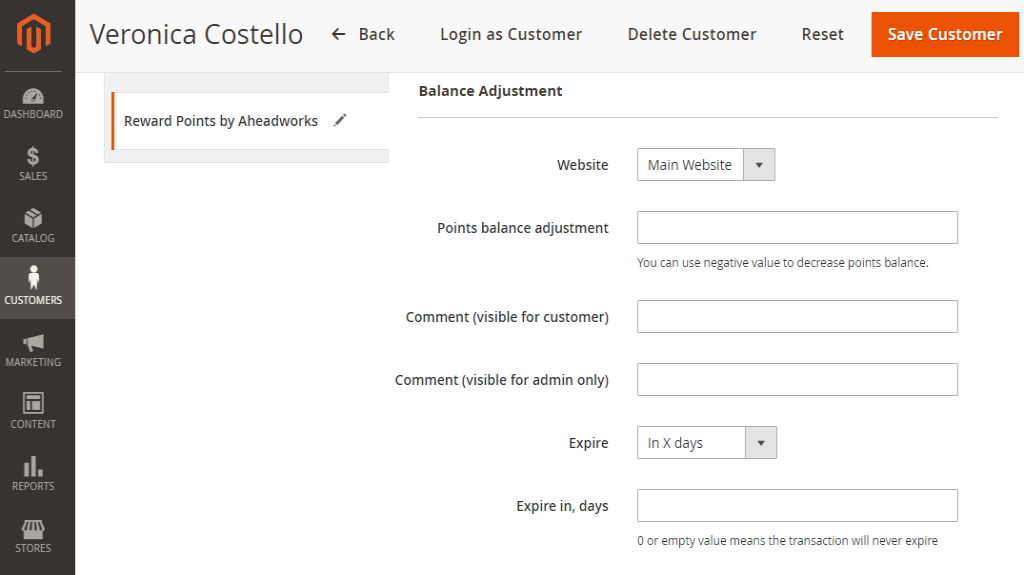
The Customers section of the Reward Points extension offers an overview of the customers and their current points balance. The section has the same navigation options as the Transactions section and proves useful for keeping track of the points use of a particular customer(s). With Magento 2 Reward Points 1.6.0 it is possible to apply rewards points from the backend by admin while creating an order. “Reward points” tab at Customer PageReward points information is available at Customer Page at the Reward Points by Aheadworks tab. It offers an overview of all customers’ points balance and allows the Admin to adjust the balance. Balance Summary grid shows customers’ statistics on the current points balance, total points earned, and total points spent. Transaction History grid introduces the same information as the Transactions section. 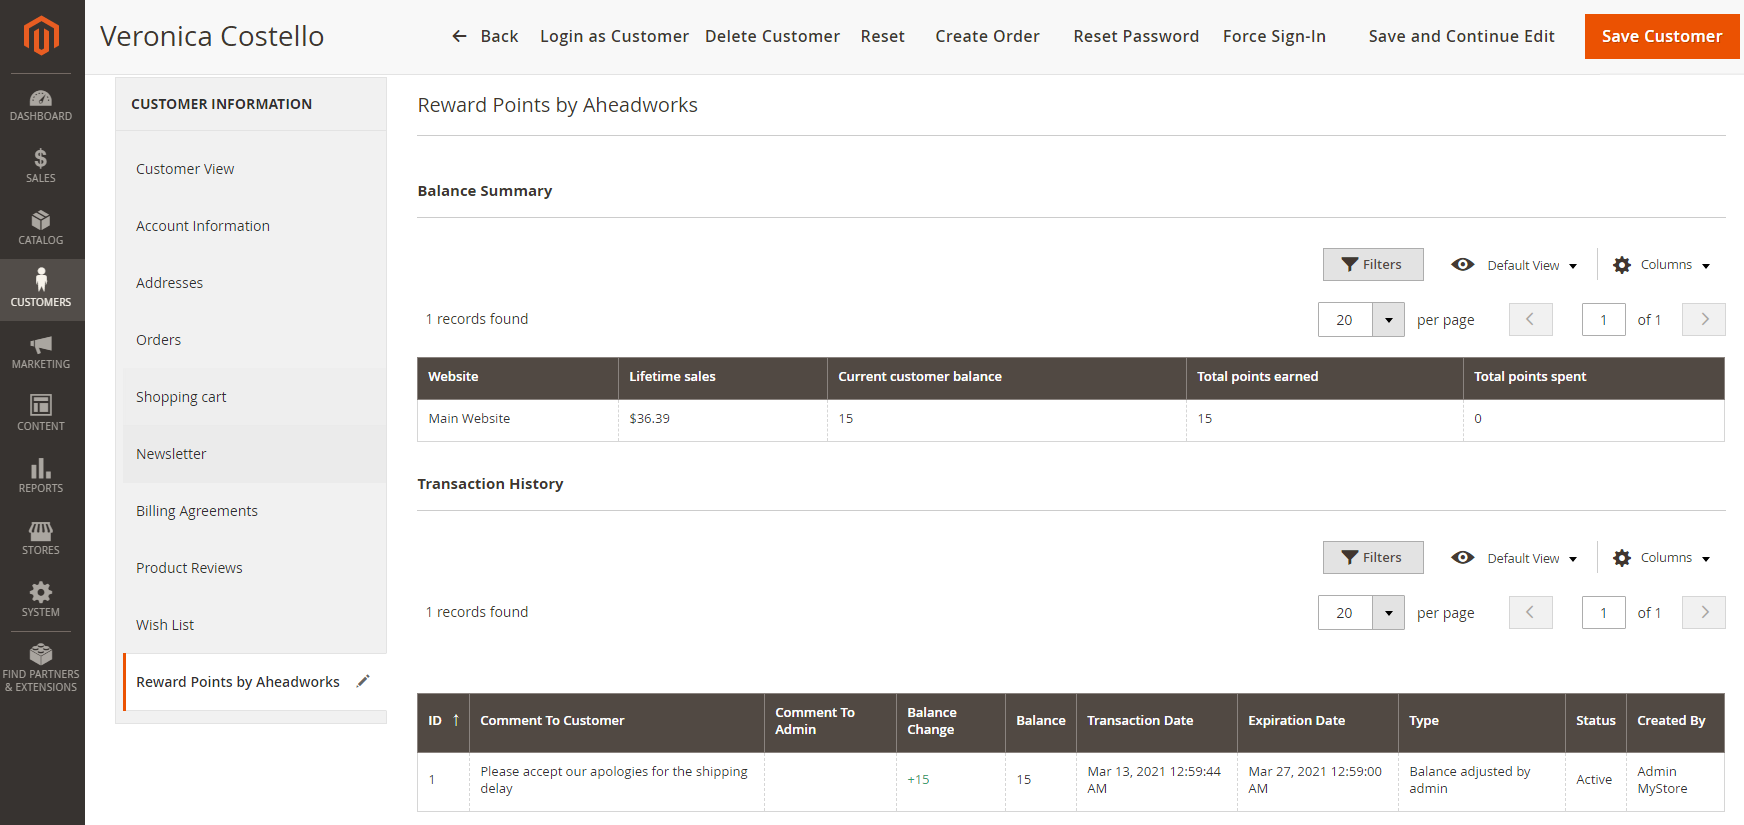 The Balance Adjustment section offers a set of options for updating the points balance of customers as in the New Transaction page.
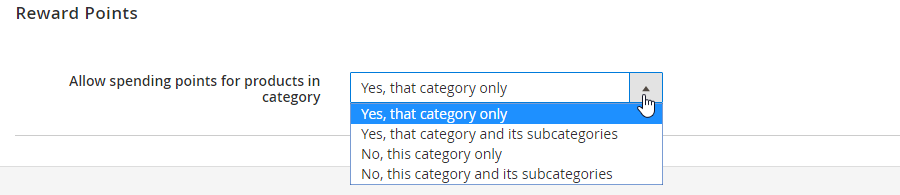
ExceptionsAlong with the points management options the Magento 2 Reward Points extension allows excluding particular product categories from the points campaign. It means that customers will still earn points for purchasing products from such categories, however, customers will not be able to PAY with points for such products at the checkout. This option has been introduced to let store owners decide what products they want to be discounted and what not. To put a category in the exception list, navigate to this category settings.
In the category settings find the Reward Points section and set Allow spending points for products in category to one of the following:
Once done with the category click "Save" button. |


Earning Rules
...
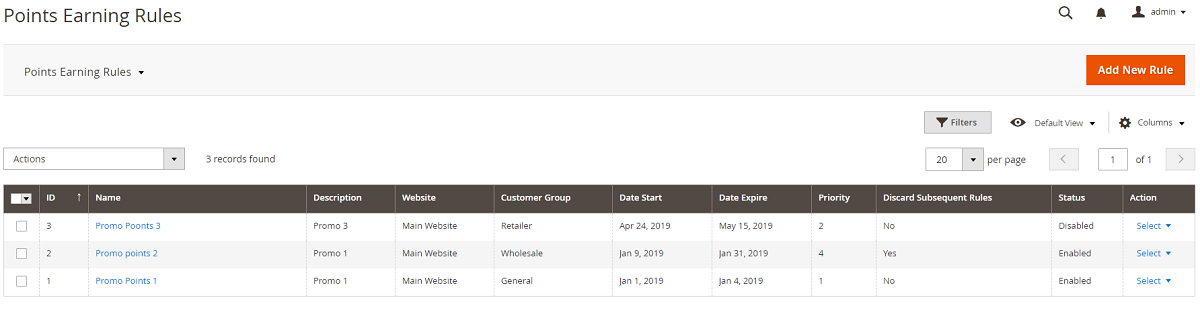
Earning Rules Grid
Here you can see the grid with all the existing earning rules.
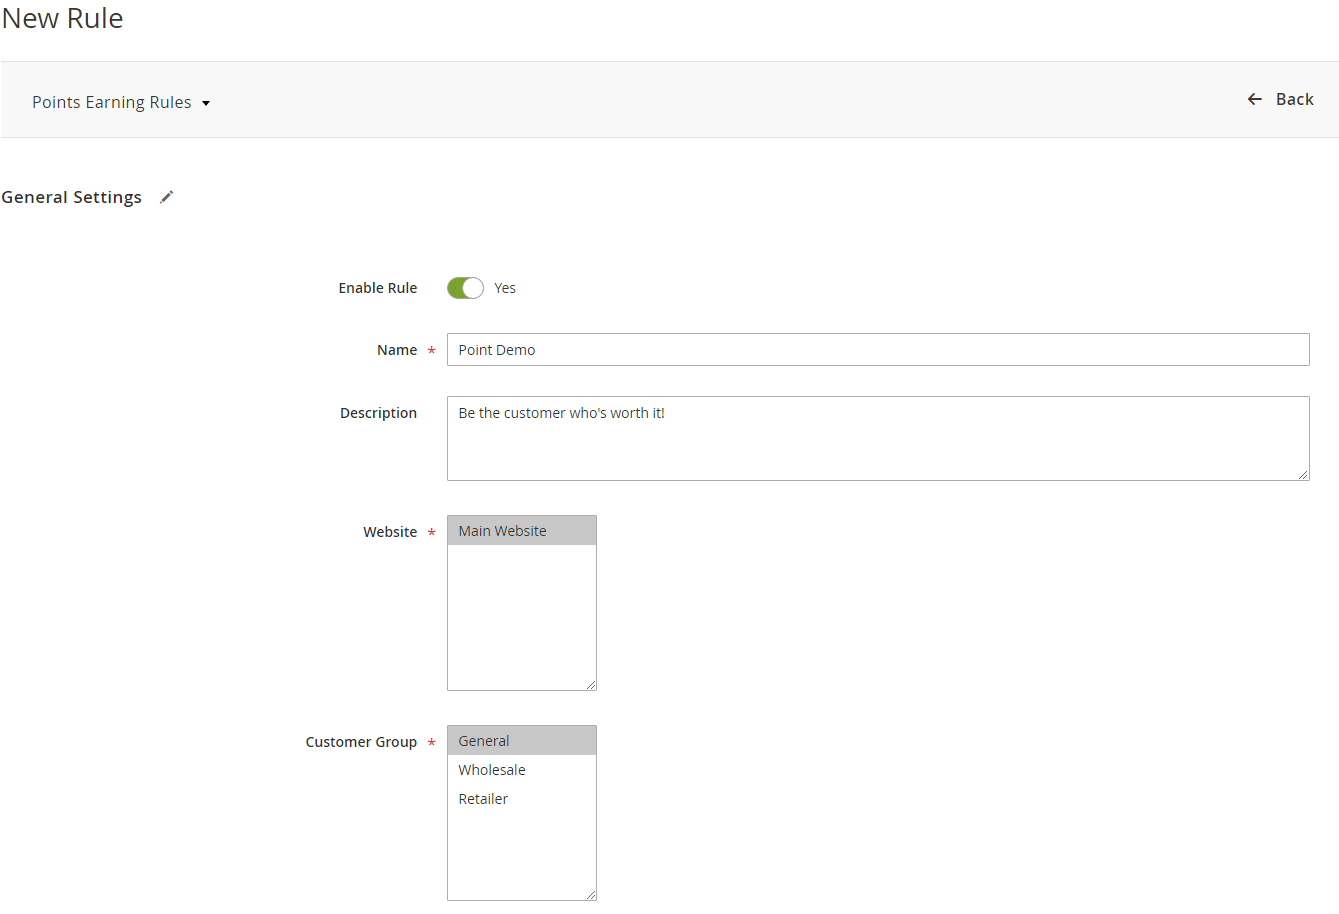
New Rule Creation
- Enable the rule.
- Give it a name and description.
- Specify the website and customer groups to which you apply the rules.
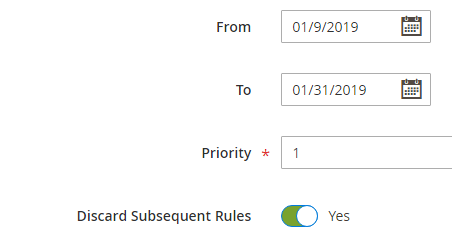
- Define the dates when the rule promo will be active.
- Assign the rule priority to avoid possible rule conflicts. (If a product matches several rules, they will be applied according to their Priority option. To prevent this, enable the option "Discard Subsequent Rules".)
Promo Settings
.png?version=1&modificationDate=1555763902576&cacheVersion=1&api=v2&width=526)
...
The default text from the general settings should be displayed in the following cases:
- On category pages, if:
- a product matches 2 or more rules.
- On product pages, if:
- the earn rates are set but there are no active rules applied;
- there are 2 or more active rules for the product;
- a rule is set with no promo text specified.
Conditions and Actions
- Multiply a defined earn rate.
- Add a fixed amount of points in addition to earning rate.
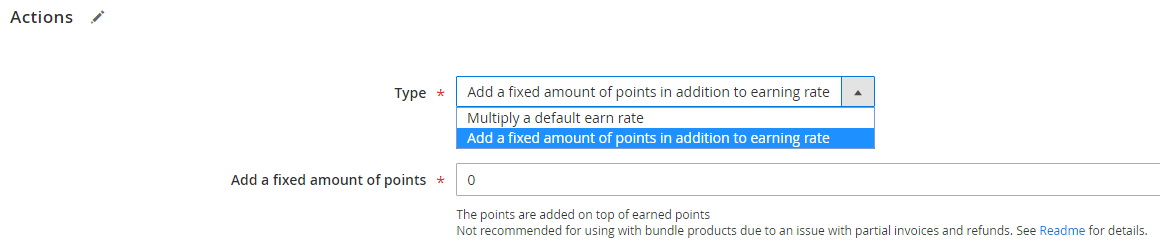
| Note |
|---|
|
Frontend View
.png?version=1&modificationDate=1555763964938&cacheVersion=1&api=v2&width=956) The promo text on a category page
The promo text on a category page
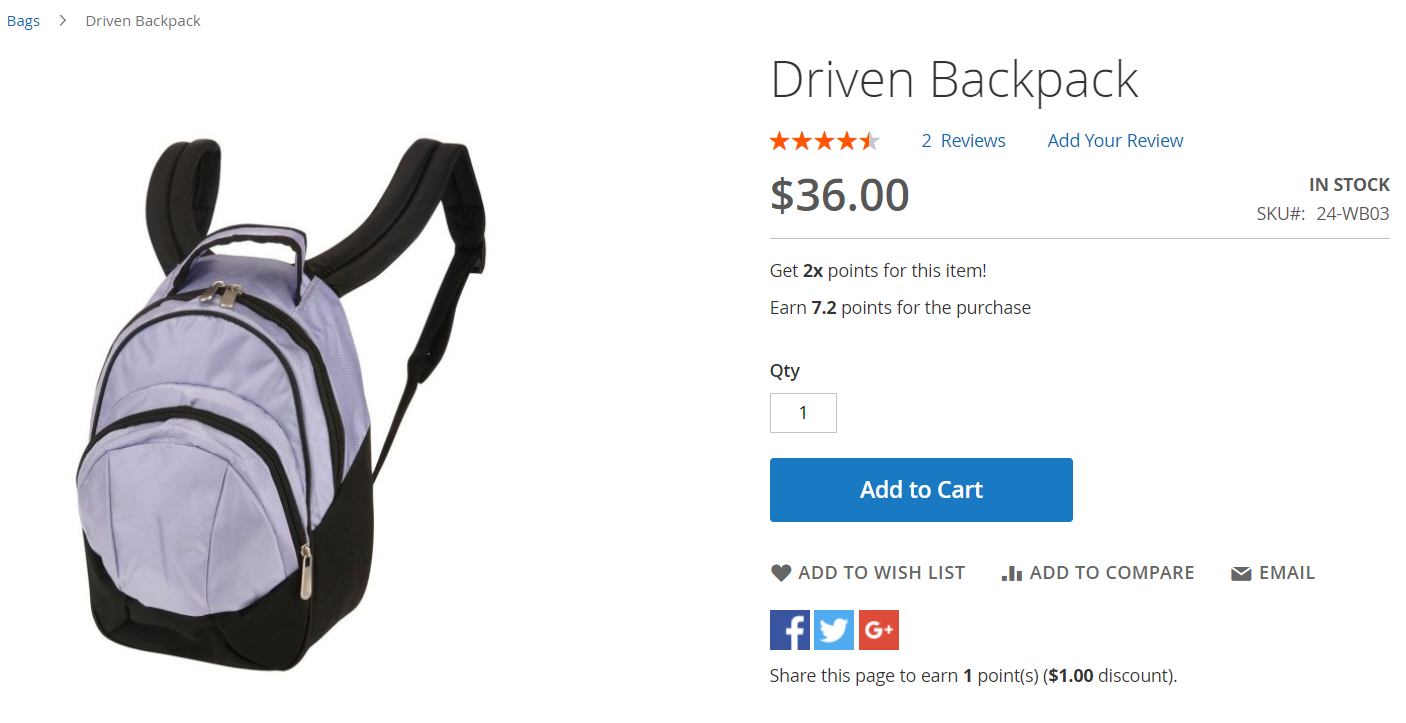 The promo text on a product page
Point Balance Import/Export
| Section |
|---|
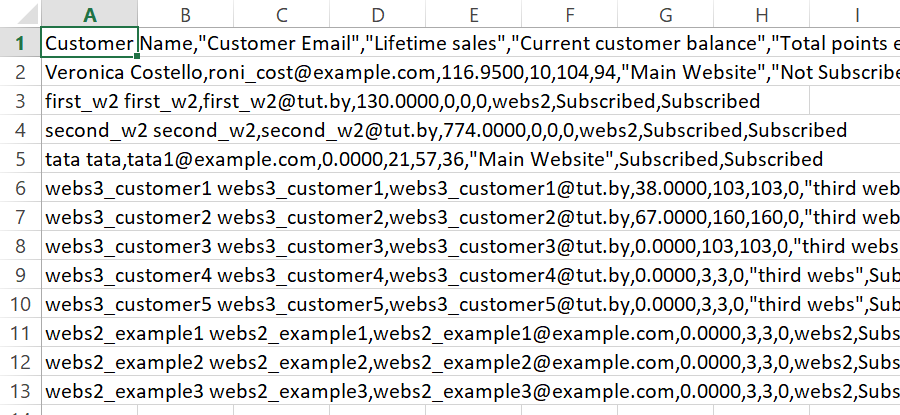
ExportVersion 1.4.0 of Reward Points extension introduced a possibility to export point balance into the .xml or .csv files. The point balance can be exported at Customers grid Marketing > Reward Points by Aheadworks > Customers. To export the points balance click Opened in the Microsoft Excel, the .csv file with the points balance will look something like this:
The export table mirrors the Customers grid including all of the most important columns. You may want to save the .csv file in case you are planning on importing point balance updates to the store. The .csv file with the import data should have the same look and appearance. ImportThe point balance can be imported at Customers grid Marketing > Reward Points by Aheadworks > Customers. All updates are imported via .csv files. The easiest way of composing the point balance .csv is to export existing balance first.
The importing functionality is useful if you are migrating to Aheadworks solution from any third party loyalty module or from a Magento 1 store and want the balances updated accordingly on your Magento 2. |
.png?version=1&modificationDate=1555764056797&cacheVersion=1&api=v2&width=70)
Uninstalling M2 Reward Points
...
| width | 50% |
|---|
Manual Removal
...
| borderWidth | 2px |
|---|---|
| borderStyle | solid |
1. Disable the module by executing the following commands:
| No Format |
|---|
php bin/magento module:disable Aheadworks_RewardPoints
php bin/magento setup:upgrade |
...
| borderWidth | 2px |
|---|---|
| borderStyle | solid |
2. Remove the extension files from the following folder:
| No Format |
|---|
app/code/Aheadworks/RewardPoints |
...
| width | 50% |
|---|
Automatic Removal (via Composer)
...
| borderWidth | 2px |
|---|---|
| borderStyle | solid |
1. Disable the module by executing the following commands:
| No Format |
|---|
php bin/magento module:uninstall Aheadworks_RewardPoints |
...
more information follow the product user manual on our website |
Thank you for choosing Aheadworks!
Need Customization?
.png?version=1&modificationDate=1564161869999&cacheVersion=1&api=v2)
You can always find the latest version of the software, full documentation, demos, screenshots, and reviews on http://aheadworks.com
License agreement: https://aheadworks.com/end-user-license-agreement
Contact Us: https://aheadworks.com/contact
Copyright © 2021 Aheadworks Co. http://www.aheadworks.com
...