...
...
...
...
...
...
| width | 50% |
|---|
| Table of Contents |
|---|
| Warning |
|---|
Firefox user notice: Please use another web browser to view this document. Sorry for the inconvenience. |
...
| width | 30% |
|---|
...

Magento 2 Sales Representative tool assigns personal managers to certain orders, customers, and customer groups to improve customer service and sell products more effectively.
Compatibility: Magento Open Source 2.3.X - 2.4.X, Magento Commerce 2.3.X - 2.4.X
...
Thank you for choosing Aheadworks!
Installing Magento 2 Sales Representative
| Warning |
|---|
Make sure that to use Sales Representative the BUP module is to be installed as well. When using Composer to install Sales Representative, BUP is installed automatically, otherwise make sure you enable BUP as an extension on its own. |
...
| Panel | ||||
|---|---|---|---|---|
| ||||
1. Backup your web directory and store database |
| Panel | ||||
|---|---|---|---|---|
| ||||
2. Download the Sales Representative installation package |
| Panel | ||||
|---|---|---|---|---|
| ||||
3. Upload contents of the Sales Representative installation package to your store root directory |
...
| borderWidth | 2px |
|---|---|
| borderStyle | solid |
4. In SSH console of your server navigate to your store root folder:
| No Format |
|---|
cd path_to_the_store_root_folder |
run:
| No Format |
|---|
php -f bin/magento module:enable Aheadworks_Bup
php -f bin/magento module:enable Aheadworks_SalesRepresentative |
then:
| No Format |
|---|
php -f bin/magento setup:upgrade |
after:
| No Format |
|---|
php -f bin/magento setup:static-content:deploy |
| Panel | ||||
|---|---|---|---|---|
| ||||
5. Flush store cache; log out from the backend and log in again |
| Note |
|---|
Make sure the installation is done from the FTP administrator account. Otherwise, set 775 permissions to the store root directory after the extension is deployed. |
...
| width | 50% |
|---|
...
| borderWidth | 2px |
|---|---|
| borderStyle | solid |
If you are installing an extension from Aheadworks for the first time, you need to add our composer repository to your Magento store:
| Panel | ||||||||||||||
|---|---|---|---|---|---|---|---|---|---|---|---|---|---|---|
| ||||||||||||||
1. Login to your ssh console and navigate to your store folder:
Run the following command:
On successful execution of the commands you will be able to use the composer to install the extensions. |
...
| borderWidth | 2px |
|---|---|
| borderStyle | solid |
To install the extension:
2. Login to your ssh console and navigate to your store folder:
| Panel | ||||
|---|---|---|---|---|
| ||||
| cd path_to_the_store_root_folder |
...
| borderWidth | 2px |
|---|---|
| borderStyle | solid |
3. Run the following command to install the latest version of the extension:
| Panel | ||||
|---|---|---|---|---|
| ||||
composer require aheadworks/module-sales-representative |
if you need to install a specific version, run this command:
| Panel | ||||
|---|---|---|---|---|
| ||||
composer require aheadworks/module-sales-representative:<version> |
| Tip |
|---|
Specify the version of the extension in <version> |
| Panel | ||||
|---|---|---|---|---|
| ||||
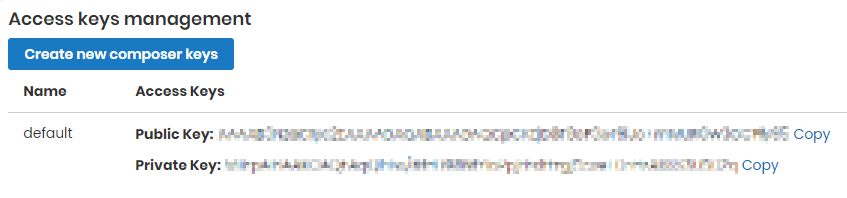
When prompted, enter Public Key (Username) and Private Key (Password): |

| Note |
|---|
Both Public Key (Username) and Private Key (Password) can be found in My Projects and Licenses in your personal account on our site:
|
| Panel | |||||||||||||||||||||||||||||||||||
|---|---|---|---|---|---|---|---|---|---|---|---|---|---|---|---|---|---|---|---|---|---|---|---|---|---|---|---|---|---|---|---|---|---|---|---|
| |||||||||||||||||||||||||||||||||||
4. Enable the extension:
Next, register the extension:
Recompile your Magento store if you are in the Production mode:
To verify that the extension is enabled, run this command:
Clean store cache, by running the following command:
Log out and Log in the backend again. |
...
| borderWidth | 2px |
|---|---|
| borderStyle | solid |
To upgrade the extension:
5. To update or upgrade an extension:
Download the updated extension file. Take note of the module-name and version. Export the contents to your Magento root.
If a composer package exists for the extension, run one of the following.
| Code Block | ||
|---|---|---|
| ||
composer update aheadworks/module-sales-representative |
| Code Block | ||
|---|---|---|
| ||
composer require aheadworks/module-sales-representative:<version> |
Run the following commands to upgrade, deploy, and clean the cache.
| Panel | ||||
|---|---|---|---|---|
| ||||
php bin/magento setup:upgrade --keep-generated php bin/magento setup:static-content:deploy php bin/magento cache:clean |
Introducing M2 Sales Representative
| Section |
|---|
The Sales Representative Extension for Magento 2 enables the role of a personal manager in a store. The extension allows creating sales representatives and assigning them to customer groups and individual customers. Orders can be ascribed to. With the present extension, you are able to do the following:
|
Creating Sales Representatives
| Section | ||
|---|---|---|
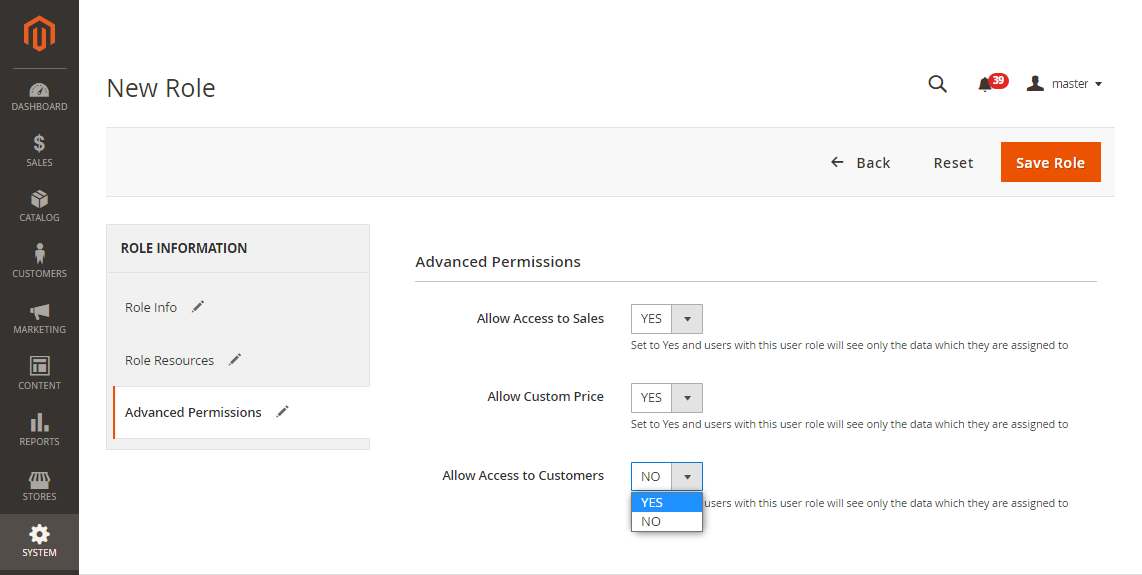
Sales Representative PermissionsStart creating a sales representative with adding a new user role in System > Permissions > User Roles. Configure Role Info and Role Resources just as usual. Then, go to the Advanced Permissions tab. Here you can specify if the user will have access to Sales, Customers and Custom Price. Do that with the help of the Allow Access to Sales, Allow Customer Price and Allow Access to Customers selectors.
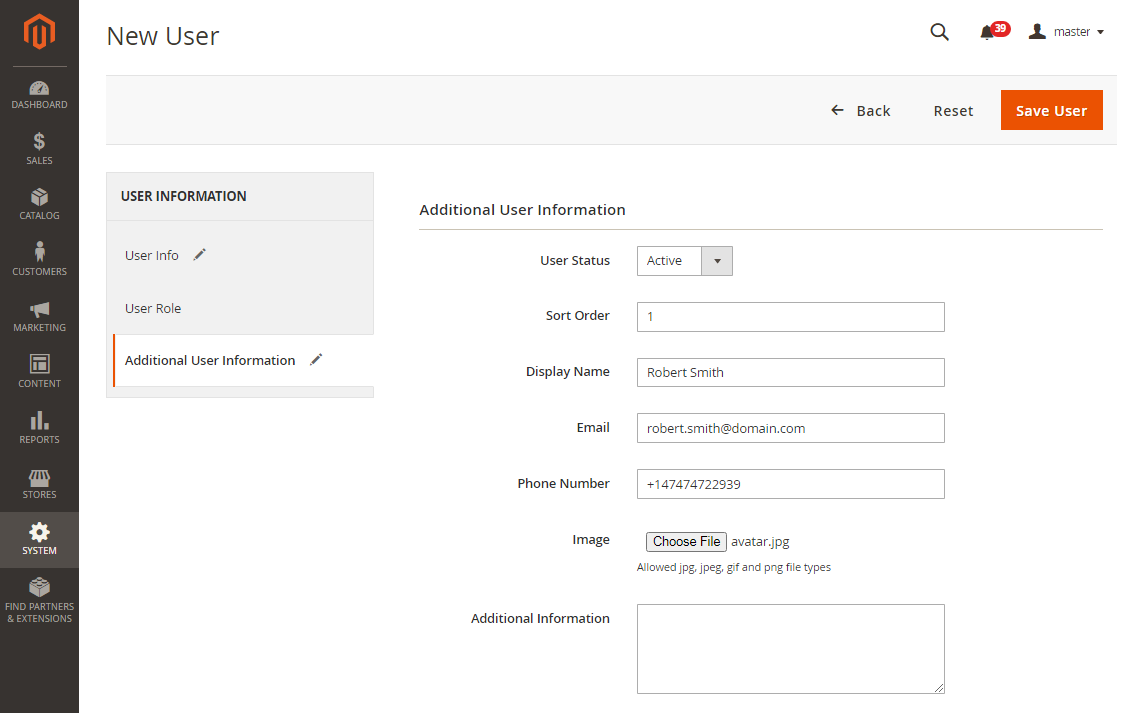
Additional Information about Sales RepresentativeNext, add a new user in System > Permissions > All Users. Enter all the necessary User Info and choose User Role. In the Additional User Information tab the following fields are presented:
Any input field can be left empty if there is no need to display such user information for customers. |
Backend Configurations
...
Assign Sales Representative to Customer Group
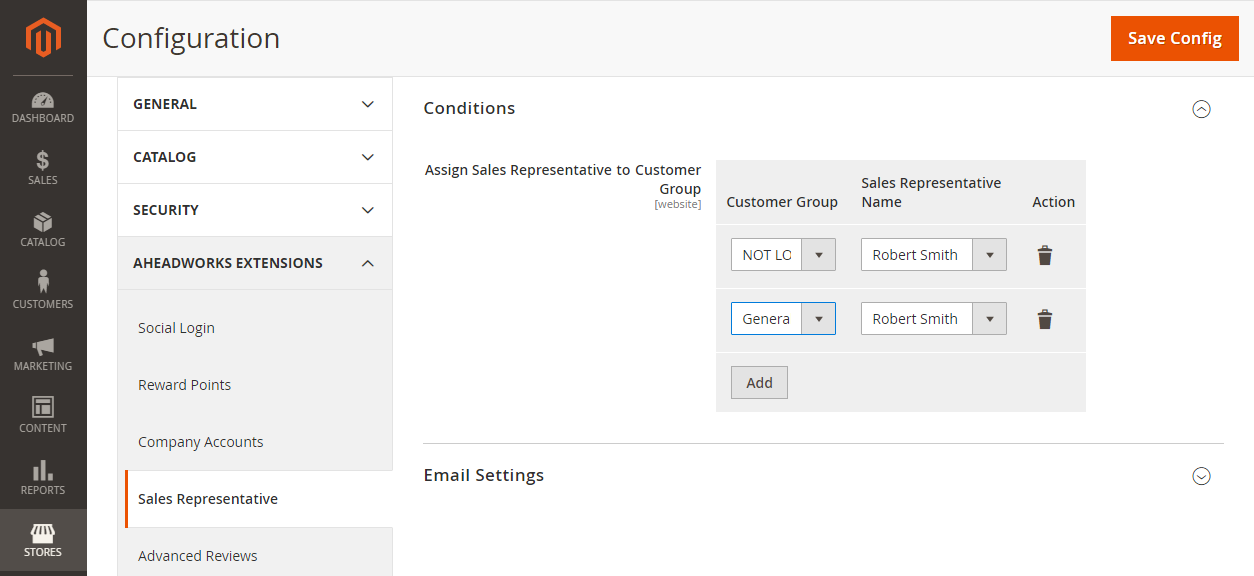
If you want sales representatives to be assigned to orders automatically, choose sales representatives for customer groups in Stores > Settings > Configurations > Aheadworks > Sales Representative.
After clicking ‘Add’ button in the Conditions tab, you can assign sales representatives to customer groups:
- Customer Group - a dropdown with the list of all customer groups in the store.
- Sales representative Name - a dropdown with the list of all users created on All Users page.
- Action - ‘trash’ button that allows you to delete options.
One sales manager can be chosen for several customer groups while one customer group cannot have several sales representatives.
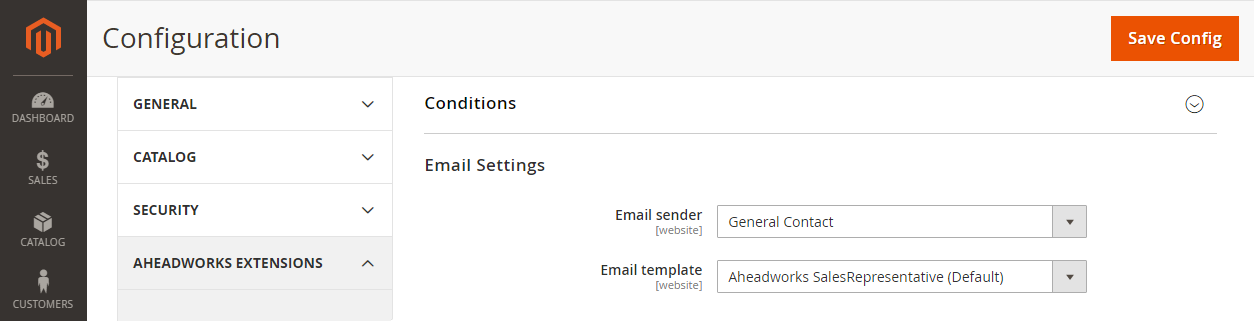
Email Settings
Email Settings tab includes:
- Email sender - the one who sends emails to sales representatives.
- Email template - an email that a sales representative receives after having been assigned to a new order (Aheadworks SalesRepresentative template is set by default).
Assign Sales Representative to Order
Sales managers can be assigned to orders manually on Sales > Orders > Order View page. You can find Sales Representative section in the Account Information tab:
- Sales Representative - a dropdown with the list of both active and inactive sales managers. You can assign a user from the list to the order or choose ‘Not Assigned’ value to leave the order without any sales representative.
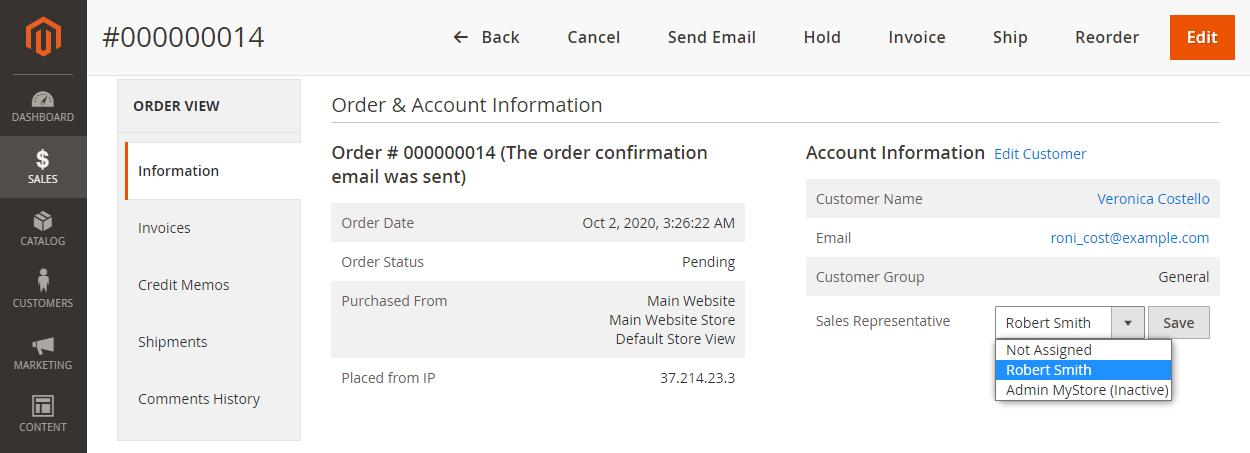
Click the ‘Save’ button near the dropdown to save the changes. If a sales representative has been chosen for an order, a confirmation email with the order details will be sent to this sales representative.
Assign Sales Representative to Customer
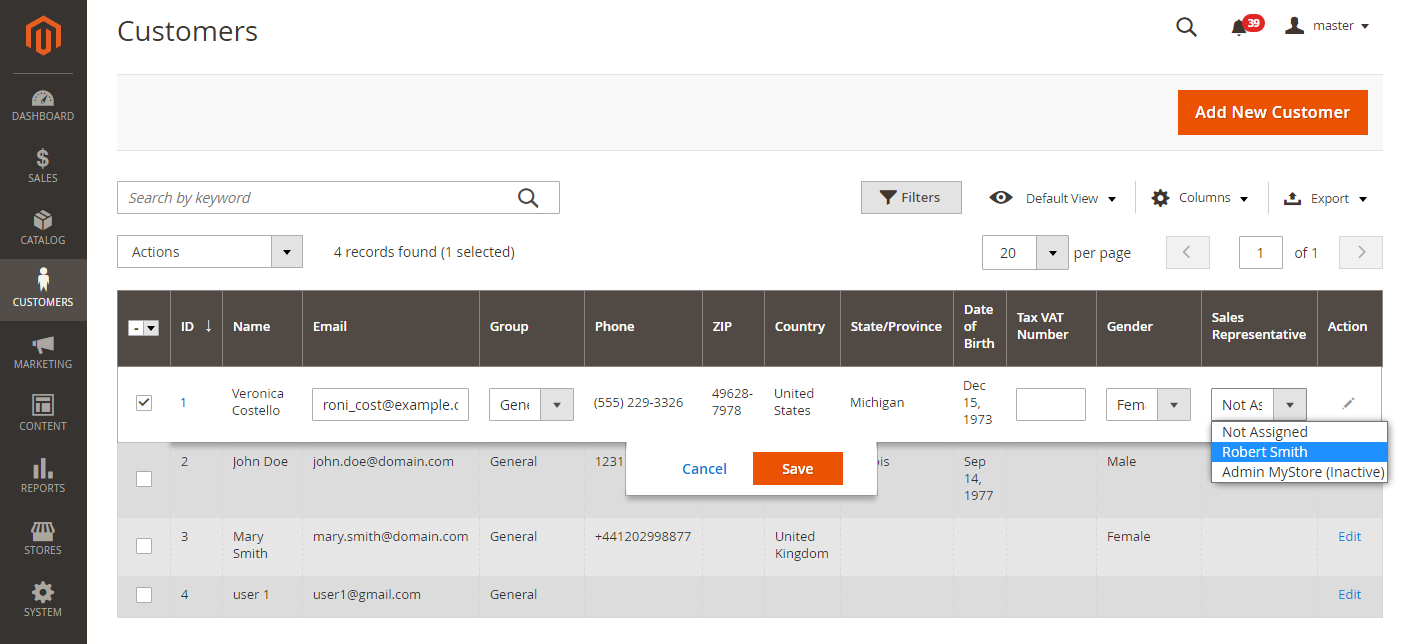
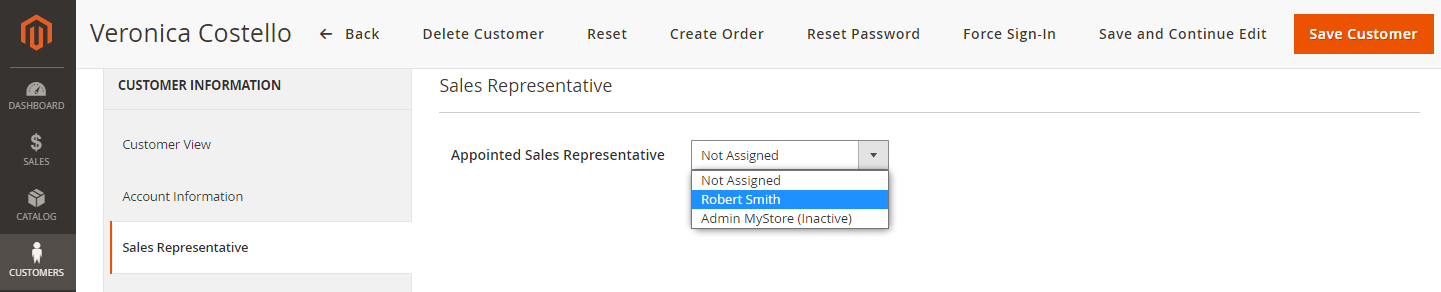
What is more, a dedicated sales representative can be chosen for a customer in Customers > All Customers. There are two options to do so:
- Choose a sales representative in the corresponding column of the Customers Grid.
- Choose a sales representative in the individual tab on the Customer Information page.
Let’s look at the Customer Grid first.
If you assign a sales representative in the Customer grid, you just need to click on the row of a particular customer. As soon as the quick editing mode has been activated, a dropdown with the list of all sales representatives appears in the corresponding column. The ‘Not Assigned’ value is displayed here too, in case a sales representative has to be unassigned from any customer.
Click ‘Save’ to save all the changes in the grid. Click ‘Cancel’ to abandon any changes.
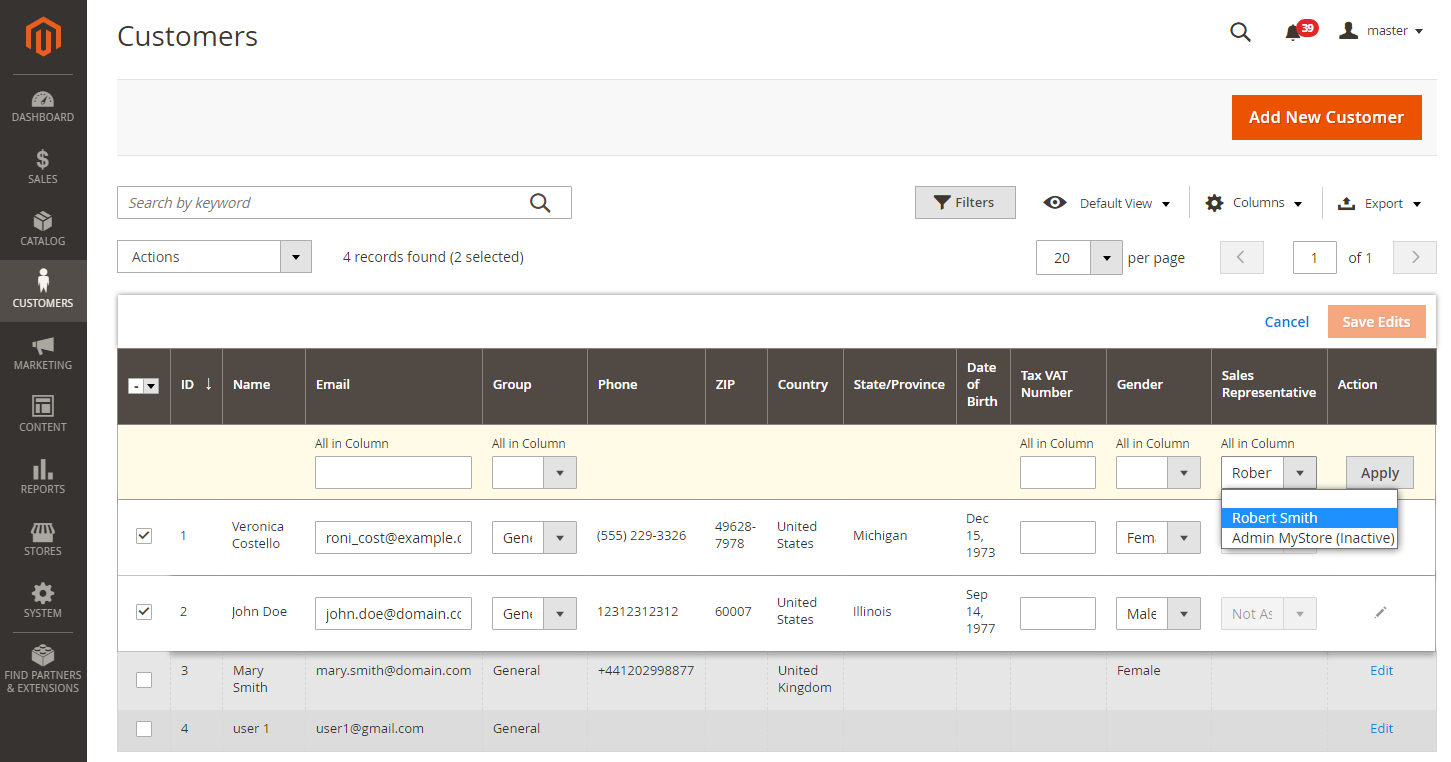
Assigning sales representatives to customers in bulk is also applicable. You just need to select customers in the first column via checkbox and choose ‘Edit’ in the Actions dropdown. Having chosen the right option, click ‘Apply’ and ‘Save Edits’ above the grid to save the changes.
The second option - the Sales Representative tab on the Customer Information page.
Here you see the same dropdown as in the Customer grid and on the Order View page.
As long as a customer has an appointed sales representative, his/her orders are assigned to this sales representative. If a customer has no appointed sales representative, his/her orders are assigned to the sales representative specified for his/her customer group.
Storefront
...
Sales Representative Infoblock
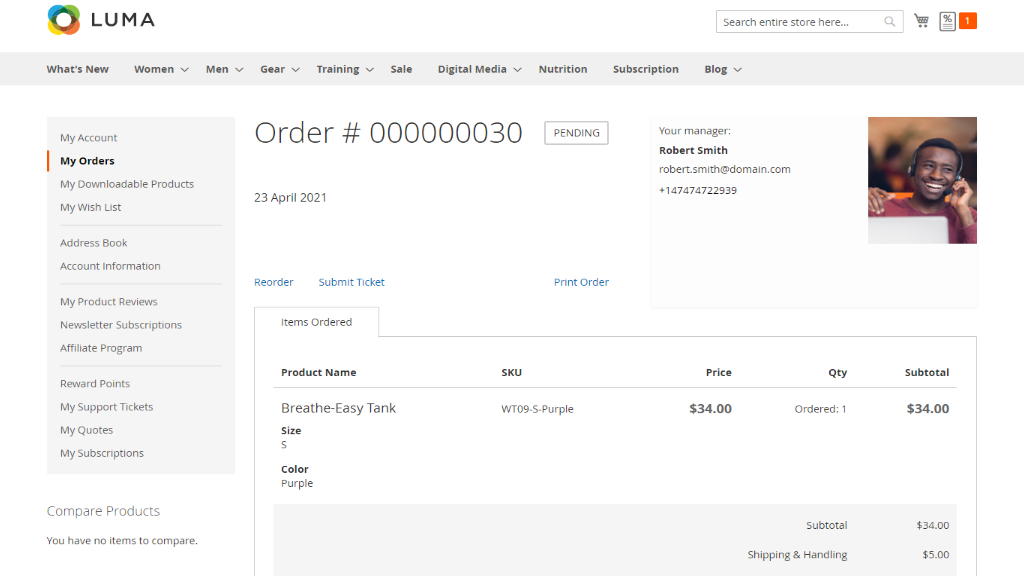
Sales manager’s contact information is available for signed-in customers on My Account > My Orders > Order View page. There is a special block with the data about a sales representative specified in the Additional Information tab on the backend:
- sales manager’s name;
- email;
- phone number;
- additional information;
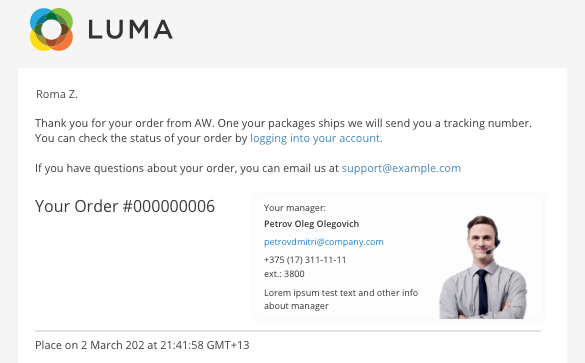
- photo.
If it’s necessary, the contact information of a sales representative can be added to the order confirmation email for guests and logged-in customers. All you need to do is to insert the ‘Sales Representative Information’ variable while creating a new order confirmation email template. Here is an example what the email can look like:
Integration with Aheadworks Modules
...
Sales Representative for Magento 2 can enhance the functionality of some Aheadworks modules, namely:
Company Accounts
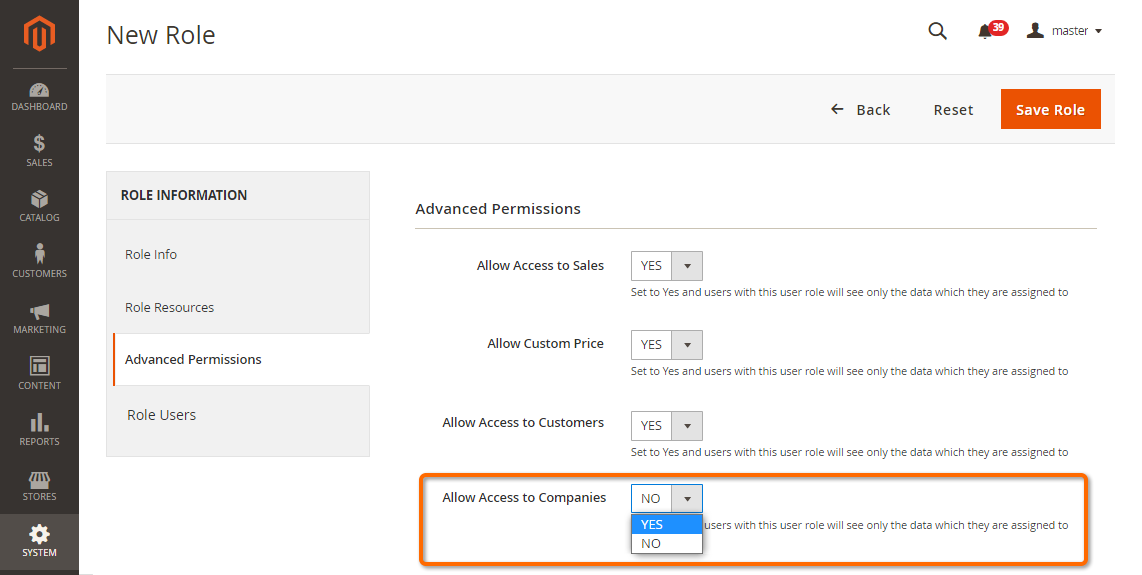
When M2 Company Accounts is installed on the store alongside M2 Sales Representative, the Admin gets able to appoint sales representatives to companies. Sales representatives can be appointed to companies automatically in compliance with the company users' belonging to a customer group, or manually and individually to each company. By appointing sales representatives to companies, that is users created with the help of M2 Sales Representative, the Admin can demarcate access for these users to the data on the companies.
Integration of M2 Company Accounts enables the Allow Access to Companies option in the Advanced Permissions tab on a User Role page. When set to Yes, this user role will allow users to access data in the Companies grid.
It must be mentioned here, that M2 Company Accounts, when used on its own, has an option of assigning sales representatives to companies. With regard to this fact, M2 Sales Representative is meant to enhance M2 Company Accounts as follows:
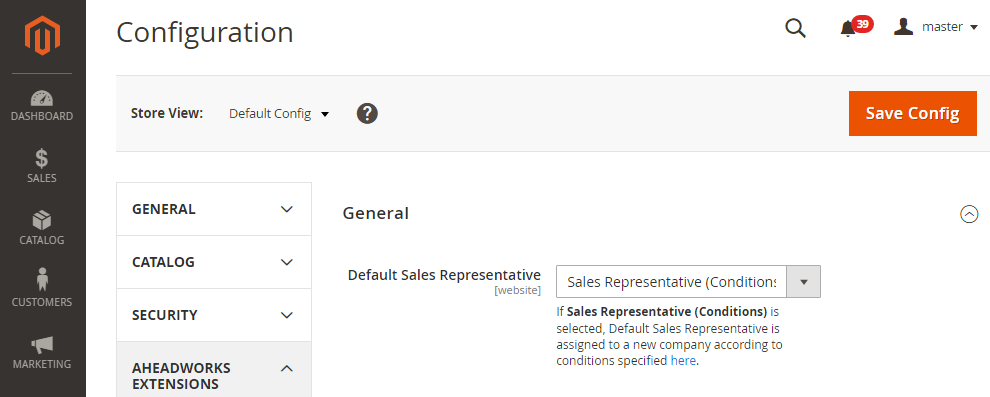
Sales Representative (Conditions) is added as an option to the dropdown Default Sales Representative at Stores → Configuration → Aheadworks Extensions → Company Accounts
A hint is added to explain the use of Sales Representative (Conditions) and to give quick access to Stores → Configuration → Aheadworks Extensions → Sales Representatives → Conditions: “If Sales Representative (Conditions) is selected, Default Sales Representative is assigned to a new company according to conditions specified here {link to SR conditions}”
- Sales Representative (Conditions) is the default value of Default Sales Representative when M2 Company Accounts and M2 Sales Representative are installed one after another for the first time on the store. Otherwise, if M2 Company Accounts has already been in use, and M2 Sales Representative is added to the store, the default value of Default Sales Representative remains unchanged. The latter aspect allows companies that have been created before the installation of M2 Sales Representative to keep on working with the appointed to them earlier sales representatives.
Cart to Quote
When M2 Cart To Quote is installed on the store alongside M2 Sales Representative, the Admin gets able to assign Sales Representatives to quotes. Sales representatives can be appointed to quotes automatically in compliance with the customers belonging to a customer group, or manually and individually to each quote. By assigning quotes to sales representatives, that is users created with the help of M2 Sales Representative, the Admin can demarcate access for these users to the data on the quotes.
M2 Cart to Quote, when used on its own, has an option of assigning sales representatives to quotes. With regard to this fact, M2 Sales Representative is meant to enhance M2 Cart To Quote as follows:
Sales Representative (Conditions) is added as an option to the dropdown "Admin User Quote is Assigned to" at Stores → Configuration → Aheadworks Extensions → Cart to Quote
A hint is added to explain the use of Sales Representative (Conditions) and to give quick access to Stores → Configuration → Aheadworks Extensions → Sales Representatives → Conditions: “If Sales Representative (Conditions) is selected, Default Sales Representative is assigned to a new company according to conditions specified here {link to SR conditions}”
- Sales Representative (Conditions) is the default value of "Admin User Quote is Assigned to" when M2 Cart To Quote and M2 Sales Representative are installed one after another for the first time on the store. Otherwise, if M2 Cart To Quote has already been in use, and M2 Sales Representatives is added to the store, the default value of "Admin User Quote is Assigned to" remains unchanged. The latter aspect allows quotes that have been created before the installation of M2 Sales Representative to keep on being monitored by the appointed to them earlier sales representatives.
- Automatic emails are sent to users indicated as sales representatives in "Admin User Quote is Assigned to" when quotes are assigned to them.

Uninstalling M2 Sales Representative
...
| width | 50% |
|---|
Manual Removal
...
1. Disable the module by executing the following commands:
| No Format |
|---|
php bin/magento module:disable Aheadworks_SalesRepresentative
php bin/magento setup:upgrade |
...
2. Remove the extension files from the following folder:
| No Format |
|---|
app/code/Aheadworks/SalesRepresentative |
...
| width | 50% |
|---|
Automatic Removal (via Composer)
...
1. Disable the module by executing the following commands:
| No Format |
|---|
php bin/magento module:uninstall Aheadworks_SalesRepresentative |
...
| Warning |
|---|
For more information follow the product user manual on our website |
Thank you for choosing Aheadworks!
Need Customization?
You can always find the latest version of the software, full documentation, demos, screenshots, and reviews on http://aheadworks.com
License agreement: https://aheadworks.com/end-user-license-agreement
Contact Us: https://aheadworks.com/contact
Copyright © 2021 Aheadworks Co. http://www.aheadworks.com
...