| Section | |||||||||||||
|---|---|---|---|---|---|---|---|---|---|---|---|---|---|
|


...
| Command Line Installation | Composer Installation | ||||||||||||||||||||||||||||||||||||||||||||||||||||||||||||||||||||||||||||||||||||||||||||||||||||||||||||||||||||||||||||||||||||||||||||||||||||||||||||||||||||||||||||||||||||||||||||||
|---|---|---|---|---|---|---|---|---|---|---|---|---|---|---|---|---|---|---|---|---|---|---|---|---|---|---|---|---|---|---|---|---|---|---|---|---|---|---|---|---|---|---|---|---|---|---|---|---|---|---|---|---|---|---|---|---|---|---|---|---|---|---|---|---|---|---|---|---|---|---|---|---|---|---|---|---|---|---|---|---|---|---|---|---|---|---|---|---|---|---|---|---|---|---|---|---|---|---|---|---|---|---|---|---|---|---|---|---|---|---|---|---|---|---|---|---|---|---|---|---|---|---|---|---|---|---|---|---|---|---|---|---|---|---|---|---|---|---|---|---|---|---|---|---|---|---|---|---|---|---|---|---|---|---|---|---|---|---|---|---|---|---|---|---|---|---|---|---|---|---|---|---|---|---|---|---|---|---|---|---|---|---|---|---|---|---|---|---|---|---|---|
|
|
.png?version=1&modificationDate=1613404334292&cacheVersion=1&api=v2&width=450)
Uninstalling M2 Company Accounts
| Automatic removal | Manual Removal | ||||||||||||||||||
|---|---|---|---|---|---|---|---|---|---|---|---|---|---|---|---|---|---|---|---|
|
|
Introducing M2 Company Accounts
| Section |
|---|
Business AdvantagesMagento 2 Company Accounts facilitates the B2B model for an eCommerce business. Store admins find it easier to manage the accounts of companies, and project for higher sales as they see a broader purchasing strategy of the partner. Corporate customers get able to stay organized within a sharp structure with apparent role boundaries; they act as one but loose no individuality and always retain composure and feel the back of the colleague. What Makes the module Different
What's new?The latest version of the extension (1.6.0) enables the following:
|
M2 Company Accounts on Backend
| Section | |||||||||||||||||||||||||||||||||||||||||||||||||||||||||||||||||||||||||||||||||||||||||||||||||||||||||||||||||||||||||||||||||||||||||||||||||||||||||||||||||||||||||||||||||
|---|---|---|---|---|---|---|---|---|---|---|---|---|---|---|---|---|---|---|---|---|---|---|---|---|---|---|---|---|---|---|---|---|---|---|---|---|---|---|---|---|---|---|---|---|---|---|---|---|---|---|---|---|---|---|---|---|---|---|---|---|---|---|---|---|---|---|---|---|---|---|---|---|---|---|---|---|---|---|---|---|---|---|---|---|---|---|---|---|---|---|---|---|---|---|---|---|---|---|---|---|---|---|---|---|---|---|---|---|---|---|---|---|---|---|---|---|---|---|---|---|---|---|---|---|---|---|---|---|---|---|---|---|---|---|---|---|---|---|---|---|---|---|---|---|---|---|---|---|---|---|---|---|---|---|---|---|---|---|---|---|---|---|---|---|---|---|---|---|---|---|---|---|---|---|---|---|---|
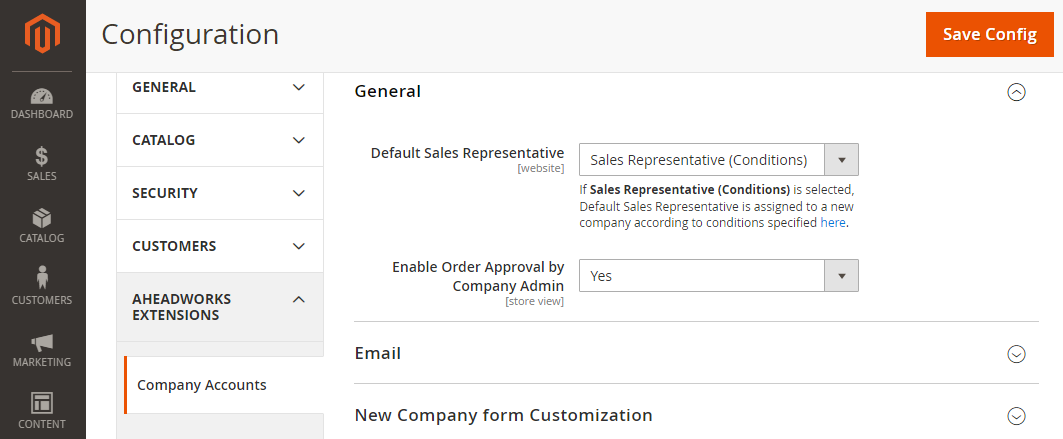
Customizing the ExtensionTo access the settings of the extension, proceed to Stores > Settings > Configuration > Aheadworks Settings > Company Accounts. The configuration page is split into three sections: General, Email and New Company form Customization. General SettingsThe following configuration options are available in the General section:
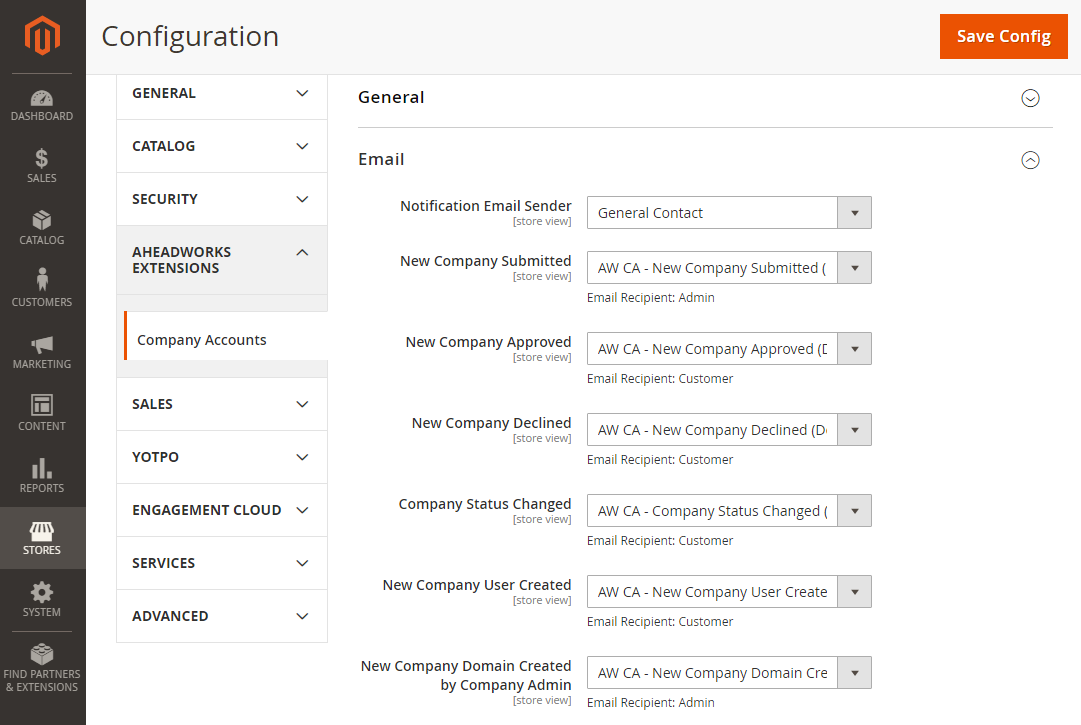
First, specify the sender of the notifications. Do that with the help of the Notification Email Sender drop-box. The options available here are native Magento 2 parameters which can be found and fine-tuned in Stores > Settings > Configuration > General > Store Email Addresses. Next, select the templates for the notifications considering the following:
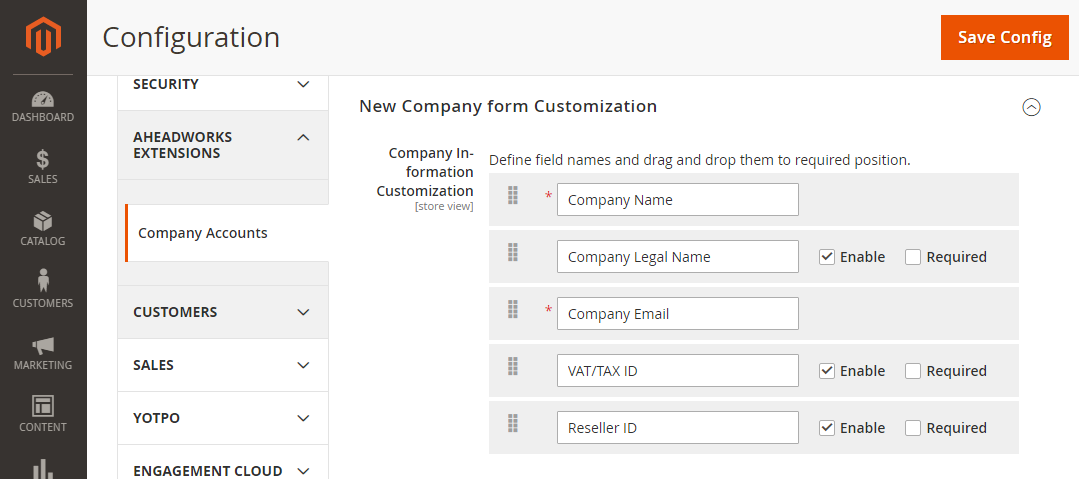
New Company Form Customization (for Frontend)
To customize the New Company form, you can do the following:
The New Company form Customization section is split into three blocks: Company Information Customization, Company Administrator Customization and Legal Address Customization. The Company Information Customization allows customizing the form as follows:
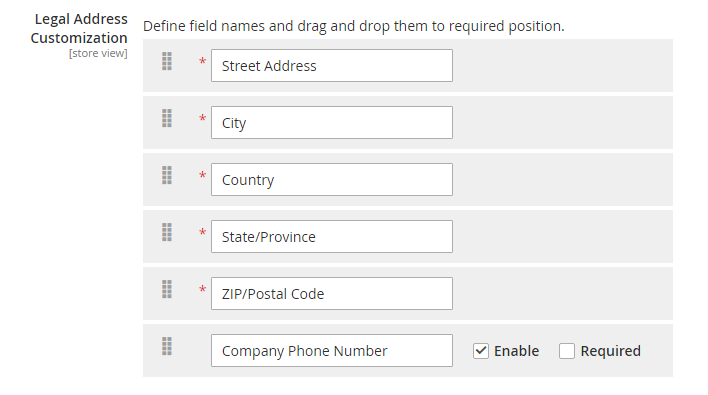
The Legal Address Customization allows customizing the form as follows:
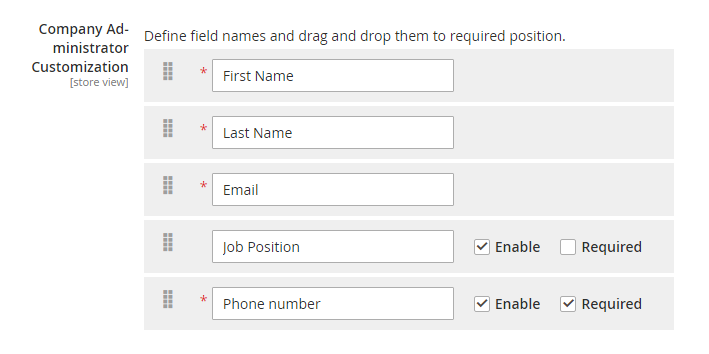
The Company Administrator Customization allows customizing the form as follows:
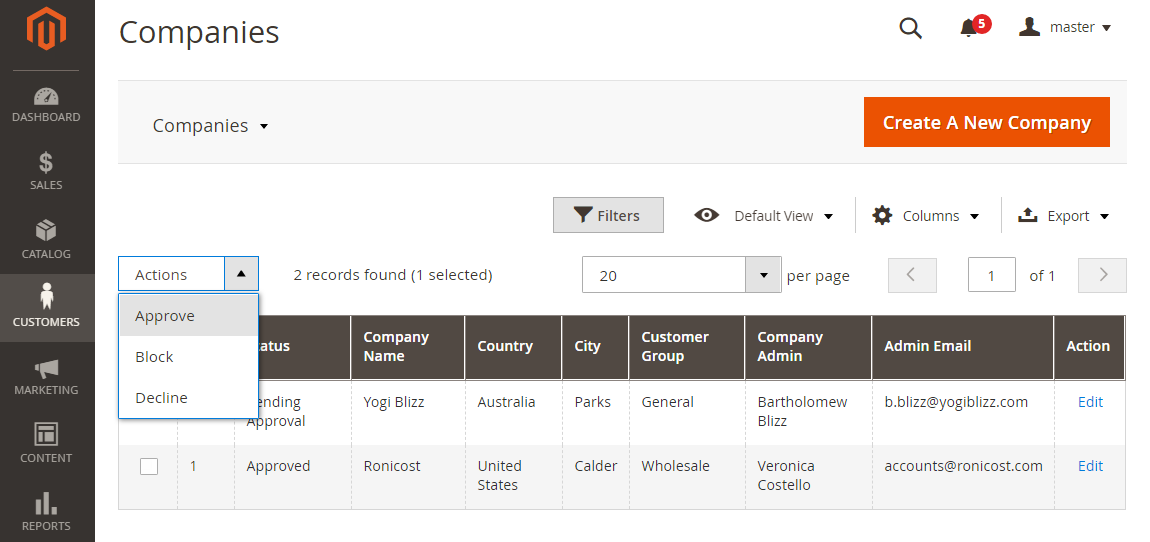
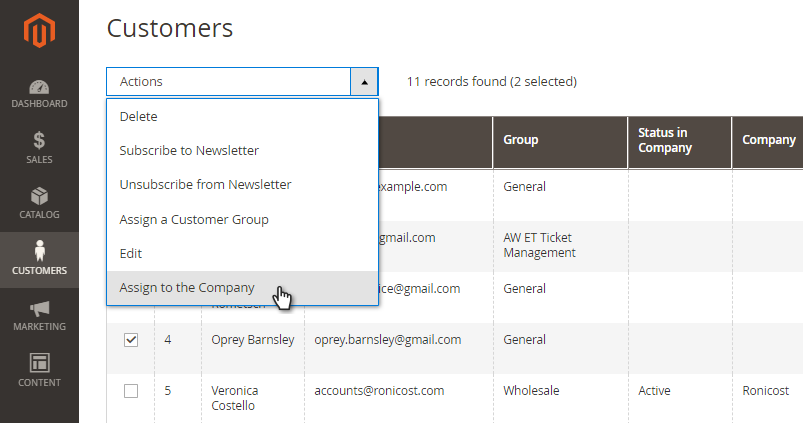
To finalize the configuration, click on the Save Config button in the top right corner of the Settings page. Adding reCaptcha to the New Company formTo secure your store from robot-messages and spam, enable Google reCaptcha for the New Company form. To do so, go to Stores → Configuration → Security → Google reCaptcha → Frontend. Enable the reCaptcha on the Frontend, and scroll down the section to enable reCaptcha for the New Company form. To do so, set Use in Create Company to Yes. More on Google reCaptcha in Magento 2. Company Accounts GridTo get access to the company accounts, proceed to Customers > Companies. The page shows a grid with the following columns:
You can decline, block and approve company accounts individually or in bulk with the help of the Actions drop-box on the left, above the grid. Editing is only possible for an account via the Edit active link in the correspondent cell of the Action column.
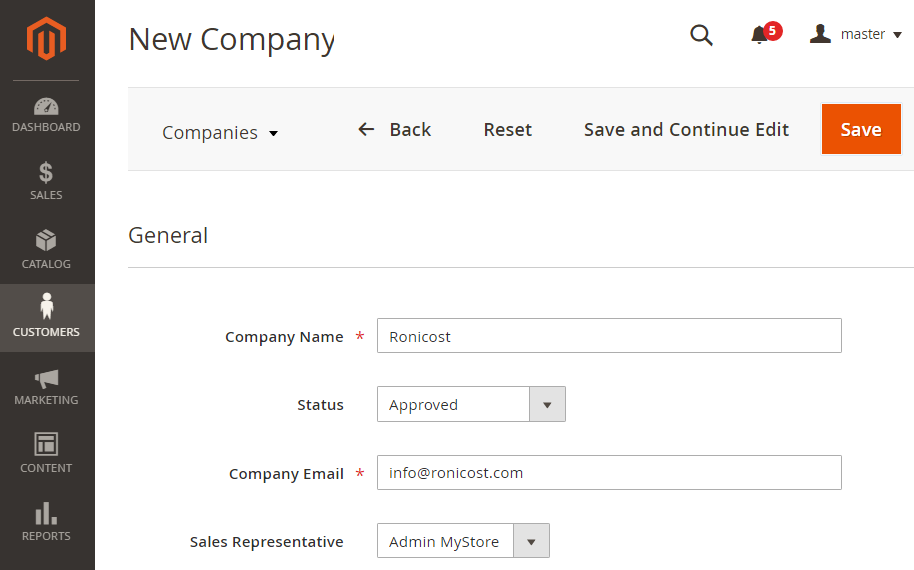
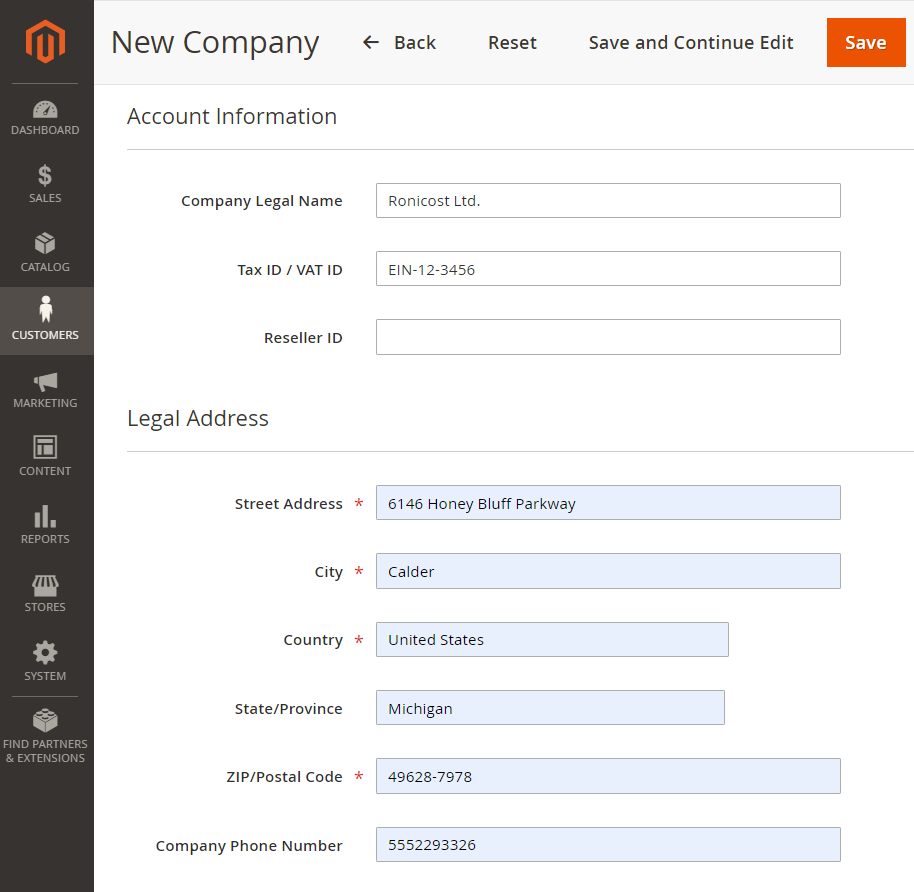
Creating / Editing Company AccountsTo create a company account from the Backend, click on the Create a New Company button in the top right of the page. To edit a company account, click on the Edit active link in the correspondent cell of the Action column of the Companies Grid. Once Create a New Company is clicked on, the module takes you to the Create/Edit a Company account page. This is where you proceed with the following blocks: General, Account Information, Legal Address, Company Admin Information, Notes, Company Domains (only for the Edit Company page)and Allowed Payment Methods (only when Payment&Shipping Restrictions is installed). General Company InformationThe General block prompts some general information about the company:
Account Information and Legal AddressThe Account Information block invites to enter some legal and financial details of the company account, if available:
The Legal Address requires typical address details of the company as a legal unit. State/Province and Phone Number are optional herein.
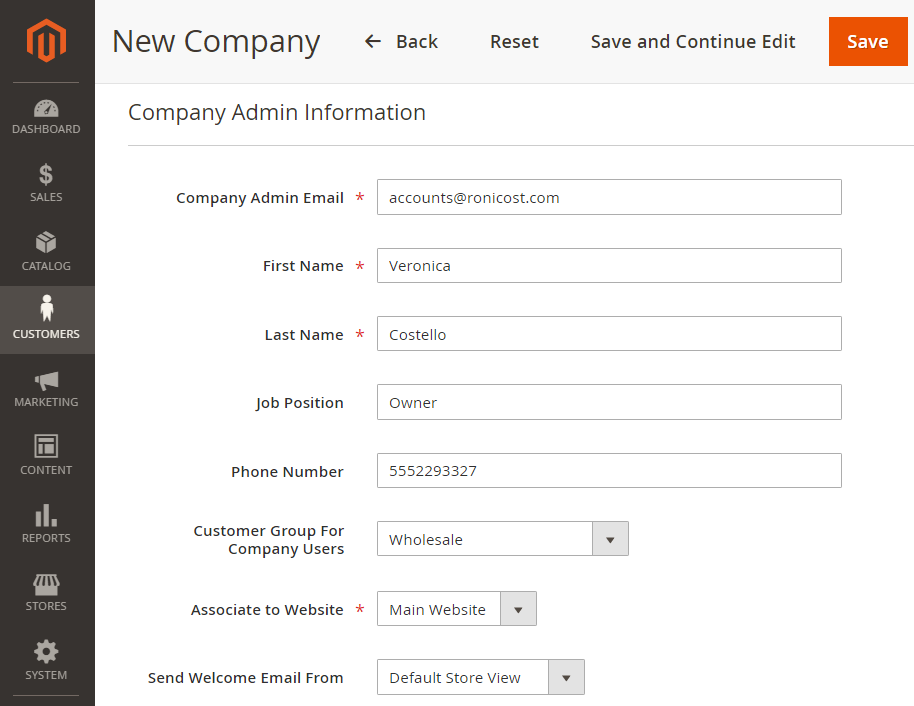
Company Admin InformationThe Company Admin Information block suggests you provide some details on the administrator of the company account:
The value of the Customer Group parameter will be assigned to all users of the company account, as chosen herein. Company account users are added by the Company-Admin (or by other company users with relevant role-permissions) on the Frontend. You can assign a company user to a different group. Do that on the Customer Edit page: Customers → All Customers → Edit (link in the Action column) → Account Information .
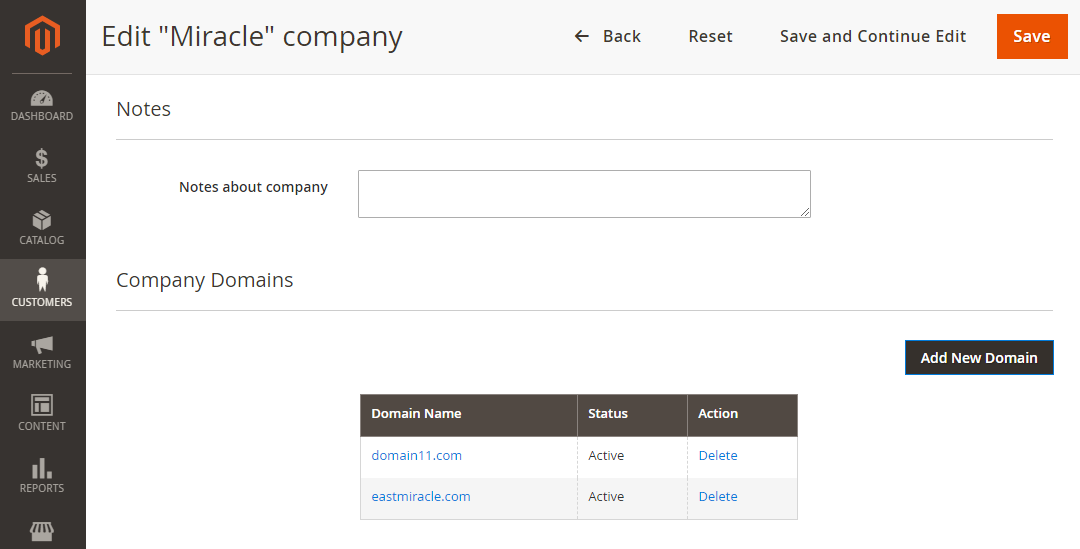
NotesThe Notes block contains a text-field where you can leave notes about the company. These will be visible only to the Store-Admin. Company DomainsThis block is available only on the Edit Company page. When creating a company from scratch (that is when working on the New Company page), you will first have to save the company and then edit it to add company domains.
The Company Domains block comes with a grid and the Add new Domain button. The grid collects the domains assigned to the company account into the three columns: Domain Name, Status and Action. The Action columns contains the Delete active link. To delete a domain from the grid, and untie it from the company account, use the respective Delete link.
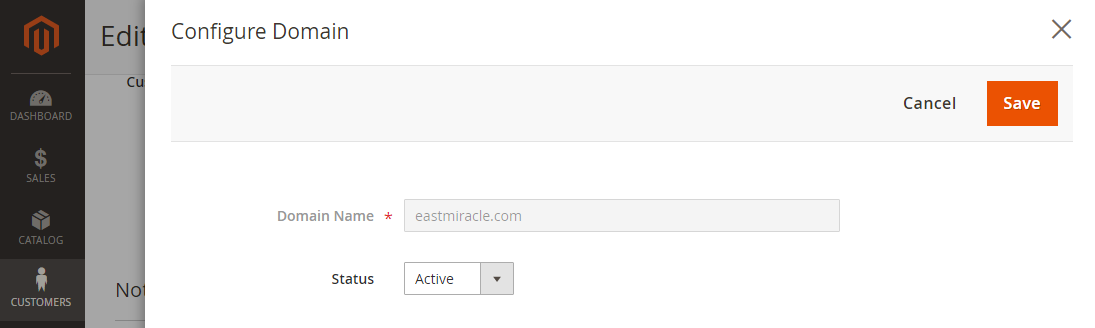
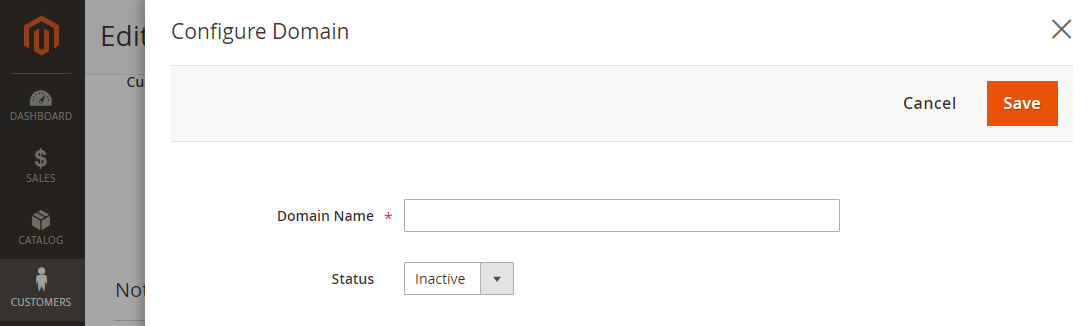
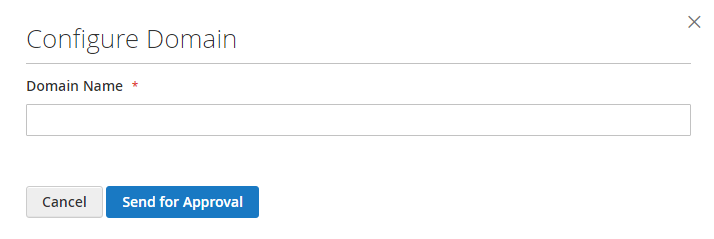
To update the status of a domain, click on the name of the domain and update the status. The Configure Domain popup up will emerge. The popup has two fields: Domain Name and Status. Use Status to update the status of the domain.
Mind the following when updating the status of a domain:
To add a domain, click on the Add New Domain button. The Configure Domain popover will prompt you to enter the name for the domain and specify its status. The status may take one of the three options: Inactive (by default), Pending and Active. To save the domain, click on the Save button in the top right. To cancel the operation - Cancel.
Domains entered here by the Store-Admin will appear in the Configure Domains grid on the Frontend.
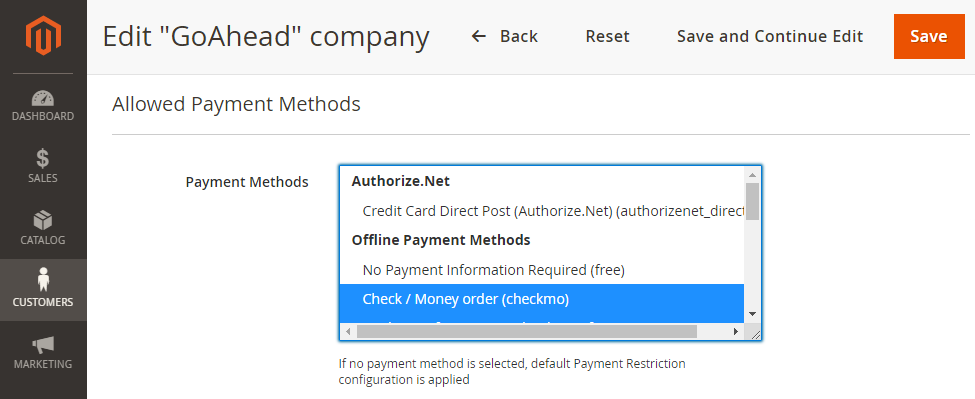
Allowed Payment MethodsThe Allowed Payment Methods block gets available on integration with the Payment&Shipping Restrictions module. The blocks comes as a list of payment methods available for multiple selection. Selected payments will then be available to all company users at checkout. Once finished, click Save in the top right corner of the page to save the company account. Alternatively, you may use one of the the other buttons claiming a correspondent action with the present company account.
Learn more on setting Payment Restriction defaults. Learn how to enable/disable payment methods in Magento 2. The list of native Magento 2 payment methods can be extended by the following extensions from Aheadworks:
Deleting Company AccountsWhen the status of a company is Declined, the Company Edit Page displays the Delete button. Click on the button to remove all company data including that of the sub-accounts and company account itself. A popup is displayed: “Do you want to delete this company permanently? Company data and related sub-accounts will be deleted.” Click on Yes to finalize the proceed, click on No to cancel the operation.
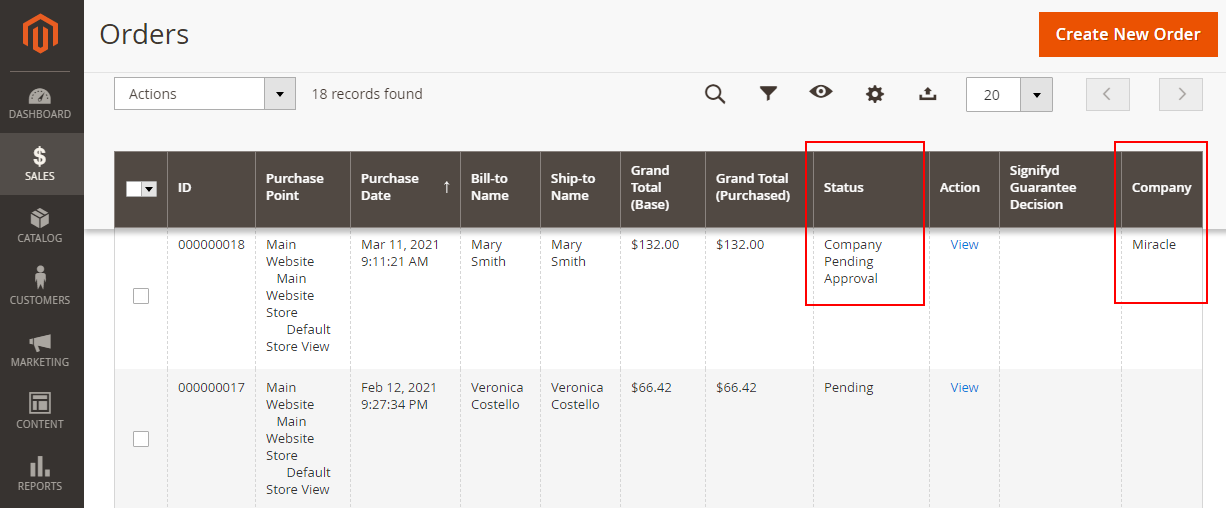
Company Account as a Customer AttributeAccording to the logic of the present extension, Company Account is a customer attribute. Thereby, discounts, refunds or rewards to a particular customer within the Company are visible and available to all the company users. Moreover, the Backend will feature the Company and Status in Company columns added to the Customers Grid, alongside other company information in the layouts of orders, invoices, etc. Managing Orders Placed by Company UsersWhen M2 Company Accounts is installed on the store, the Orders grid is enhanced with the Company column. The column features the name of the company, the Company User of which has placed the order. Furthermore, the Status column features "Company Pending Approval" for orders which are subject to the approval of the Company Admin.
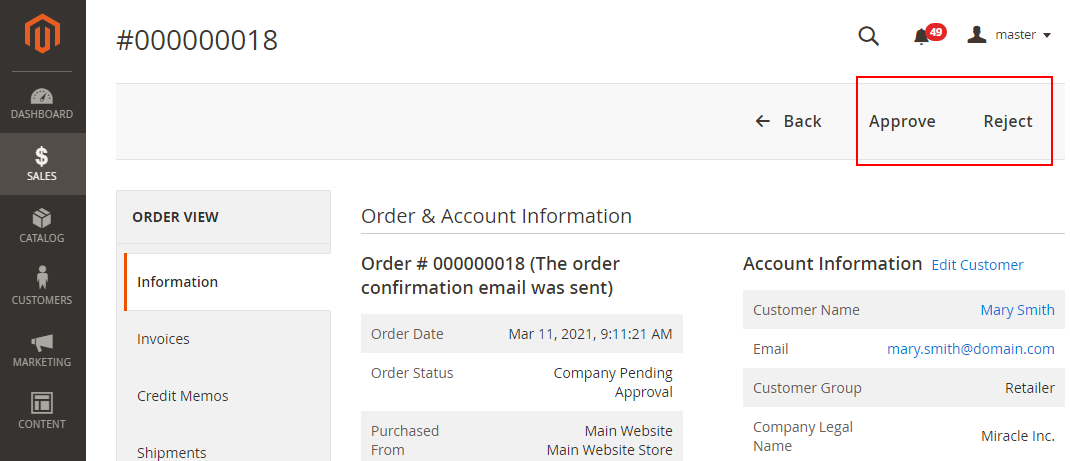
The Store Admin can approve/reject orders instead of the Company Admin. This is only possible for orders with status Company Pending Approval. To approve/reject an order, go to Backend → Sales → Order # ____ page and refer to the Approve and Reject buttons in the top right. Mind, for orders with status Company Pending Approval buttons Approve and Reject substitute native Magento 2 CTA buttons. The following takes place when the Store Admin clicks on the Approve button:
The following takes place when the Store Admin clicks on the Reject button:
|
Company Accounts on Frontend
| Section | |||||||||||||||||||||||||
|---|---|---|---|---|---|---|---|---|---|---|---|---|---|---|---|---|---|---|---|---|---|---|---|---|---|
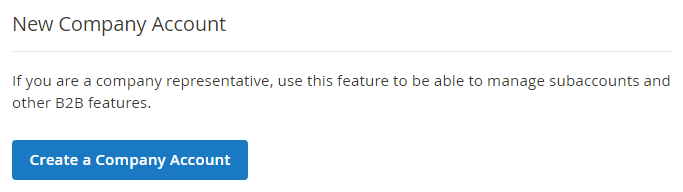
Starting Company AccountsCreating a company account on the Frontend is similar to creating a customer account. When the module is successfully installed on your store, the Sign-In or Create New Account page will have an extra block - New Company Account. The Customer clicks on the blue button Create a Company Account to start a company account.
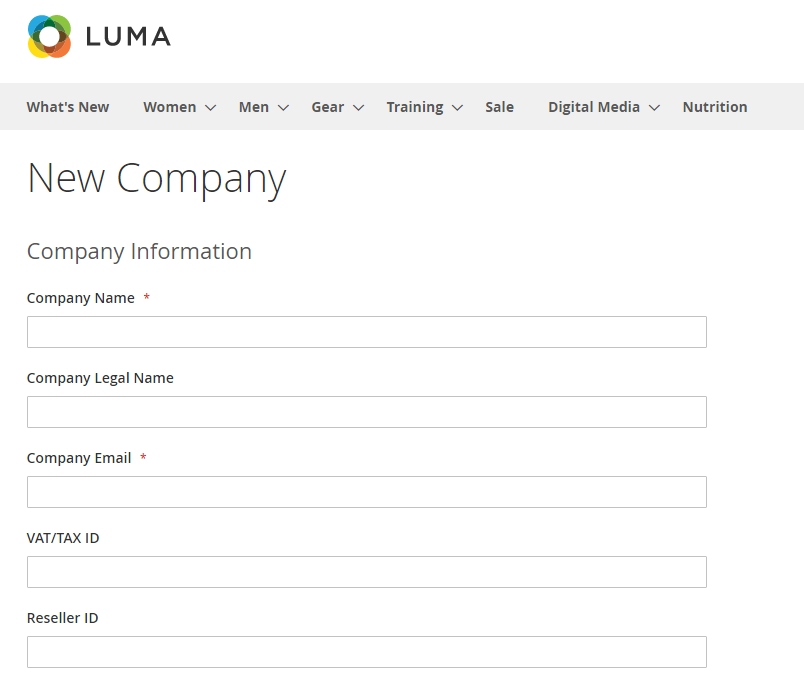
On clicking on the Create a Company Account button, the user is redirected to the New Company page, where he/she is prompted to fill in the New Company form. The form will have the fields as specified in the extension configuration.
On creation of the account, a notification arrives to the email inbox of the Company-Admin. The notification will have a link to set a password and enter the account for the 1st time. Please mind, the link is subject to expiration ( the period of link validity is set in Backend → Stores → Configuration → Customer configuration → Recovery Link Expiration Period). The link stays active even when it expires. In this case, instead of taking the user to the "Set Password" page, it will take him/her to the 'Forgot password' page. On entering the email address in the offered field, a new notification with a re-activated link will be forwarded to the user to set a password and enter the account.
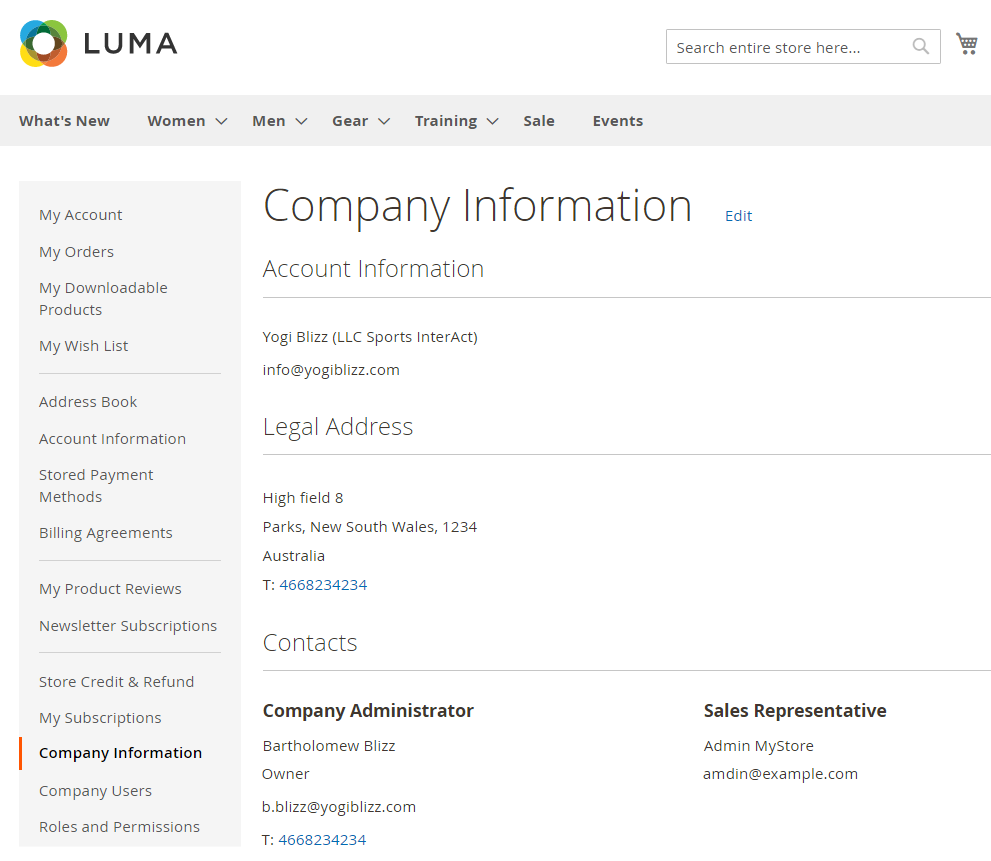
Managing Company AccountsCustomers use My Account on the Frontend to manage company accounts in the same fashion as they do for individual customer accounts. The list of features is extended here with those of Company Information, Company Users and Roles & Permissions. Company InformationCompany users find the details on the company in My Account→ Company Information. This information is given in the way it was provided by the Company-Admin on creating the company account. To edit the information, the Company User clicks on the Edit active link next to the title of the page .
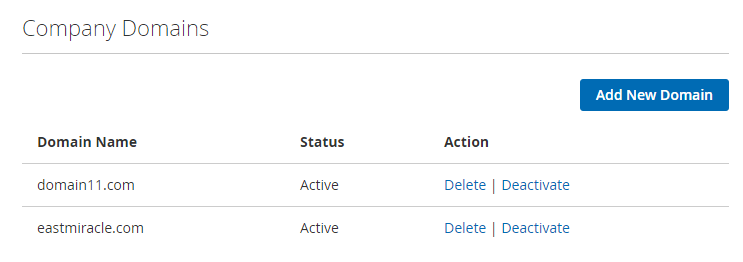
For the Company-Admin only, the Company Information page also shows the Company Domains section. Other company users are not able to see the section. This is where all company domains are collected into a grid of the following columns: Domain Name, Status and Action. The Action cells contain the Delete and Deactivate/Activate links which allow to manipulate the domains as follows:
Only Delete is displayed for domains with the Pending status.
To add a domain, the Company-Admin clicks on the Add New Domain button. A popup emerges prompting to indicate a domain name. On clicking on the Send for Approval button, the popup is closed, the record is added into the grid with status Pending. On clicking the Cancel button, the popup is closed and the record is not saved.
Domains entered here by the Company-Admin will appear in the Company Domains grid on the Backend.
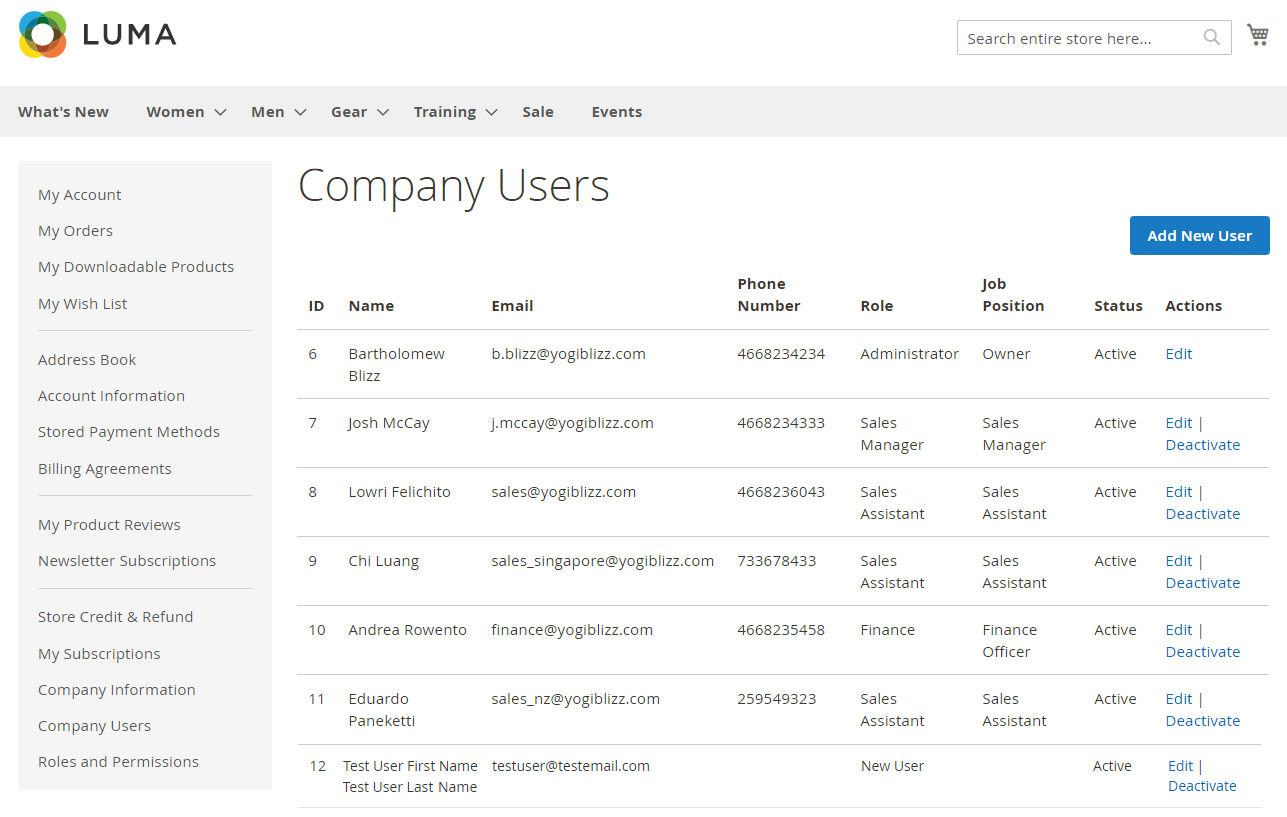
Company UsersThe Company Users page lists all the company account users. The data is presented in a table of the following columns: ID, Name, Email, Phone Number, Roles, Job Position, Status and Actions. The status of a company user may take one of the two values: Active or Inactive. To activate/deactivate a user, click on a corresponding active link in the Actions column.
To edit or add a company user, the Company User clicks on the Edit active link or the Add New User button respectfully.
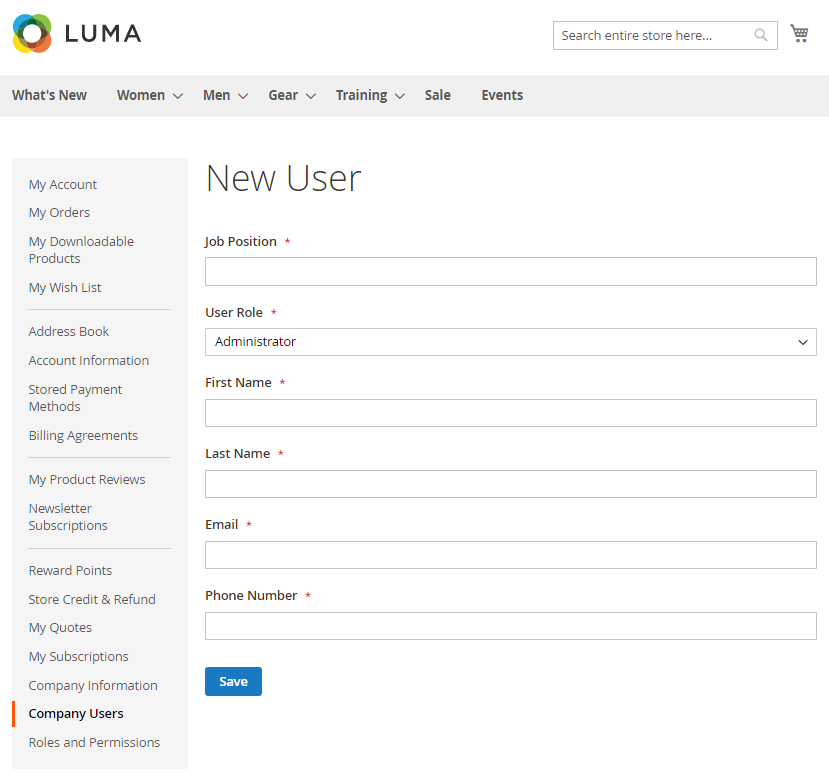
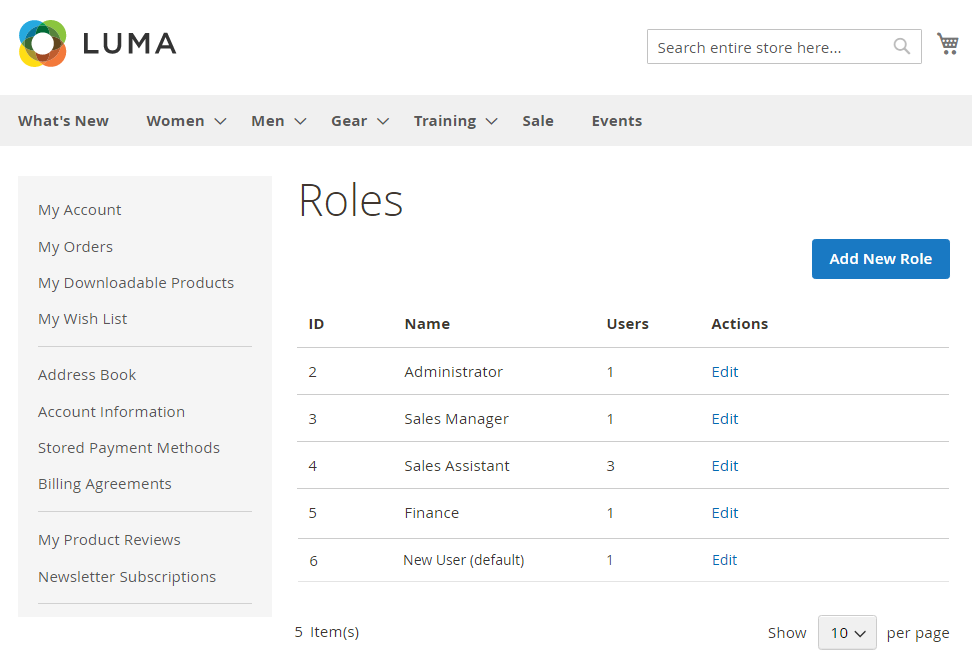
All fields in the New User form are mandatory. They are text fields prompting User's job position, name, email and phone number, as well a drop-box User Role to pick out a role of the user within the company account (Administrator by default). When no suitable role is found in the drop-box, the Customer User proceeds to the next step. Roles and ResponsibilitiesTo browse, edit and add new roles, the Customer User gos to Roles and Permissions in My Account. The page features a table with all the roles available in the account. Company users can see the number of users which belong to a role, the name and id of the role. To edit or add a new role, the Customer User clicks on the Edit active link or Add New Role button respectively.
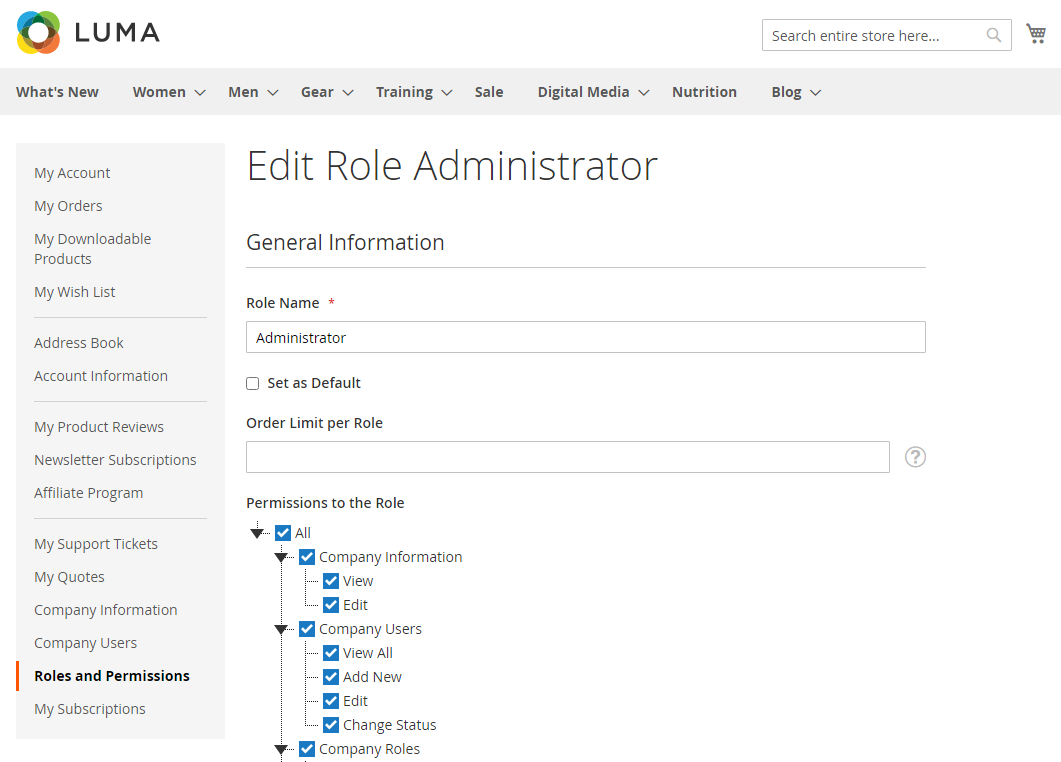
There are three blocks on the Create/Edit Role page: General Information, Store Credit & Refund and Reward Points (the later two require respective modules from Aheadworks installed). The General Information block prompts the following:
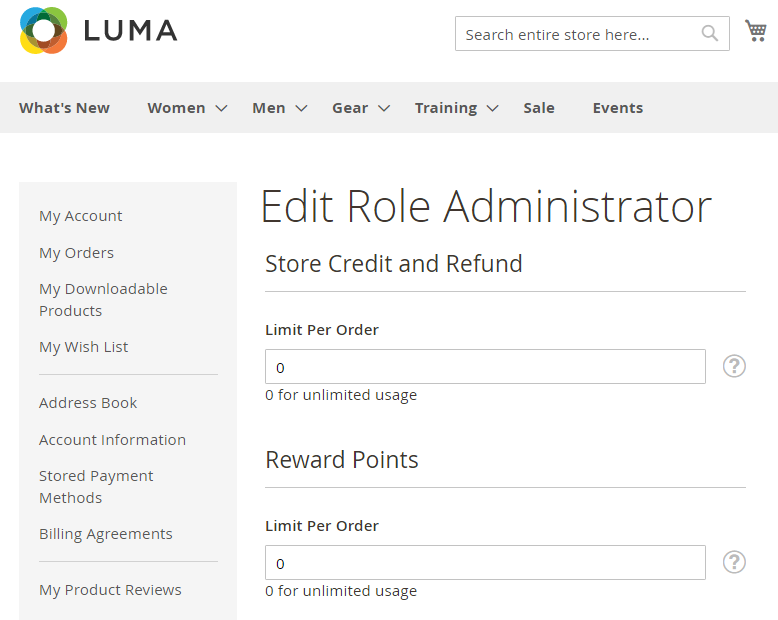
The Store Credit & Refund and Reward Points blocks feature two text-fields, each to set the limit of credit balance and reward points available to the role per order. '0' (zero) is the text-box value for unlimited usage of either reward points or credit balance. "0" is the value by default. The Customer Admin leaves '0' if he/she wants the role to have access to all reward points or credit balance available for the company. Roles with limit values different from '0' are not able to spend more reward or credit points than that value.
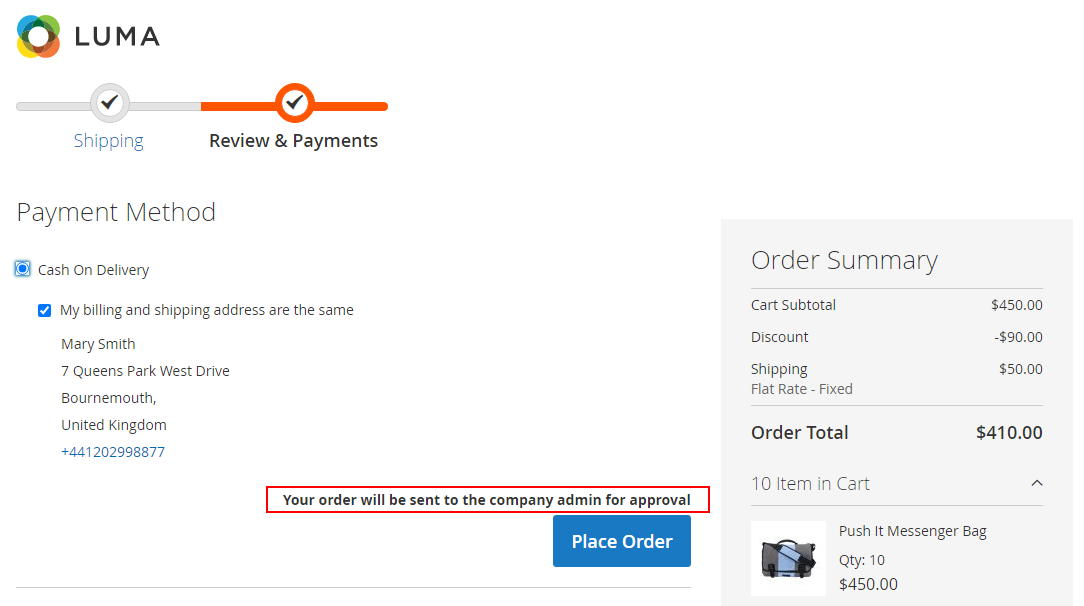
Once finished, the Company User clicks on the Save button. The User will be redirected to the Roles page. Managing OrdersWhen the Company User places an order which subtotal exceeds the Order Limit per Role value, the Checkout page features the following note below the button Place Order button: “Your order will be sent to the company admin for approval“. On clicking on the Place Order button, a success page is opened saying “Your order was successfully sent for approval to company admin”. The order receives status "Company Pending Approval".
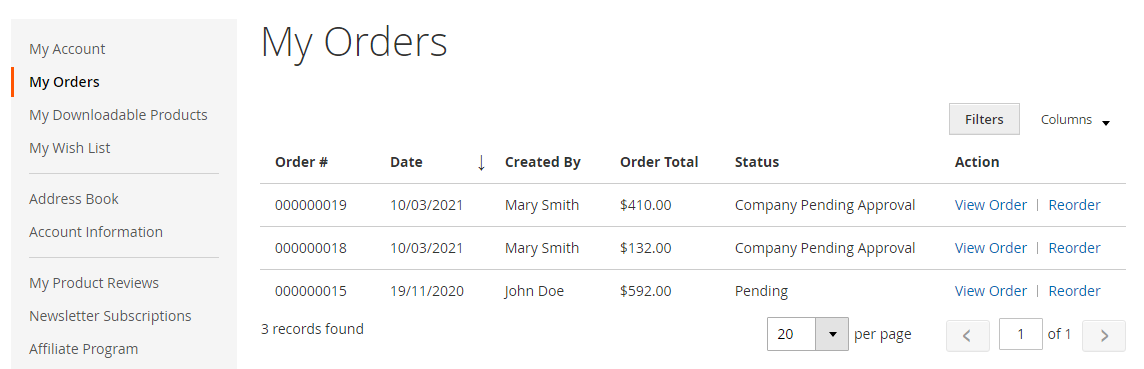
To approve or reject orders, the Customer Admin goes to My Account → My Orders. The native Magento 2 My Orders grid is enhanced with the Created By field, featuring the name of the Company User who created the order. The Company Admin can approve/reject orders with status Company Pending Approval only. To do so, the Company Admin clicks on the View Order active link in the Action column and proceeds to the Order # ___ page.
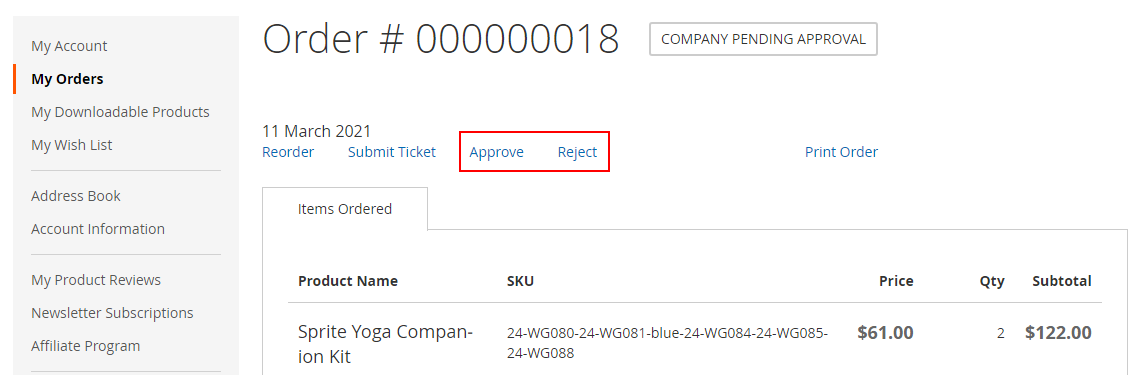
The Order # ___ page displays the following active links to approve or reject orders: Approve and Reject, correspondingly. These links are only displayed to the Company Admin. When the Company Admin clicks on "Approve", the following takes place:
When the Company Admin clicks on "Reject", the following takes place:
|
Integrations
| Section | |||||
|---|---|---|---|---|---|
Integration OptionsThe Company Accounts module is integrated with Aheadworks Reward Points, Store Credit & Refund, Cart to Quote, Payment & Shipping Restrictions, Requisition List, Company Credit and Sales Representative. These modules make up an essential bundle for business-to-business model of eCommerce. There are no particulars in setting or operating that integration, but for that of the Sales Representative, which is explained below. Such an approach further makes the use of Company Accounts similar to the B2C experience, easy and flawless. You may learn more on the extensions and the embodiment of the integrations from the manuals below:
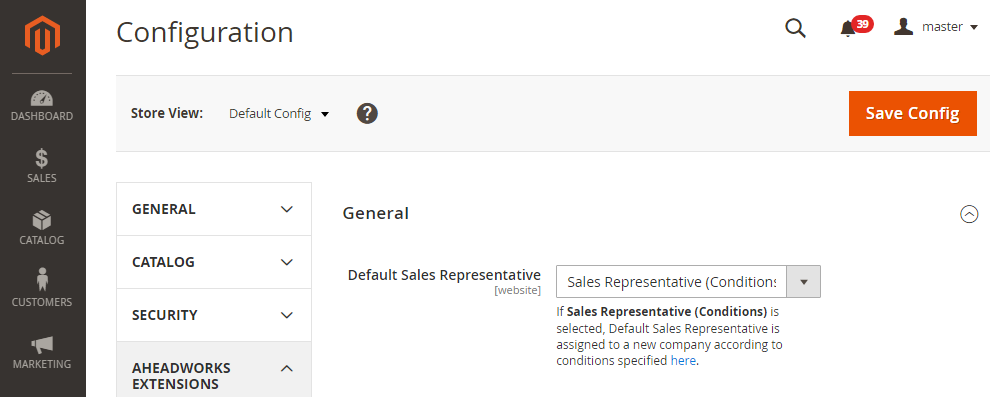
Integration with M2 Sales RepresentativeWhen M2 Sales Representative is installed on the store alongside M2 Company Accounts, the Admin gets able to appoint Sales Representatives to companies. Sales representatives can be appointed to companies automatically in compliance with the company users' belonging to a customer group, or manually and individually to each company. By appointing sales representatives to companies, that is users created with the help of M2 Sales Representative, the Admin can demarcate access for these users to the data on the companies. M2 Company Accounts, when used on its own, has an option of assigning sales representatives to companies. With regard to this fact, M2 Sales Representative is meant to enhance M2 Company Accounts as follows:
|
Need Customization?
.png?version=1&modificationDate=1568105653799&cacheVersion=1&api=v2)
You can always find the latest version of the software, full documentation, demos, screenshots, and reviews on http://aheadworks.com
License agreement: https://aheadworks.com/end-user-license-agreement
Contact Us: https://aheadworks.com/contact
Copyright © 2021 Aheadworks Co. http://www.aheadworks.com
...