Configuring the ExtensionOnce you are done with installing the extension and registering the Disqus application, proceed to your Magento 2 backend to finalize the setup of the Blog extension. Before creating your first blog post, we suggest walking through the settings of the Blog extension. This will help you then keep complete control over your blog. Go to Stores > Configuration > AHEADWORKS EXTENSIONS > Blog. General SettingsThis is where you configure the behaviour of the blog: its accessibility, content layout, and etc. Please refer to the following configuration options: 
Enabled - defines if the Blog extension is enabled in your store; - Add Blog to Navigation Menu - enables/disables the Blog tab on the frontend in the navigation menue;
- Blog Title - defines the name of the blog page;
- Route to Blog - defines the direct link to the main blog page of your store;
- Route to Authors Page - defines the link to the authors page of the blog;
Posts per page - defines how many posts will be displayed per a blog page; - Quantity of related posts - defines the number of related posts will be displayed on a page;
Display Sharing Buttons At - defines where the social network sharing buttons should be displayed at;

You have just configured the main blog page and enabled access to it. Scroll down the General Settings window to proceed to adjusting the sidebar of the Blog and SEO metadata. This configuration section reflects the Blog sidebar's functional aspects. These settings define the post tags look, let you add a CMS block and configure the recent posts to display. 
Here, you have access to the following configuration options: - Number of Recent Posts to Display - defines how many most recent blog posts are to be displayed in the Blog sidebar;
- Number of Most Popular Tags to Display - defines how many popular tags are to be displayed in the tag cloud of the blog sidebar;
- Highlight Popular Tags - defines if the most popular 1227948850 are to be highlighted with bold or increased font size;
- Sidebar CMS Block - allows choosing a CMS block to be displayed on the blog sidebar;
- Display Categories List in a Sidebar - enables blog categories to be displayed on the sidebar;
- Maximum Number of Categories to Display - the number of categories visible above the 'Show X More' link on the sidebar.
SEOScroll down the Sidebar configuration, and find the SEO metadata settings block. This is where you optimize your blog for best search outcomes with modern search engines. 
The options here come as follows: - Enable Meta Tags - leave 'Yes' (by default) should you not opt for a stand-alone third-party SEO solution;
- Blog Meta Description - a brief description of the content of the Blog Home page (an element in the HTML code of the page to be displayed by a search engine in search results);
- Blog Meta Keywords - a list of phrases to tell the search engine the topic of the page (an element in the HTML code of the page);
- URL structure - one of the two options for the structure of a blog post url (including or excluding the category name);
- Post URL Suffix - the character(s) to close a URL of a blog post (usually a '/', '.html' or empty);
- Author Page URL Suffix - the character(s) to close the Author Page (aka the 'All Authors' page) URL;
- URL Suffix for all other pages - the character(s) to close the URL of the blog Home page, categories page, authors page and search by tag page.
- Create Permanent Redirect for URLs if URL Key Changed - select 'Yes' to avoid confusing customers with pages differing in content and URL suffixes;
| Info |
|---|
URL Suffix - to forward-slash or not? This is mostly the question of a forward slash, which is often automatically added to a url by many blog platforms like Wordpress, for example. The addition of a slash at the end of a URL (aka trailing slash) instructs the web server to search for a directory. This speeds the web page loading because the server will retrieve the content of the web page without wasting time searching for the file. However, this is not the rule, but a recommendation of the present day. You may either use the trailing slash or not, but make sure the choice is consistent. It is important to stick to the preferred version and enforce a common policy for all the URLs of the website, including those in the site map. In some cases, the non-trailing slash and trailing slash version don’t redirect to the same version of a page. This can be the case when you migrate your blog from Wordpress to Magento. Wordpress deliver the same content with and without the trailing slash. Migration may break the ties. To prevent showing multiple results to the visitors, set up redirection to the preferred URLs. In the latest version (2.7.0) of the extension this could be done with the help of the Create Permanent Redirect for URLs if URL Key Changed selector. |
 Image Modified Image Modified
| Info |
|---|
Canonical tags A canonical tag (aka "rel canonical") is a way of telling search engines that a specific URL represents the master copy of a page. Using the canonical tag prevents problems caused by identical or "duplicate" content appearing on multiple URLs. Practically speaking, the canonical tag tells search engines which version of a URL you want to appear in search results. For example, if your blog is configured to include the category path in post URLs, your store will generate multiple URLs that point to the same product page: http://site.com/blog/health_and_lifestyle/food_and_diet/recipes/sample_recipe/
http://site.com/blog/sample_recipe/
When canonical meta tags for categories are enabled, the category page of your blog includes a canonical URL to the full category URL: http://site.com/blog/health_and_lifestyle/food_and_diet/recipes/sample_recipe
When canonical meta tags for posts are enabled, the post page includes a canonical URL to the domain-name/post-url-key because post URL keys are globally unique. http://site.com/blog/sample_recipe/
Canonical tags vs. redirects One common SEO question is whether canonical tags pass link equity like 301 redirects. In most cases, they seem to, but this can be a dangerous question. Keep in mind that these two solutions create two very different results for search crawlers and site visitors. If you 301 redirect Page A-->Page B, then human visitors will be taken to Page B automatically and never see Page A. If you rel-canonical Page A-->Page B, then search engines will know that Page B is canonical, but people will be able to visit both URLs. Make sure your solution matches the desired outcome. |
| Tip |
|---|
Title tags Having a strong, relevant, clickable title can have a major impact on rankings, click-through rates and overall traffic numbers. Include key-words in your title prefix and company name in the suffix, for example. The title tags set herein will then be added as a title-tag automatically, to all subpages, that do not have absolute title-tags. |
The settings above echo those in Stores->Config->Catalog->Catalog->Search Engine Optimization. For more details on SEO practices in Magento 2 refer to the official Magento 2 use guide. Related ProductsScroll down the extension settings page to reach the Related Products block. Starting 2.0 version of the Blog extension, store administrator can add related product to a blog post page. In addition, a Blog tab is added to the product pages. Under the Blog tab customers can find blog posts where the product is mentioned as related. 
This configuration section defines the behavior and layout of the product block related to the blog posts: - Display Blog Posts Tab on Product Page - defines if the Blog tab should be displayed at product pages;
- Display Related Products Block on Post Page - defines if and where the related products block should be displayed at the blog post page;
- Related Products Block Layout - defines the related product block's layout;
- Display "Add to Cart" Button - defines if the Add to Cart button should be displayed on the products featured in the related product blocks at blog post pages.
Once done with the settings click the Save Config button at the top of the Configuration page, or proceed to the next step. Wordpress ImportGo to Stores > Configuration > Aheadworks extensions > Blog and scroll down the page to reach the settings for Wordpress blog import. Starting from 2.2.0 version of the Blog extension, store administrator can import blog posts from a WordPress blog. 
The process behind the migration is the following: - Navigate to Tools > Export in the Wordpress administrator area;
- Choose 'Posts' option and click the Download export file button. An XML file containing all blog posts should be downloaded;
- Navigate to your Magento backend Stores > Configuration > aheadWorks extensions > Blog;
- In the 'Wordpress Import' section of the Blog settings upload XML file via 'Import file';
- Set 'Override existing posts with the same URL' if you want the existing Magento 2 posts with the same URL overridden;
- Click 'Import Posts' button to begin post import;
- If imported successfully copy contents from the Wordpress folder:
wp-content/uploads/
directly to the Magento folder:
/pub/media/wp-content/uploads/
If this directory doesn't exist - create it manually. Make sure file permissions are set up properly.
Post migration is now complete. To add blog post updates to your store RSS feeds go to Stores > Settings > Configuration > Catalog > RSS Feeds. Enable RSS Feeds for Aheadworks Blog. 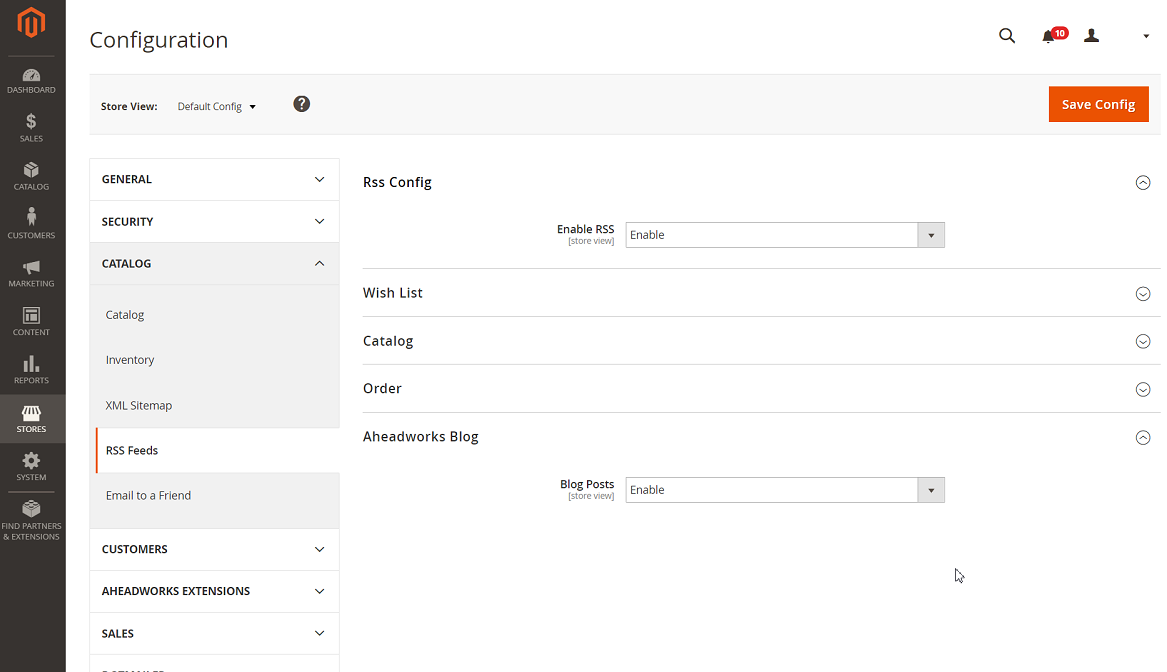
Blog CategoriesCategories GridTo create and manage blog categories please navigate to Content > Blog by Aheadworks > Categories. This is where you will see the Categories grid to collect the categories available in the blog. 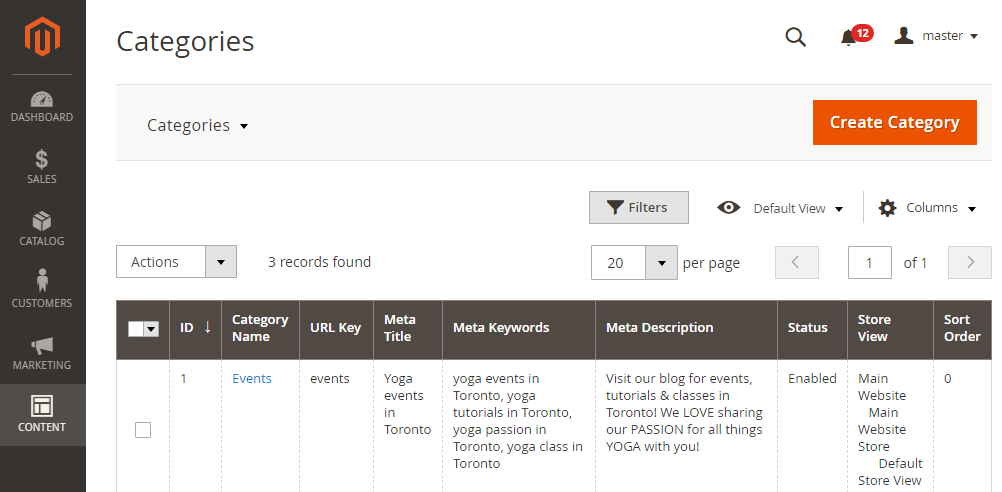
The Categories grid will include the following columns: - ID - identification number of the category;
- Category Name - the name of the category;
- URL Key - the uniform resource locator of the category;
- Meta title - the title of the category as shown by a search engine in search list;
- Meta Keywords - the words to tell a search engine the key ideas of the category;
- Meta Description - the description of the category as shown by a search engine in search list below the title;
- Status - the status of the category (enabled/disabled);
- Store view - the view of the store to feature the category in the blog;
- Sort order - the whole numeric to suggest order of the categories in the category tree.
You can edit categories one after another by clicking the name of the category or in bulk. The latter is possible with the Actions folding list on the left just below the table. Create/Edit CategoryClick the Create Category button to add a blog category to the store. This window will come open: 
To create a new category please proceed to the three steps below: Set-up the hierarchy - step 1To assign a place for a new category in the hierarchy use the block on the left of the customisation fields. There you will see the Categories Tree, which you can expand or collapse via the active links in blue above the tree. Further above you will see two gray buttons Add Root Category and Add Subcategory which act out respectively to their names. - First category created will start the hierarchy;
- To add a subcategory, choose the category which will be expected to be the root one in the tree and click the Add Subcategory button.
- To add a root category, choose the category which will be expected to be the subcategory and click the Add Root Category button.
Please note, when you do not refer to the hierarchy tree after clicking the Create Category button, and proceed straight on to the category customisation fields, the newly created category will be added as a root one to the bottom of the tree. You will later be able to sort out the order of categories in the Categories table as described in the section above. Customize the category - step 2Refer to the following fields: - Name - the name of the category speaking for its content;
- URL-key - the url-key to the category (is generated automatically as you fill-in the field above, but at the same time may be adjusted manually when clicking on the field);
- Status - enable or disable categories with this field;
- Image - upload an image to visually support the category page;
- Image title - suggest the title for the image which will appear when hovering the mouse cursor over the image;
- Image text - suggest the text for the image which will appear should the picture be not displayed;
- Description - type-in a description of the category to make the page more informative.
Tweak SEO settigns - step 3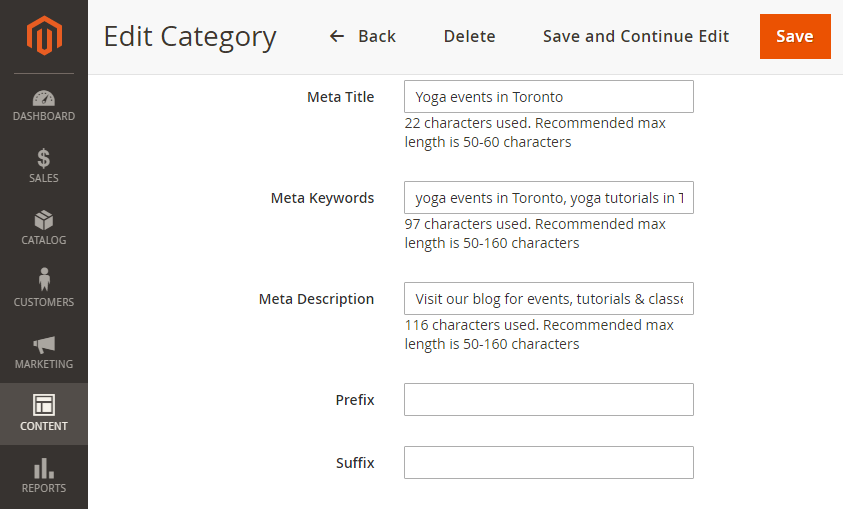 The options for configuration here come as follows: The options for configuration here come as follows:
- Meta Title - add a meta title to the category (this will be shown as a title line by a search engine in the search list)
- Meta Keywords - add keywords for search engines to know what the category page is about;
- Meta Description - add a description as it will appear below the meta title in the search list;
- Prefix - the text line to start the title of the category page (when left blank the Title Prefix value will be used as set in the Extension Settings);
- Suffix - the text line to close the title of the category page (when left blank the Title Suffix value will be used as set in the Extension Settings).
| Tip |
|---|
SEO tips: - Add keywords to the prefix
- Add action and power words to the title
- Drop in keyword variations and secondary keywords into the title
- Remember to mention your company/blog name in the suffix.
A suggested example of a Blog/category tag will be: [Keyword] - [Category title or tighter version of the category title] | [Blog/site name] |
| Info |
|---|
The above text fields are backed with hints on line length in characters. You will be able to see the number of characters in your text-line as you type it in. |
Once finished, click the Save button on top of the page. You will be redirected to the Categories page. | Info |
|---|
Your customers will be able to see and navigate along the categories on the frontend. Check out the snaphshot below as an example. 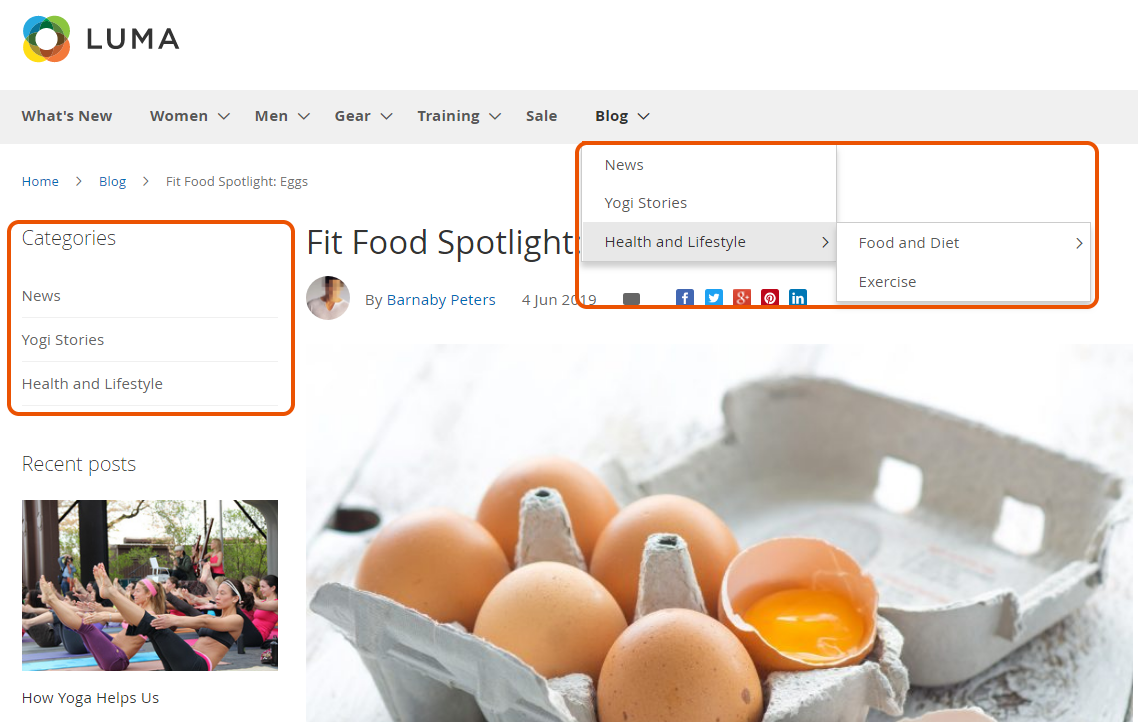
|
AuthorsAuthors GridTo add and manage blog authors please navigate to Content > Blog by Aheadworks > Authors. This is where you will see the Authors grid to collect the authors featured in the blog. 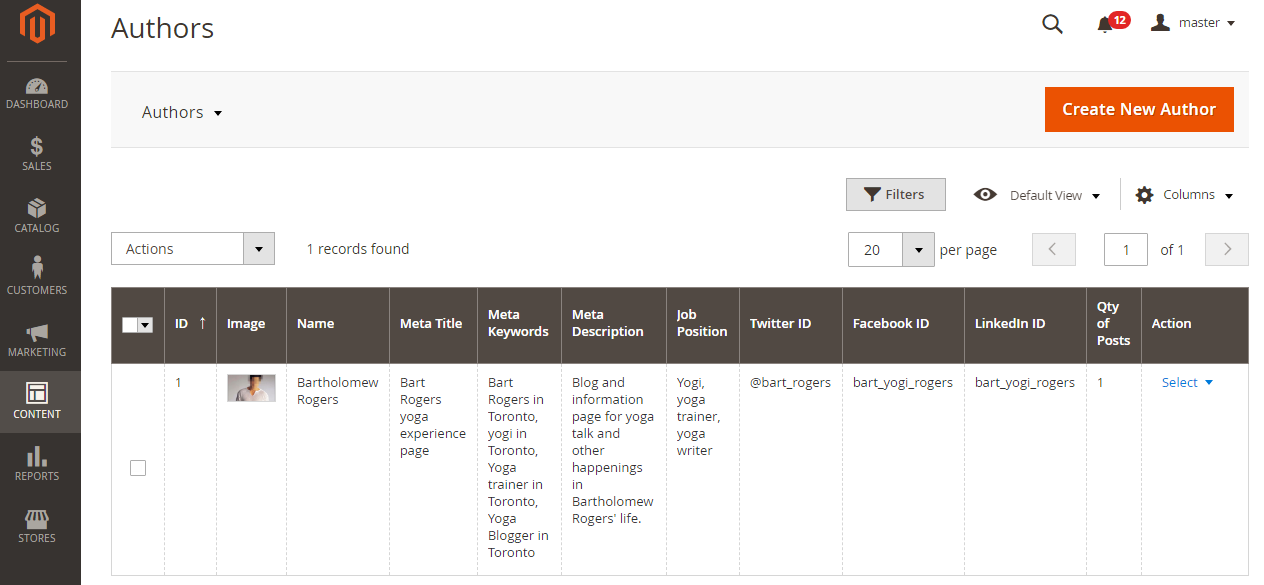
The Authors grid will come in the following columns: - ID - the identification number of the author;
- Image - the thumbnail avatar of the author;
- Name - the name of the author;
- Meta title - the title of the author page as shown by a search engine in search list;
- Meta Keywords - the words to tell a search engine the key ideas in the author page;
- Meta Description - the description of the author page as shown by a search engine in search list below the title;
- Twitter ID - the name of the Twitter account of the author;
- Facebook ID - the name of the Facebook account of the author;
- LinkedIn ID - the name of the LinkedIn account of the author;
- Qty of Posts - the whole numeric to tell the number of posts made by the author;
- Action - an active link to select between the two actions: Edit and Delete.
You can edit authors individually by clicking the active link in the correspondent cell of the Action column, or in bulk. The latter is possible with the Actions folding list on the left just below the table. Create/Edit AuthorTo add a new author, click the Create New Author button in the top right of the page. You will be redirected to the New Author page. To complete the authors page, follow the two steps below: Suggest general information about the author - step 1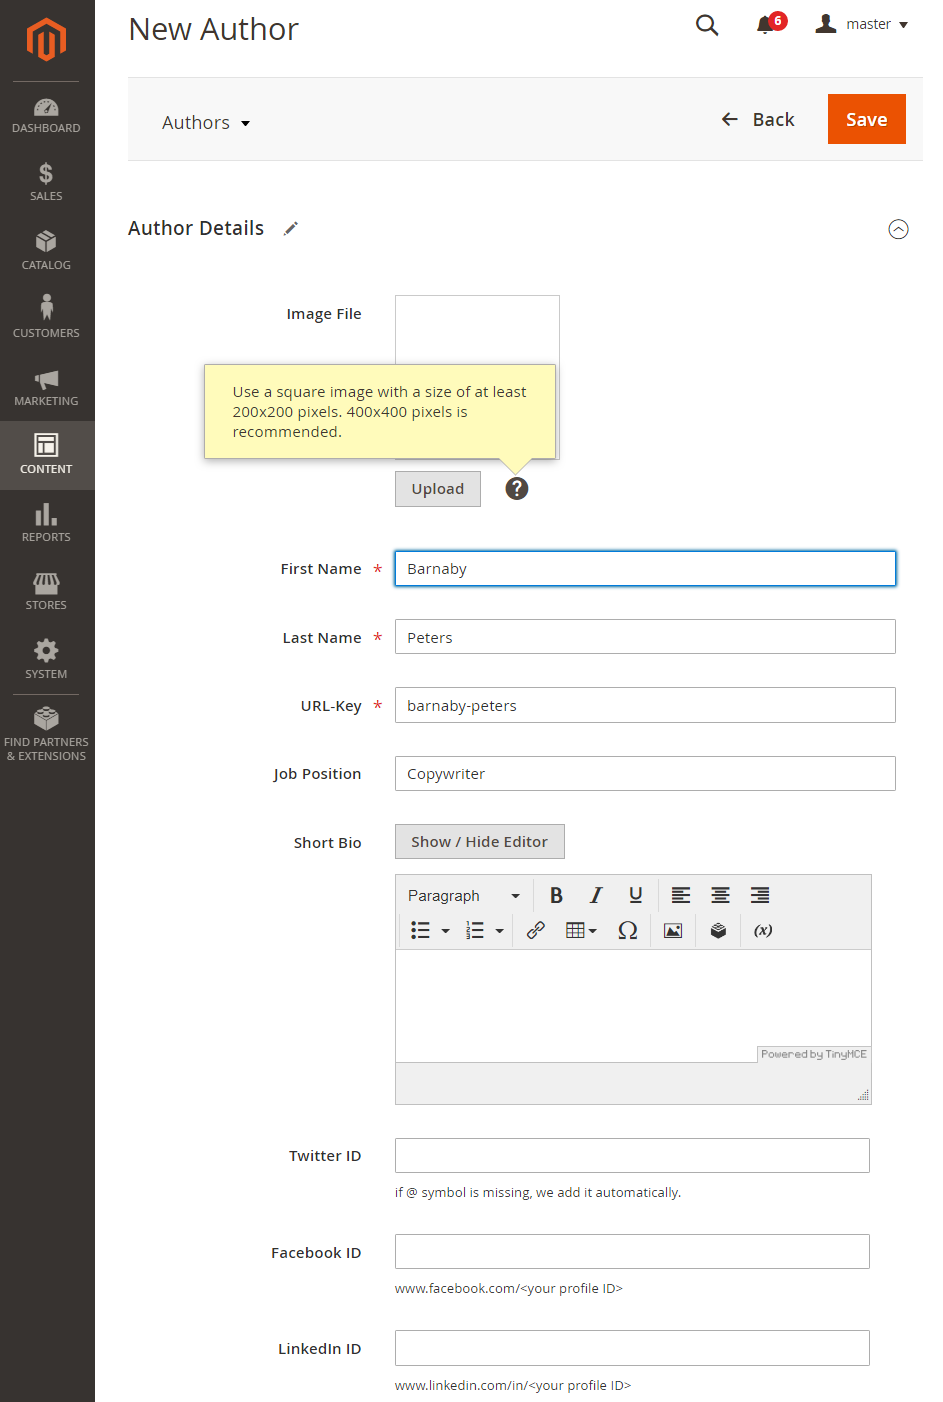 The page has the following fields, which speak for their target content: Image File, First Name, Last Name, URL-key, Job Position, Short Bio, Twitter ID, Facebook ID, Linkedin ID. Fill-in the mandatory fields marked with an asterix (*). You may also opt for the ones which are not. Use the rich-text formatting bar to make the content of the author's biography visually appealing to readers. | Note |
|---|
Text is only supported in "Short bio" on the Authors page. Widgets are not supported |
| Tip |
|---|
It is suggested you use a square image of 200x200 pixels minimum (400x400 pixels is recommended) for the avatar of the author. |
Tweak SEO settings for the Author Page - step 2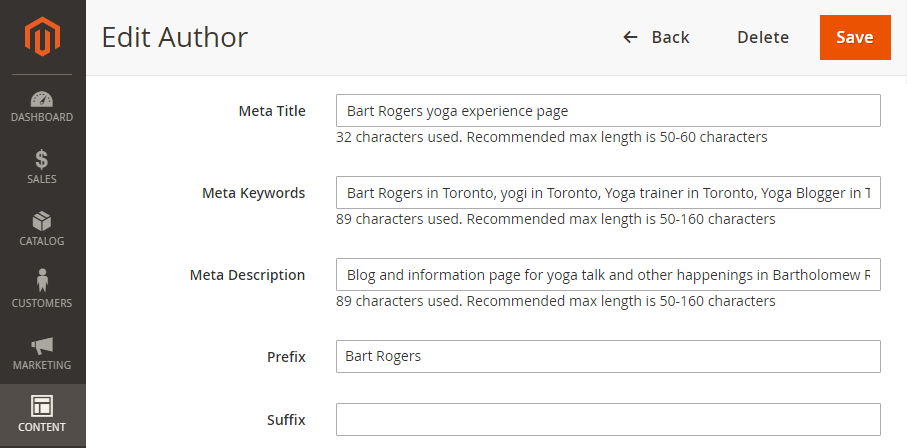 The options for configuration here come as follows: The options for configuration here come as follows:
- Meta Title - add a meta title to the author page (this will be shown as a title line by a search engine in the search list)
- Meta Keywords - add keywords for search engines to know what the author page is about;
- Meta Description - add a description as it will appear below the meta title in the search list;
- Prefix - the text line to start the title of the author page (when left blank the Title Prefix value will be used as set in the Extension Settings);
- Suffix - the text line to close the title of the author page (when left blank the Title Suffix value will be used as set in the Extension Settings).
| Tip |
|---|
SEO tips: - Add keywords to the prefix
- Add action and power words to the title
- Drop in keyword variations and secondary keywords into the title
- Remember to mention your company/blog name in the suffix.
A suggested example of a Blog/Author tag will be: [Keyword] - [Category title or tighter version of the category title] | [Blog/site name] |
| Info |
|---|
The above text fields are backed with hints on line length in characters. You will be able to see the number of characters in your text-line as you type them in. |
Once finished click the Save button. You will be redirected back to the Authors page. | Info |
|---|
Authors' names will be clickable on the frontend. In your blog thus, readers will be able to follow the authors they like most. |
Blog PostsPosts GridTo add and manage blog posts, navigate to Content > Blog by Aheadworks > Posts. The page will feature a grid to aggregate all posts created/migrated into the blog. 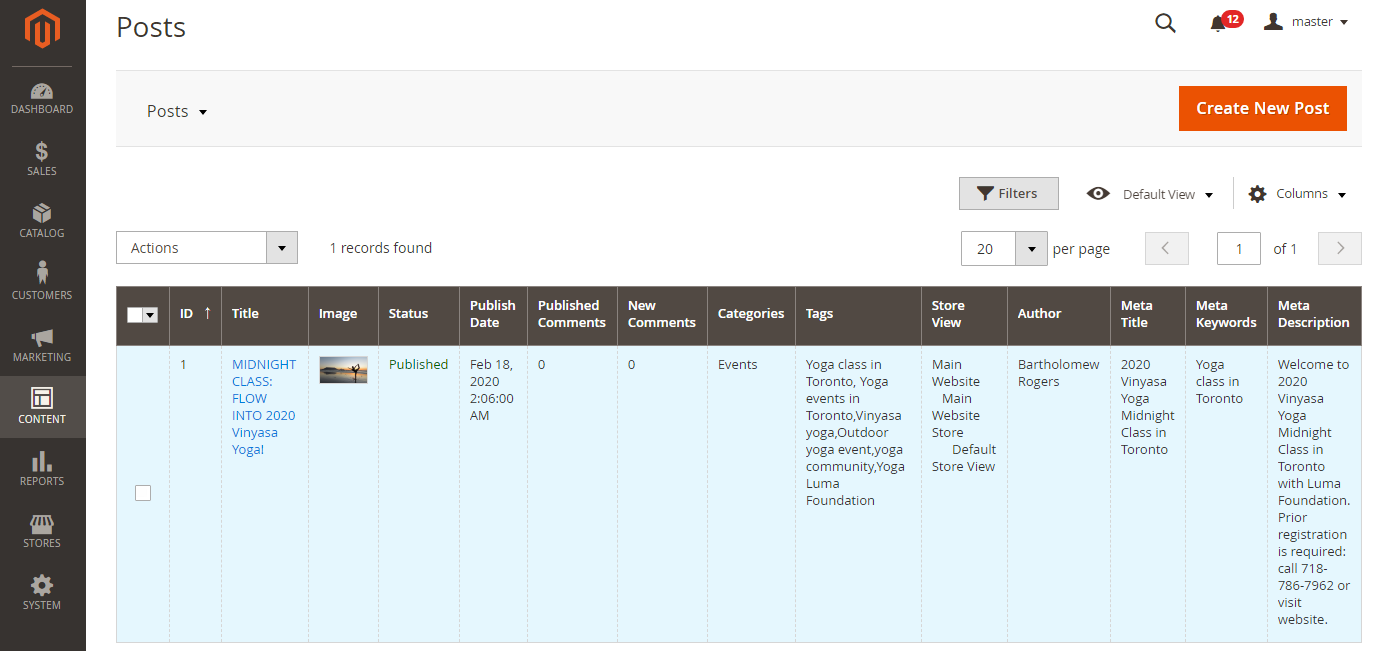
The grid contains the following columns: - ID - the identification number of the post;
- Title - the title of the post as it will appear on the frontend;
- Image - the thumbnail of the head image in the post;
- Status - the status of the post (published, drafted);
- Publish Date - the date of publishing of the post;
- Published Comments - the whole numeric to tell the number of comments published to the post;
- New Comments - the whole numeric to tell the number of comments not yet confirmed by the admin for publishing on the frontend;
- Categories - the categories the post belongs to;
- Tags - the phrases to tell readers/customers what the post is about;
- Author - the author of the post;
- Store view - the store view the post belongs to;
- Meta title - the title of the post page as shown by a search engine in search list;
- Meta Keywords - the words to tell a search engine the key ideas in the post page;
- Meta Description - the description of the post page as shown by a search engine in search list below the title;
You may edit posts individually by clicking the active link in the Title column, or in bulk. The latter is possible with the Actions folding list on the left just below the table. Create/Edit PostTo add a new post, click the Create New Post button in the top right of the page. You will be redirected to the New Post page. To complete the post page, follow the two steps below: Add content and suggest general information about the post - step 1
Refer to the block on the left. At this step you are suggested to: - Type-in the blog post title;
- Decide on the URL-key of the post;
- Upload an image and suggest details to it: image title (appears when hovering a mouse cursor over the image) and Alt Text (appears instead of the image when the latter is not displayed);
- Type-in the body of the post and format it to your needs and taste (the Show/Hide Editor button hides/enables the WYSIWYG editor as part of the Bluefoot Magento page builder and allows for HTML/CSS markup of the post text);
The image can be taken from the existing media files or uploaded from your device. Click the Upload button next to the Image field. With Magento 2 Blog 2.6.0, featured images are used as thumbnails for the display of blog posts in a category, recent posts, and related posts. | Info |
|---|
Best parameters for sharing on Facebook and Twitter:
Minimum 600x315px, 1200x630px is recommended.
Maximum 4096x4096px, less than 5Mb.
Try to keep aspect ratio close to 2:1 to avoid image cropping. |
Decide if your post should have a Short Content, set the post to a particular category and decide on tags. Short Content can prove useful if your post is content heavy and takes a couple of pages. What it does is instead of displaying the whole post on a Blog page it allows displaying only the contents of the Short Content field, thus saving blog page space and making it look neat. | Info |
|---|
| Expand |
|---|
Without Short Content field enabled: 
With Short Content field enabled: 
|
|
Tweak SEO settings for the Author Page - step 2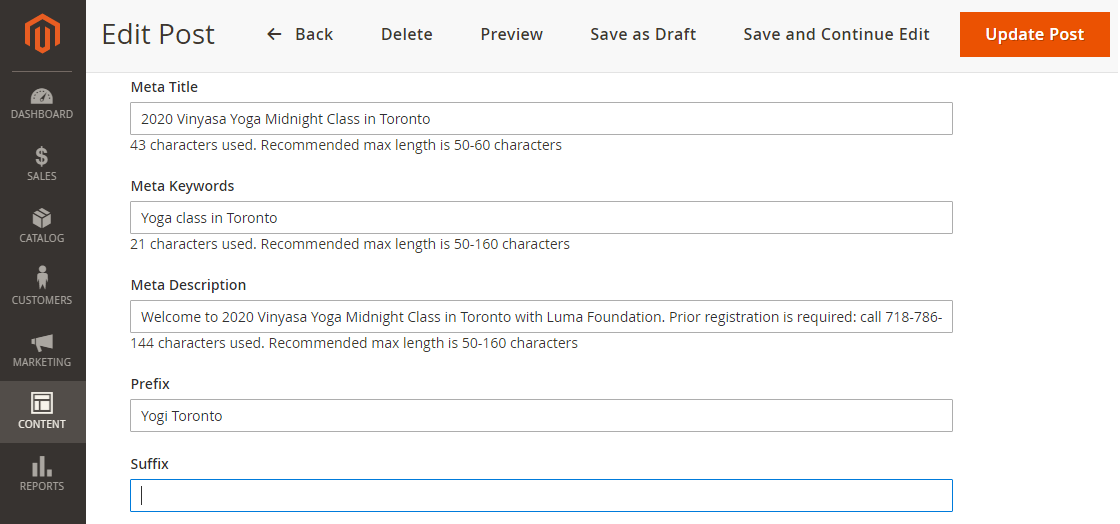
The options for configuration here come as follows: - Meta Title - add a meta title to the post page (this will be shown as a title line by a search engine in the search list)
- Meta Keywords - add keywords for search engines to know what the post page is about;
- Meta Description - add a description as it will appear below the meta title in the search list;
- Prefix - the text line to start the title of the post page (when left blank the Title Prefix value will be used as set in the Extension Settings);
- Suffix - the text line to close the title of the post page (when left blank the Title Suffix value will be used as set in the Extension Settings).
| Tip |
|---|
SEO tips: - Add keywords to the prefix
- Add action and power words to the title
- Drop in keyword variations and secondary keywords into the title
- Remember to mention your company/blog name in the suffix.
A suggested example of a Blog/Author tag will be: [Keyword] - [Category title or tighter version of the category title] | [Blog/site name] |
| Info |
|---|
The above text fields are backed with hints on line length in characters. You will be able to see the number of characters in your text-line as you type them in. |
Add products related to the post - step 3
Scroll down the page to the Related Products block to add products related to the content of the post. These will appear on the frontend behind the post. To specify the products for relation to the post, use the Conditioning section. This is where you can set a combination of conditions to the attributes of the products, which will then be filtered for relation to the post. Click the green '+' to add a condition, and the red 'x' to delete one. Click the words in bold to unfold the options of the condition or the options of the product attribute. | Info |
|---|
Products related to blog posts will in turn automatically receive the Blog Posts tab on the product page featuring the posts they are related to. 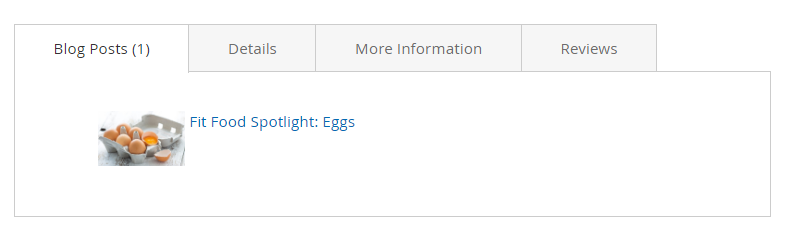 Image Modified Image Modified
|
Configure the post for publishing - step 4
Refer to the block on the right. This block opens up the following features to be configured before you complete the post: - Post scheduling;
- Assigning an author;
- Selecting a category for the post;
- Typing-in tags relevant to the content of the post;
- Enabling comments;
- Setting-up Twitter site account;
- Selecting groups of users who will be able to see the post.
Schedule the post for successive publishing. | Info |
|---|
Scheduling posts can prove vital in various situations. Very often it is useful for posts to appear not later or earlier some occasion like the following: - Start of the sale;
- New product/service release;
- Holiday (to greet);
- etc.
With the scheduling functionality, you can choose the date, hour, and even second you want the draft to be published. Whenever you click the Calendar icon  next to the Publish now field a Calendar will fold out where you can select the date and time. To fix the selection click Close, the data and time will appear in the Publish now field. If you want your post to be published today click Go Today, current date and time will appear in the Publish now field. There is another opportunity to set current date and time to your post. It saves a great deal of time! Do not click the Calendar icon in the Publish now field, leave it blank, and your post will be published instantly once you finalize customisation. next to the Publish now field a Calendar will fold out where you can select the date and time. To fix the selection click Close, the data and time will appear in the Publish now field. If you want your post to be published today click Go Today, current date and time will appear in the Publish now field. There is another opportunity to set current date and time to your post. It saves a great deal of time! Do not click the Calendar icon in the Publish now field, leave it blank, and your post will be published instantly once you finalize customisation. | Expand |
|---|

|
|
Tags are one of the navigation tools provided by the Blog extension. Every post is suggested to be tagged with relevant words or phrases to simplify subsequent search performed by customers via the search field of your Magento store. Tags are gathered in a tag cloud displayed in the blog Sidebar. | Info |
|---|
| Expand |
|---|

The more relevant your tag is, the more highlighted it is. See the image above, the 'sport' and 'fashion' tags have been used three times on our blog, all other tags were used only once. As you can see from the tag cloud the tag 'sport' is larger than the others. |
|
The default Twitter Card tag of the shop can be customized herein. Do that with the 'Twitter site account' text-field. The 'Enable post for customer groups' makes it possible to hide posts from particular customers when necessary. To complete creating/editing the post, click the Publish Post button at the top of the page. Magento 2 PageBuilder - step NRelease of Magento 2 PageBuilder has been an important landmark in store content creation. The Magento 2 Blog extension supports the PageBuilder functionality. The drag-and-drop composer is available for Magento 2 Commerce stores and can be found on the new post page in the backend. .png?version=1&modificationDate=1556206215026&cacheVersion=1&api=v2&width=1199) Image Modified Image Modified
For the PageBuilder details, please, follow the link Save/Preview PostOn completing the above three steps (or anytime along the process) you will be able to save the post. Do that with one of the options available in the control bar at the top of the page. - Save as draft (save and get redirected to the Posts Grid);
- Save and Continue Editing (save and stay on the Create/Edit Post page).
Alternatively, you can preview the post. The preview page will not save the post, but will open in the new window of the browser. The Preview page will have all the main page elements. | Info |
|---|
The Preview Post page will not be indexed by search engines and will not be added to the sitemap. |
The Publish (Update) Post button also saves the post, at the same time confirming its publication on the front. The action redirects you to the Posts grid.
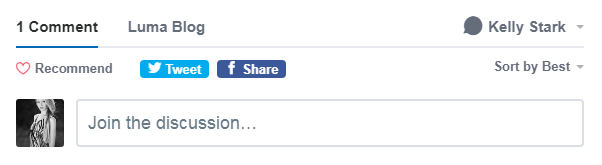
Once your post is ready and published, customers may see it as shown in the three pictures below. Check out the tags, social networks sharing buttons, categories field, related posts, related products, and finally the block for comments. .png?version=1&modificationDate=1556107615294&cacheVersion=1&api=v2&width=709)
- Social network sharing buttons - available right after installation and do not require additional setup;
- Tags - are clickable for quick blog navigation;
- Related Posts block - is displayed below the post body and contains post selected based on similar tags
.png?version=1&modificationDate=1556107616261&cacheVersion=1&api=v2&width=1233)
- Related Products - add the related products to the blog post page to boost your sales (the Add to Cart button will be added to each related product to motivate customers for quick response );
- Blog post category - represents a category of the post (store only);
- Disqus account login - promts your customers to log in to Disqus forums;
- Disqus forum name and link - navigates to your store forum on Disqus.
In order to comment, customers need to have a Disqus account or log in via Facebook, Twitter, or Google+. Once logged in, they can leave comments and enter any open discussions on Disqus. By clicking on the Disqus forum name, customers are redirected to the corresponding Disqus forum of your store. Here, all active blog posts will be represented as different forum topics that customers can join. 
Customers can like, share, flag, and reply to comments. Every customer's action is reflected on the Blog page of your store. As a store admin, you can manage all customer comments to your blog posts. To do so proceed to Content > Blog by aheadWorks > Comments. 
Сomment management takes place on the Disqus side. Here, you can approve, mark as spam, and delete comments along with managing the Disqus forum settings. For more information on how to manage the comments and set up Disqus, read the Disqus knowledge base.
OpenGraphIn order to make social media sharing convenient and attractive for your customers, the extension uses both Open Graph markups. The Open Graph markup acts behind the scenes and includes the following tags: “og:site_name” content="Store title" - store title; “og:type” content="article" - the type of marked-up object. ‘Content’ in this particular case; og:locale - the locale to be used; og:image - an image representing blog post; og:title - blog post title; og:description - blog post short description; og:url - canonical blog post URL.
GraphQLGraphQL is a query language for your API, and a server-side runtime for executing queries by using a type system you define for your data. GraphQL isn't tied to any specific database or storage engine and is instead backed by your existing code and data. GraphQL API support starts with version 2.5.0 of the Blog. The GraphQL acts behind the scenes and allows the following types and fields for markup: - list of blog categories;
- list of blog posts in the category;
- list of tags;
- list of posts which have a tag;
- blog post and all its properties,
- and other (see module configuration).
JSON DLJSON-LD is a way to transfer linked data (Linked Data, LD) using the JSON text format (JavaScript Object Notation). Pages with JSON-LD markup facilitate the structuring of data by machines and the recognition of concepts, which is important for you in the context of search engine promotion. The JSON DL acts behind the scenes too. The support of the markup starts as of Blog version 2.7.0. It is only one field value that you set yourself herein for JSON DL - Organisation (see Extension Settings).
| 
.png?version=2&modificationDate=1613403706689&cacheVersion=1&api=v2&width=450)


.png?version=1&modificationDate=1564160468166&cacheVersion=1&api=v2)